Saturday, October 31, 2009

Pumpkin Bread Taste Test


Autumn is my favorite baking season. The crisp air and changing leaves just call out for warm fragrant spiced baked goods. The denser and spicier the better, and nothing is more wonderful than a spicy pumpkin bread!

I have a pumpkin bread recipe that I've been baking for the better part of two decades. The loaves come out dense and spicy but a little fluffy too, and the bread's always been a big hit whenever I serve it. It's called Victoria's Pumpkin Bread, and is a recipe from Crescent Dragonwagon. (I've mentioned this recipe last year, at the end of the TWD Pumpkin Muffins post.)

This year when the calendar turned to October, pumpkin recipes were suddenly everywhere; sweet and savory, pastas, cheesecakes, cupcakes, and soups. I resolutely ignored all recipes for pumpkin muffins and pumpkin bread until I saw Olive Oil Pumpkin Bread on the Serious Eats site. I just had to try it to see if it was as good as my old standby pumpkin bread. Only one way to find out: bake them both, side by side.

left: Olive Oil Pumpkin Bread, right: Victoria's Pumpkin Bread

n.o.e.'s notes:

- The recipe for the Olive Oil Pumpkin Bread was posted on Serious Eats, which is an immensely entertaining food site, and a valuable Twitter contact (because it sends out tweets to things like pumpkin bread recipes!)

- Scroll down to the end of this post for the recipe for Victoria's Pumpkin Bread

- I roasted a couple of "sugar pumpkins," also called "pie pumpkins" according to the method given in the Serious Eats post that accompanies the Olive Oil Pumpkin Bread recipe. Last year I prepared cooked pumpkin two other ways: in the microwave and by roasting cut up pieces in the oven, and I have to say that I prefer this year's puree from the roasted whole pumpkins. It's much easier to cut the pumpkins once they are cooked, and the puree is neither dried out nor watery.

- I've found that homemade puree is much lighter in color than canned pumpkin puree. I like my pumpkin bread to be a bit dark and spicy, so I mixed some canned puree in with my homemade puree, and used the same mixture for both pumpkin bread recipes. The difference in color in the final bread comes from the proportion of pumpkin to flour, and the other ingredients in the recipes.

- In both recipes I used a mixture of 2/3 All Purpose flour and 1/3 White Whole Wheat flour. Otherwise I stuck to the recipes as written.

- The Olive Oil recipe calls for "light" flavored olive oil. I had "extra-light" flavored olive oil, so I mixed hit half and half with regular olive oil.

- I baked the bread on a chilly gray day with a mug of steaming tea at hand. Nothing could be more perfect!


the verdict:

My husband and I both agreed that the Olive Oil Pumpkin Bread was head and shoulders above the Victoria's Pumpkin Bread. The Olive Oil bread was dense, moist, dark and spicy, compared to the lighter spiced Victoria's bread. While I still like the Victoria recipe, I'm going to have to make the Olive Oil recipe my go-to pumpkin bread.


the recipe:

Victoria's Pumpkin Bread
from ‘The Dairy Hollow House Cookbook’

2 tsp ground cinnamon
2 tsp baking powder
1 tsp nutmeg
1 tsp baking soda
1 tsp salt
½ tsp ground cloves
¼ tsp ground ginger
dash allspice
6 cups unbleached white flour (can use half whole wheat pastry flour or white whole wheat)
1 c mild vegetable oil
½ cup yogurt (I often use ¾ c oil and ¾ c yogurt)
4 eggs or equivalent egg substitute
3 c sugar (can use part brown sugar)
2 ½ c. unsweetened pumpkin puree
1 c. chopped black walnuts (I never use nuts)

1. Preheat oven to 350 degrees.

2. In large bowl, sift together the cinnamon, baking powder, nutmeg, baking soda, salt, ground cloves, ground ginger, allspice and flour. Set aside

3. In a separate bowl, mix together the vegetable oil, yogurt, eggs, sugar and pumpkin. Mix until smooth.

4. Combine the two mixtures and beat until smooth. Fold in the walnuts.

5. Pour the batter into 3 8x4 or 9x5 inch loaf pans (no more than 2/3 up the pan)

6. Bake for around 1 hour, or until the loaves shrink away from the sides of the pan and have a hollow sound when tapped. Test for doneness after 45 minutes.


Thursday, October 29, 2009

Lemon Pudding Cakes


This is the final week for the Tyler Florence Fridays group, which was formed last November so that bloggers spend a year exploring Tyler's varied repertory of recipes. As the TFF Powers That Be put it:

"So TFF peeps and fans, next week, Friday October 30 will be our last official weekly Tyler Florence Fridays Round-up. (Sniff, sniff) It has been a ton of fun over the past year and we have enjoyed getting to know so many great bloggers. We hope to see you all here for the party--with a new Tyler dish or maybe repeating a past favorite."

I've enjoyed participating - however sporadically - in TFF over the past year, and couldn't miss posting in this final week. Funnily enough, this is the first Tyler Florence dish that I ever prepared, his Lemon Pudding Cakes. I baked these last November and the post has been in my drafts folder ever since!

On a chilly day last Fall we had another couple over for a casual dinner. I served a hearty beef stew and wanted to finish with something rather light and refreshing; Tyler's recipe for Lemon Pudding Cakes sounded perfect. I love serving individual-portion desserts to company.


n.o.e.'s notes:

- This is an easy and straightforward recipe to prepare, and many of the steps can be done ahead, making it ideal for entertaining.

- As it bakes, this dessert separates into a cake layer on the bottom and a pudding layer on top. I guess that's why Tyler calls them "pudding cakes"!

- I used a tea ball for dusting the powdered sugar on top.


the verdict:

These pudding/cakes really hit the spot. I loved the different textures of the two lemony layers and the berries were a delicious counterpoint. I had one tiny quibble: I thought the pudding/cake was a bit too sweet, so next time I'll reduce the sugar.

This is an elegant and easy dessert for entertaining, or for enjoying all by yourself!

Tuesday, October 27, 2009

{TWD} Chocolate Cherry Torte


One of the best parts about being in the Tuesdays with Dorie baking group is that in most months the assignments tend to even out. In October we've had fairly easy recipes (pudding, muffins, biscuits) and now a fairly spectacular chocolate torte. Even with a month's notice, I had a hard time figuring out the proper "torte" event at which I could pull out this dessert, so in the end I baked a half recipe and placed the torte in a state of suspended animation in the freezer.


- I made 1/2 recipe in deep 6" springform. It's a good thing my pan is very deep - 3" - because I needed all of that depth to fit the cake and the topping layers.

- This was one of those dirty-dish-generating recipes; every step seemed to require a new bowl, pan, or piece of equipment.

- I bought a yummy jar of cherry stuff especially for this recipe, then realized it was jam not preserves. I used it anyway and it didn't seem to matter. For this recipe, dried sour cherries are soaked, cooked, doused with kirsch and flambeed, then simmered with cherry preserves. By the time they were added to the cake batter, the cherries smelled delicious.

- The cake layer tood a good long time to bake. I clung to Dorie's doneness test and left it in the oven until it had moist crumbs that stuck to a testing knife.

- For the mousse layer I combined the appropriate amount of cream cheese, mascarpone, and cream, taking care not to over-mix. The recipe says to "pour" the mousse, but mine was "spreadable" rather than "pourable" so I spooned it in the pan and spread it along the top of the cake, smoothing with an offset palette knife.

- The recipe gives instructions for an optional decorating technique, where cherry preserves are pureed then piped on top of the mousse and formed into beautiful chevron shapes with a toothpick. I was very tempted, but Dorie is specific that preserves, not jam, must be used. I wasn't willing to take my chances with the jar of jam that I had, so I came up with an alternative decorating scheme. I thawed a bit of ganache from the freezer and piped it with the cut corner of a sandwich bag. This was one time where my spidery piping skills were actually appropriate! (Honestly, though, I really need to practice piping...)

- I cut and tasted one slice, then put a parchment collar around the torte and bundled it back into the springform pan then into a plastic bag for protection in the freezer. Fingers crossed that the mousse survives being frozen.

the verdict:

This was a great torte! The brownie layer was dense and fudgy (after an overnight in the fridge) with just a hint of deep cherry flavor. And the mascarpone mousse? Mine wasn't very mousse-y, but I loved it the way it was. Not sweet, just a creamy counterpoint to the dark chocolate of the cake layer.

I'm not usually a fan of chocolate + cherries, but I loved the combination in this torte. The cherries were quite subtle and complemented the chocolate beautifully. In fact, next time I'd increase the cherries by 50% and eliminate the chopped chocolate chunks (which I found a bit distracting).

I plan to serve this torte to my book group next Thursday. We'll see how it survived the freezer. [Update: I thawed the torte in the fridge and it came out perfectly! Everyone in book club loved it; in fact it is their second-favorite TWD chocolate dessert, after the chocolate caramel tart!]

Thanks to April of Short + Rose for selecting this delicious torte.
You can find the recipe on April's post or on pages 284-285 of Dorie Greenspan's book, Baking: From My Home to Yours.

Saturday, October 24, 2009

Fudgy Brownies from The Essence of Chocolate

Back at the beginning of the summer I was planning for a brownie taste-off. I had two strong contenders on hand (in the freezer, that is): the Baked brownies, Sweet Melissa's brownies, and Dorie Greenspan's version of Katherine Hepburn's brownies was third candidate. Then I heard from my bloggy friend Di that her favorites are the Fudgy Brownies from from The Essence of Chocolate by John Scharffenberger and Robert Steinberg. So I quickly whipped up a batch to include in the brownie taste test! I'll post a full report of the taste test results at a later date, but this entry is about the Scharffen Berger Fudgy Brownies. And I've gotta say, they deserve a post all to themselves!

The recipe's introductory paragraph says:
"In order to achieve the crackled top and fudgy texture of classic brownies, this batter must be beaten by hand until it pulls from the sides of the bowl. This sounds like a task, but it’s not; there’s something homey and satisfying about stirring this thick, glossy batter yourself."
I was all ready for a "homey and satisfying" baking experience, all the more so since it wouldn't involve washing the mixer!

n.o.e.'s notes:

- You can find recipe here.

- It took about 3 min of vigorous beating until the batter came away from the side of my bowl, enough time to make my arm just the littlest bit sore.

- This recipe has no vanilla or other flavoring - just pure unadulterated chocolate.

- As luck would have it, I used the last of my Scharffen Berger chocolate the day before on the Katherine Hepburn brownies, so I used El Rey chocolate for this Scharffen Berger recipe.

- The brownies baked at 325 for 33 minutes. I used the King Arthur divot test to determine doneness.

- This recipe has a higher amount of flour and lower butter than Dorie's Katherine Hepburn brownies, so they were less greasy on the surface.

the verdict:

These are really delicious brownies. If you like cakey brownies or brownies with complex flavors, these are not the ones for you. They're uncomplicatedly fudgy - nothing else is present to distract or diffuse the strong dense chocolate-y flavor and texture.

At the brownie taste-off one of the tasters, AT, mentioned that these would be good warm with ice cream. She also said that she was not sure if she could eat a big serving because they are so rich and fudgy.

This is a wonderful recipe to have in the brownie repertory!

Thursday, October 22, 2009

"How to Make a Pizza"

Today we have very special guest post of sorts. My daughter A.L.E., who turns 24 today, wrote and illustrated this little book when she was a child. It's called "How to Make a Pizza," and she leaves out no detail. (The purple things are her hands.)

Enjoy! And Happy Birthday to my daughter!!


We knead the dough/ And put it in the pan


Then put sauce on/then the chees


If you want put pepperoni/ put it in the oven


Out you come pizza/ Yummy


We cut it


Then eat it/ all gon


The end

Tuesday, October 20, 2009

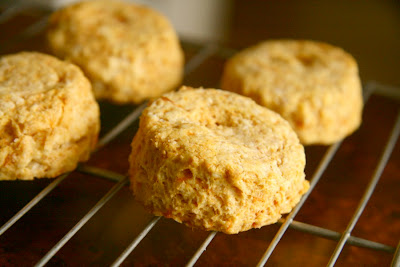
{TWD} Sweet Potato Biscuits


Absolutely no offense to Erin of Prudence Pennywise who chose this week's recipe for Tuesdays with Dorie baking group, but I wasn't particularly fired up about baking the Sweet Potato Biscuits, which is odd, since I love sweet potatoes (in fact, when my husband is out of town, one of my fall-back dinners is a baked sweet potato).

My reluctance may be because I've been baking a lot of yeast breads, muffins, and quick breads (most of which I haven't had a chance to turn into blog posts yet). Or it may be because we don't eat a whole lot of biscuits here at home (leaving that exercise for those times when we eat breakfast out - there are lots of great biscuits to be had at restaurants here in Georgia!) So whatever the reason, I had low enthusiam and low expectations for this recipe. However, I've been in TWD long enough to know that usually that means that I will be pleasantly surprised by the outcome of the baking session.

Somewhere along the way, my "set of 4" lost the crucial biscuit size cutter

n.o.e.'s notes:

- I made 1/4 recipe. Since I didn't want to use a partial can of sweet potatoes, I chopped and braised a small fresh sweet potato in cider and butter - it got a little caramelized - then mashed it for the 1/4 cup I'd need for the biscuits. The puree looked a dry, so I thinned it with some milk.

- Last week I borrowed a copy of Alton Brown's baking book, I'm Just Here for More Food from the library. One entire chapter covers the "Biscuit Method" of mixing ingredients for baking, so I brushed up on Brown's methods before starting in on making the biscuits. Brown talks at great length about the "landmines" that are present at every step of biscuit-making. Yipes! I incorporated several of Brown's tips as I prepared these biscuits - hoping that I'd end up with nice fluffy biscuits:

- I froze my butter, and kept putting it in the freezer at most every opportunity.

- The dry ingredients got combined in my mini-prep food processor, then I rubbed the butter into the flour mixture with my fingers at the same time I was trying to not over-handle the dough. Back into the freezer it went.

- I turned the dough out onto lightly floured parchment paper and used the paper to handle the dough. I gave it several letter folds, trying to build up layers in the dough.

- Although Brown recommends using a 2 inch biscuit cutter for maximum rise during baking time. The set of biscuit cutters that I'd bought when I was first married has been missing that size for years, so I used a smaller cutter - closer to 1.5 inch - instead. I ended up with 6 tiny biscuits.

- I set my oven to 450 rather than Dorie's specified 425.

- Despite all those precautions, they didn't rise very much in the oven. I'm guessing it was because the dough might have needed to be wetter to get the proper rise. The sweet potato was the only wet ingredient in the entire recipe! Next time I think I'd add even more milk to the puree.


the verdict:

You may have guessed it by now, but I was thrilled by the taste of these biscuits! No matter that they weren't grand and tall biscuits, they were so moist and tender inside, and the flavor was subtle and savory. The teensy pinch of fresh nutmeg didn't stand out, but lent a little complexity.

The biscuits were good with sharp cheddar, but my favorite way to eat them was warm with butter. Luckily they rewarmed decently in the microwave and I was able to enjoy them for several days!

You can find the recipe on Erin's post or on pages 26 of Dorie Greenspan's book, Baking: From My Home to Yours.

Sunday, October 18, 2009

Mexican Street Salad


Browsing for recipes is one of my favorite pasttimes. My cookbook shelves are filled to overflowing and I love paging through them, contemplating the possibilities. On the bottom shelf is a basket piled high with magazine clippings and handwritten pages, an invitation to delicious exploration.

But lately the recipes come directly to me. Via Twitter. I "follow" a couple dozen content-heavy contacts - @finecooking, @nytimesfood, @ruhlman, @bittman, @beardfoundation, @MarthaStewart, @bflay, @seriouseats and the list goes on. From their tweets, I've learned about food, restaurants, cooking events, and at least several days a week I've learned what's for dinner at my house.

A fun person to follow on Twitter is Jamie Oliver (@jamie_oliver), the UK chef who champions cooking at home. Jamie's website features a recipe of the day, and it comes across daily on Twitter. Here are some sample Tweets from Jamie:


"rite u loverly lot recipe of the day is delicious blackbery and apple pie ... perfect for this time of year jxx
" (Sep 25, 2009) [I bookmarked it]

"simple chicken salad recipe of the day http://bit.ly/gW1oS enjoy jxxx" (Oct 7, 2009) [I made it; will post soon]"perfect for this time of year, grilled and marinated rabbit ... jxxx" (Oct 13, 2009) [um, I'll probably skip this one]

One of Jamie's recent projects
is "Jamie's American Roadtrip," a television show that's currently airing in the UK, and an accompanying cookbook, "Jamie's America." Some of Jamie's tweets are about the show:
"thanks for all the loverly mesages about the show last nite glad u all liked it the navajo were amazing jxx"(Oct 7, 2009)
" http://twitpic.com/ka3mj - me and the navaho queen from this tuesdays programe hope your all well jamie oxx" (Oct 4, 2009)
Here's one that really caught my attention:
"u can see loads of recipes from the new book http://bit.ly/1tuUpo just clik on the book cover jxxx" (Sept 1, 2009)
I clicked on the link and found some wonderful recipes from his American roadtrip. The Mexican Street Salad caught my attention immediately. I had cabbage on order from my farm box, so I made sure I had the other ingredients on hand.


n.o.e.'s notes:

- Essentially the salad is made up of lots of sliced fresh vegetables and hot chiles with a zippy dressing of lime juice, olive oil and salt.

- Jamie says that it's easiest to use a food processor or mandolin to slice the vegetables. I found an "as seen on TV" mandolin set at Marshalls, which I inaugurated with this recipe. The mandolin made quick work of the shredding with minimal cleanup. Given how sharp the blade is, however, I plan to use the hand guard every time I use it.

- Although the recipe suggests using or substituting other vegetables, I followed it as written: white cabbage, red cabbage, radishes, carrots, onions, hot peppers (I used our homegrown serranos). I'd love to try other veggies too: celery, fennel, green beans, sweet peppers, broccoli.

the verdict:

Although it has similar ingredients to a coleslaw, it has none of coleslaw's creamy subtlety. This salad is lively! It really emphasizes the taste of the fresh vegetables. I made half recipe and ended up with a ton of salad. It lasted well for several days and each time it was as delicious as the first. We never got tired of it, and the next week I made another batch!

Tuesday, October 13, 2009

{TWD} Allspice Crumb Muffins

The Tuesdays With Dorie assignment this week was Allspice Crumb Muffins, chosen by Kayte of Grandma's Kitchen Table. I "met" Kayte pretty early in my TWD days, and I liked her immediately. How could I not? She's fun, kind, and truly interested in everything and everyone around her. What's more, we have a lot in common - we're nearly the same age and share interests, including cooking and baking for our families.

When the October TWD recipes were announced, Kayte explained her choice to me: "I figured you could use them for Muffin of the Month for 'Mom!' Tell her I picked them out just for her!" That's the kind of friend that Kayte is. She remembered that I had a project of baking muffins this year for my mother, and she picked this recipe partly so that my baking would serve double duty: TWD participation and m.o.m. all rolled into one!

What's even more amazing is that my mom has a million food sensitivities and allergies, and Kayte managed to choose a muffin recipe that fits within my mother's narrow range of acceptable ingredients! For a long time I'd had my eye on the allspice muffin page in Dorie's book and I was hoping that somebody would choose the recipe soon so that I could bake it for my mom. Leave it to Kayte to read my mind!

n.o.e.'s notes:

- I made 1 1/2 recipe: 1 dozen for my mother and half dozen for us.

- It's always fun to use my spice grinder (coffee bean grinder in disguise) - I ground whole allspice berries. It turned out with some rather large bits, so I put some sugar in with allspice and it ground finer.

- In a bid to reduce the saturated fat in the muffins, I reduced the quantity of butter in half. for the other half butter, I used part oil and part plain yogurt.

- For the crumb mixture, I used King Arthur White Whole Wheat flour but I later wished that I'd remembered to use oat flour. The crumbs tasted great - the allspice took the buttery sugary goodness to a whole new level. I would have been just as happy to stop after the crumbs and serve them in a bowl with a spoon. By the way, for my fellow crumb-topping lovers, Sarah of Blue Ridge Baker just posted some sbrisolona cookies that are in effect entirely made of crumb topping.

- I substituted white whole wheat flour for half of the all-purpose flour in the muffins.

- The muffins rose nicely in the oven (well, they should, with 1 T baking powder!) and made lovely "muffin tops". They would have been very hard to get out of the pan - without ruining the crumb top - had I not used silicone muffin molds. As it was, even with pushing from below and loosening the best I could, large segments of the crumb tops spalled off while I was trying to release the muffins from the pan.

the verdict:

My husband sampled a muffin that was fairly fresh from the oven. His reaction: "Mmmm, mmmm, mmmm. That's good, good, good!" And he added, "those are unconscious." (That's high praise in case you were wondering)

I loved the allspice in these, especially in the crumb topping. The muffins are simple, straightforward, delicious, and seasonal. I can see myself making them often in the cool-weather months, when warm spiced baked goods really hit the spot.

And Kayte, my mom liked them too!

You can find the recipe on Kayte's post or on pages 16-17 of Dorie Greenspan's book, Baking: From My Home to Yours.

Friday, October 9, 2009

Cacao Nib Gelato

When I ordered my ice cream maker from costco.com last Fall, I had no idea how much fun I'd have exploring the world of frozen desserts - sorbet, frozen yogurt, sherbet, gelato, and good old ice cream, both custard and Philadelphia-style.

I've tried recipes from a variety of sources, and one source of inspiration and advice for me has been Wendy of the blog Pink Stripes. She always makes the most amazing ice creams, so when she mentioned that she was going to make the Cacao Nib Gelato from the September 2009 issue of Bon Appetit I was instantly interested. Even though we live 3000 miles apart, we made this ice cream together - virtually that is, each of us in our own kitchens, connected by our computers. (You can read about Wendy's ups and downs with this ice cream here.)

n.o.e.'s notes:

- You can find the recipe here.

- I was very intrigued by the method of this ice cream: heat the steep the cream with cacao nibs, let it steep, combine it with eggs and sugar to make the custard and chill overnight. The next day the nibs are strained out and discarded and the custard is churned.

- I made 1/2 recipe.

- Isn't it funny how scents can take you back? As the cacao nibs simmered with the milk and cream, the smell reminded me strongly of the hot chocolate that we made when I was growing up by heating milk on the stovetop. No session of playing out in the Western Massachusetts snow was complete until we'd made hot chocolate in a saucepan.

-It was hard to imagine how simple steeping was going to make this ice cream very chocolatey tasting; in fact it's closer to vanilla in color!

the verdict:

This ice cream is quite sly and deceptive. The color may be an innocuous creamy tan, but every spoonful packs an intense chocolate flavor. It's cocoa-ish but at the same time lush and dense and creamy. This would be perfect to serve for a dinner party - it's unusual and so delicious! In fact, of all the flavors that I've churned so far this ice cream is my favorite, hands down.

Thursday, October 8, 2009

Chilled Tomato Soup


Let's see a show of hands here: When you heard on Oct 5 that Daniel Boulud's restaurant Daniel was just was awarded three-star Michelin status, did it inspire you to run out and prepare one of Boulud's dishes in your own kitchen? No, me neither. In fact, truth be told, I wasn't familiar with the chef.

But in a timely coincidence I happened to have make one of his recipes just days earlier.

Last week Gavin Kaysen of Cafe Boulud prepared dinner at the Beard House (I know this because I "follow" @beardfoundation on Twitter). One dish that he made was Daniel Boulud's Chilled Tomato Soup with Basil Guacamole. I had just picked up some end of summer tomatoes from our local farm stand, and, amazingly, had all of the other ingredients on hand (well, it turned out that my leeks and fennel had gotten a bit too old in the fridge, so I had to replace them) so I cooked it right up.

n.o.e.'s notes:

- I loved the taste of the pureed soup before adding the tomato juice.

- Basil and avocado are a new combination for me, and I was glad to have a chance to use some of my basil (which really flourished in the herb garden this summer) in making the basil guacamole.

- An immersion blender comes in very handy to puree the soup without having to clean the big blender.

- I didn't end up straining the soup, opting to leave it "rustic", since it was weeknight dinner for my husband and me. If I were serving this soup to company, I'd definitely strain it.

the verdict:

This is a great soup to have in the summer arsenal. Cool, refreshing, complex, refined (especially once it's strained). All of the vegetables added depth of flavor. The soup lasted a long time in the fridge, and was delicious for lunch or along with dinner. And while it's just a little intimidating to make comments/suggestions about a 3-star Michelin chef's recipe (!) I think I'd reduce the tomato juice the next time, as I thought it masked the other flavors just a tiny bit.

Tuesday, October 6, 2009

{TWD} Split Level Pudding

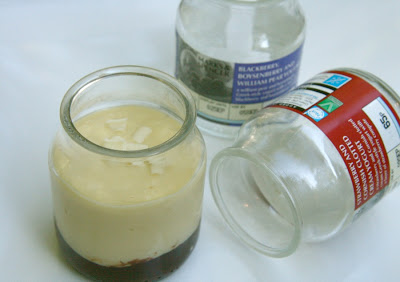
In the summer of 2003 I was lucky enough to spend a few weeks in Scotland. Our accommodations were "self-catering" (translation: "comes with an equipped kitchen"), so we could eat some of our meals right at the apartment. I reveled in the local Marks & Spencer food hall which was stocked with wonderful ingredients and even more wonderful prepared meals. One of my favorite discoveries was a Greek-style yogurt that came in little glass jars, in flavors such as "Blackberry, Boysenberry and William Pear Yogurt" and " Strawberry and Cornish Clotted Cream Yogurt." Delicious!

On some level I knew that the yogurt was not quite equivalent to the non-fat yogurt choices that I usually stuck to at home, but really it wasn't even close - each of those little guys packed a walloping 900 calories. In blissful denial I simply enjoyed this indulgence, and couldn't resist tucking the tiny jars in my carry-on luggage for the journey home. They've occupied the back corner of the cupboard above my microwave, alongside vases that I seldom use.

When I saw the recipe for this week's Tuesdays With Dorie assigned recipe, the Split Level Pudding, I knew immediately that I wanted to portion it into glass containers so that the chocolate layer would be visible underneath the vanilla layer, and the little jars had a new use.

n.o.e.'s notes:

- I made 1/3 recipe of the pudding, enough for two small servings.

- Dorie's pudding method involves scraping ingredients into and out of a saucepan and a food processor. Back when my daughters and I made the butterscotch pudding, we used the food processor for part of the batch and a whisk for the rest, and learned that the food processor made pudding that is more perfectly smooth than the whisk.

- This partial batch had greatly reduced quantities of ingredients, so I used my mini food processor for some of the steps, but also used my whisk, because the mini wasn't quite big enough. My pudding was smooth, but I'm pretty sure it would have been silkier had I adhered to Dorie's method.

- Last week's P&Q post contained the very helpful suggestion to use the leftover chocolate ganache from the caramel tart for the base layer of this pudding. I had a couple different types of ganache in the freezer. I grabbed the last bits of Sweet Melissa's ganache and warmed it in the microwave so I could pour it into the bottom of the glass jars. I chilled it in the fridge, then carefully spooned the vanilla pudding layer over the chocolate. As usual I found it impossible to layer without smudging the glass.

- There were some white chocolate curls in my baking drawer and I scattered them over the top, but immediately regretted it. They just looked like lumps.

- Because my husband is allergic to chocolate, his serving was all vanilla pudding.

the verdict:

The vanilla pudding was the best I've ever eaten - a really really good vanilla pudding. My husband loved his portion, and I liked the vanilla part of my dessert. But the combination of vanilla and chocolate wasn't really successful, which I attribute largely to user error. I used a different ganache, and it was solid at refrigerator temperatures. I found the two different textures to be very distracting. I also wasn't sure I liked the combination of intense chocolate of the ganache with the lovely delicate vanilla flavor of the pudding.

If I need vanilla pudding I'll definitely call on this recipe, but I didn't like the vanilla and chocolate enough together to try the combination again.

Thanks to Garrett of Flavor of Vanilla for choosing this week's recipe - we have a new favorite vanilla pudding! You can find the recipe on his post or on pages 384- 385 of Dorie Greenspan's book, Baking: From My Home to Yours.

Friday, October 2, 2009

Braised Short Ribs with Gremolata


A while ago my farm box offered local organic beef short ribs. They sounded great to me, so I ordered a bunch, and froze them for when cooler weather arrived. Now that we're in Fall, I took some rainy weather as a great excuse to cook up the ribs (and clear a bunch of space in the freezer!)

I knew that Tyler Florence would be a great resource for cooking the ribs. After a bit of digging around, I decided to make his Osso Bucco recipe, substituting my short ribs for the veal shank.


n.o.e.'s notes:

- The osso bucco recipe made the perfect amount of sauce for cooking 7 lb of short ribs.

- I used a 4.5-5 qt stock pot, which was a great size for a single recipe of the osso bucco

- I didn't have any amarone, so just used a decent cabernet blend.

- The gremolata sounded a little odd - a mixture of pine nuts, dried cranberries, organge zest, garlic and parsley - but I mixed it up anyway to see how it would taste with the ribs


the verdict:

This was fantastic! The ribs were falling-off-the-bone tender and we loved the layers of flavor in the sauce. If you make this, do not skip the gremolata! It has a nice balance of sweet and savory ingredients and its freshness is the perfect complement to the warm richness of the sauce. Overall, these ribs tasted like more work than they really were. The modest investment of time in babysitting the pot paid off big dividends in the finished dish.

I'm sending this post to Tyler Florence Fridays, a weekly roundup of blog posts featuring Tyler's recipes. The group is in its final month, so check the site for a few more weeks of deliciousness.