Showing posts with label chicken. Show all posts

Saturday, June 4, 2011

Chicken with Prosciutto and Parmesan


British chef Jamie Oliver has become a champion of simple but tasty and unprocessed food, in schools and homes, both in the UK and in the USA. His website and his books are a great source of easy but delicious recipes, and I've found myself turning to them again and again when time is tight and inspiration is lacking.

One recent weekday I was faced with a package of boneless chicken breasts. None of my usual standby recipes appealed to me, but Jamie's recipe Parmesan Chicken Breasts with Crispy Posh Ham caught my attention, and I decided to give it a try.

n.o.e.'s notes:

- You can find the recipe here

- I try to keep a package of Prosciutto in the freezer; it's wonderful for draping over ripe cantaloupe or jazzing up a salad. It also comes in handy for this recipe!

- I have a bad attitude about pounding chicken breasts. Although I know that it keeps them tender and makes them a uniform thickness so that they cook more evenly, I always dread pounding them. And every time, I realize that it wasn't so bad after all.

- The recipe is a snap and introduced me to a new technique for pounding chicken breasts. First you score one side of the meat and sprinkle it with seasonings and grated parmesan cheese, then lay sliced prosciutto or ham over the top. Then cover with a bit of plastic wrap and pound the breasts. Not only does the pounding thin the meat, it also imbeds the seasoning and the cheese into the meat and adheres the ham to the surface of the chicken.

- The chicken could be prepared in advance and cooked at the last minute. After a quick pan-saute, the chicken is ready to eat.

the verdict:

After I cooked the chicken and plated it, I realized how pretty it was, and I was a little regretful that I was wasting it on a weeknight dinner. It would be perfect for company. You absolutely cannot tell from looking or tasting how easy this was to make. The salty ham was a great counterpoint to the chicken, and the cheese and the thyme added tons of savory flavors.

Friday, November 5, 2010

Roast Chicken for the Lazy Types


Roast chicken is the blue chip stock of the cooking world. For an investment of very little effort, and usually very few ingredients, you can pretty much guarantee a decent return: about an hour later savory perfection emerges from the oven. I roast a chicken (and/or a turkey breast) a couple of times a month, often experimenting with a new recipe (my previous roast chicken blog posts are listed below). This week, I used the recipe for Roast Chicken for Les Paresseux (the Lazy Ones) from Dorie Greenspan's new book Around My French Table.

n.o.e.'s notes:


- I made this chicken for the French Fridays with Dorie group - hundreds of cooks world-wide who are working their way through Around My French Table and posting on Fridays. The group members are not posting recipes from the book, so if you like what you see, I'd recommend purchasing the book, or borrowing it from your library.

- The chicken sits on a bed of thick bread as it roasts. Even though this recipe claims to be for lazy folks, I think I was a shade too lazy. I didn't read far enough ahead in the recipe to note that the bread itself becomes a delectable treat. Consequently I used an old bread-end from the freezer, which was definitely improved by sitting in wonderful chicken pan drippings, but starting with a great piece of bread would have been a much better plan.

- I went ahead and trussed the chicken because I ordered a lifetime supply of butcher's twine, and even a lazy person can wrap some string around a chicken and tie a bow.

- My wide, shallow enameled cast iron Dutch oven was perfect for this recipe.

- After the chicken was in the oven for 45 minutes I followed Dories suggestion and added vegetables to the pan (carrots and onions this time) and roasted them for an additional 45 minutes or so, until the chicken is cooked and the vegetables are nicely caramelized and tender.

- Dorie suggests that after the chicken is cooked, it should rest for awhile upside down on a platter so the juices collect in the breast meat, keeping it moist. Being the lazy type that I am, I decided to rest the chicken in the roasting pan so I wouldn't get a platter dirty. The chicken sat in the pan juices, which kept the white meat plenty moist, but the crispy skin got disappointingly soft.

the verdict:

Dorie's recipe produced a perfect roast chicken for a family dinner. We loved the vegetables, especially the onions, which were sweet and nicely browned.

My previous roast chicken posts:

Jamie Oliver's
Roast Chicken in Milk
Ad Hoc
Roast Chicken with Root Vegetables
Thomas Keller's My Favorite Simple Roast Chicken
Martha's Perfect Roast Chicken
Union Square
Herb Roast Chicken

Friday, May 7, 2010

Roast Chicken in Milk


I'm drawn to new recipes for roasting chickens like a moth to a flame. When I saw the wild acclamation for Jamie Oliver's recipe for Roast Chicken in Milk on this post I knew I had to try it for myself. What an unusual set of ingredients - milk, lemon, sage, cinnamon!

n.o.e.'s notes:

- I used my shallow 3 quart cast iron Dutch oven for this recipe.

- The recipe is not difficult but it does require browning the chicken in butter and olive oil before adding the other ingredients and roasting in the oven.

- Any time that I can use large quantities of sage from the garden, I'm automatically predisposed to liking the recipe.


the verdict:

This chicken was incredibly moist and filled with flavor from the lemon, garlic, and sage. The cinnamon was not noticeable, but played a nice supporting role. Rather than truly being roasted I'd say the chicken was almost braised in the milk. We enjoyed every last morsel. Was it our favorite way to cook a whole chicken? Truthfully, I prefer the simple, nearly perfect roast chicken from Thomas Keller (which I posted here), although the two recipes are quite different in taste and method, and there's certainly room for both on my dinner table!

Friday, March 26, 2010

Ad Hoc Roast Chicken with Root Vegetables


Nearly every week in the cool-weather months - and frequently when it's warmer too - I will roast a chicken or whole turkey breast. I never tire of the flavors of beautifully-browned poultry fresh from the oven. Having leftover meat for other recipes and bones to make homemade stock only compound the pleasure from preparing a simple (usually) roast fowl. On a chilly weekend recently I turned to Thomas Keller's Ad Hoc at Home cookbook and prepared his Roast Chicken on a Bed of Root Vegetables.


noe's notes:

- A close adaptation of the recipe can be found on Simply Recipes, along with a lovely blog post about this chicken. (I included the leeks in my chicken, and was glad I did.)

- I had never removed the wishbone from a raw chicken but found it was very easy. The wishbone is the first bone that you come to in the cavity, and you can feel the shape of it through the meat. You just free it with a paring knife and snap it off.

- Keller, as is his wont, is very specific about the number and size of root vegetables to use (3 medium rutabagas, 2 medium turnips, 4 large carrots, 8 small new potatoes). I skipped the potatoes, and used the root vegetables that were in my fridge: 4 rutabagas of assorted sizes, 1 very large turnip, 2 parsnips, 3 carrots

- Rather than a cast iron skillet (I was too lazy to get it from the downstairs pot-and-pan overflow storage) I used my shallow enameled cast iron 3 qt pot.

- If you have an instant read digital thermometer, it takes the guesswork out of determining if the chicken is cooked sufficiently.


the verdict:

This roast chicken made for a perfect Sunday dinner; I loved the roasted root vegetables that were cooked in the same pot, although my husband wasn't as thrilled with them as I was. As far as the chicken itself: the taste didn't beat Thomas Keller's ultra-simple roast chicken from his Bouchon restaurant (my favorite roast chicken, which I blogged here), but it's a great cold weather dish when root vegetables are plentiful.

Saturday, January 23, 2010

Ad Hoc's Chicken Breasts with Tarragon

Boneless chicken breasts are a staple dinner item at our house. When I got my copy of Thomas Keller's new book Ad Hoc at Home I was excited to see a quick and elegant looking recipe for boneless chicken.

n.o.e.'s notes:

- Scroll down for the recipe. The basic method, as Keller explains it, is "flattened, seasoned, sauteed, and served with a simple pan sauce."

- The recipe calls for a teaspoon of yellow curry powder. I was pretty excited to make my own curry powder, using the recipe from the back of Ad Hoc at Home. Keller's recipe calls for 20 different spices/seeds, all ground up and mixed together - allspice, anise, bay leaf, brown mustard seeds, cardamom, cinnamon stick, cloves, coriander, cumin, fennel seed, fenugreek, nutmeg, mace, black peppercorns, ginger, star anise, yellow mustard seeds, turmeric, paprika, flaky sea salt. It turned out that I had most of the ingredients. Some of my spices were already ground when he called for whole, and I ground up some whole spices that Keller specified as ground. The curry powder was the perfect job for my spice grinder (a spare coffee grinder dedicated to spices). A full batch made a TON of curry powder; I spooned it into some empty spice bottles, and gave some to each of my daughters.

- I had bought a big load of chicken, enough for 1 1/2 recipe. It took forever to pound it all out thin. (Honestly, is there a worse kitchen job than pounding chicken breasts?) Luckily once I finished that work, the rest was fairly easy, and I ended up with enough chicken for an army.

- I love the precision of the directions in this cookbook, and have found the timing to be completely accurate. The chicken breasts brown - in batches - for a minute on each side. I set my timer for 1 minute and then hit repeat until all the chicken was browned.

the verdict:

This is a simple, elegant and subtlely-flavored chicken. My daughter JDE and I liked the chicken quite well, but my husband found it quite bland, and couldn't really taste the different flavors. I think the curry could be doubled or even tripled without any problem. I froze the leftover chicken, and it thawed and reheated quite nicely, and during the busy holiday time I loved having extra dinners that were already prepared.


The recipe:

Sauteed Chicken Breasts with Tarragon

1 teaspoon sweet paprika
1 teaspoon Yellow Curry Powder (recipe in the book) or Madras curry powder
6 large (about 6 ounces each) or 12 small (about 3 ounces each) boneless, skinless chicken breasts
Kosher salt
Canola oil
3 tablespoons (1 1/2 ounces) unsalted butter
1 tablespoon minced shallot
1/4 cup dry white wine
1 cup chicken stock
1 tablespoon coarsely chopped tarragon plus 1 tablespoon whole tarragon leaves
Freshly ground black pepper.

1. Mix together the paprika and curry in a small bowl. Season the chicken breasts on both sides with the mixture. Cover and refrigerate for 2 hours.

2. Lay 2 pieces of chicken on a large piece of plastic wrap, cover with more plastic and pound with a mallet until they are about 1/4-inch thick. Repeat with remaining breasts. (Chicken may be wrapped and refrigerated for up to 12 hours.)

3. Preheat oven to 200 degrees. Set a rack over a baking sheet.

4. Season chicken on both sides with salt. In a large skillet over medium-high heat, add enough canola oil to film the bottom of pan. Working in batches, without crowding, place breasts smooth side down and let cook until golden brown, 1 to 1 1/2 minutes. Turn and cook for another 1 to 1 1/2 minutes. Transfer to a baking sheet and keep warm in oven.

5. Wipe out skillet and return to medium heat. Add 1 tablespoon of butter and shallot, and sauté for 30 seconds, swirling pan to coat shallot with butter. Add wine, raise heat to medium-high, and cook until wine is reduced by half, about 1 minute. Add stock, bring to boil, and cook until reduced and slightly thickened, 1 to 2 minutes.

6. Stir in the chopped tarragon, the remaining 2 tablespoons butter, and any juices that have accumulated on baking sheet and swirl to melt the butter. Season to taste with salt and pepper. Arrange chicken on a warmed platter, pour sauce over it, and garnish with the tarragon leaves.

Sunday, December 6, 2009

Thomas Keller's My Favorite Simple Roast Chicken


In browsing around the interwebs, I've seen references to Thomas Keller's roast chicken, as served at his restaurant Bouchon. The recipe is here. I'm going to say that once I tried this chicken, my quest for the "perfect" roast chicken came to a screeching halt. Thomas Keller's favorite is now my favorite!

n.o.e.'s notes:

- I used one of the wonderful pasture raised organic chickens from my farm box. I'm really glad that I stocked my freezer with these when they were available earlier this year, because they have not been available since that time. Apparently there is not a chicken processing facility for small operation chicken farmers close enough to make it cost effective for the farm box folks to continue offering them.

- This was first time I've ever actually fully trussed a chicken (before now, I usually tie the legs together and call it "done"). I used these directions and crossed a bunch of string. I can't say if my trussing effort was exactly correct but the bird was compact and nothing flopped around so I deemed it a success.


- Keller's roasting method couldn't be simpler: Salt + pepper in cavity. Truss. Salt and pepper outside. Roast 450 until done. Nothing else. Remove from pan, put thyme in pan juices, baste chicken and let it rest 15 minutes. Carve and enjoy!

the verdict:

Boy, did we enjoy! My husband repeated, "this is unbelievable," the entire time he was eating the chicken. Although Keller says to slather the meat with butter when you serve the chicken, I didn't think it needed anything. The chicken was succulent and filled with flavor. I'm sure some of the credit has to go to the organic pastured chicken, but the recipe is a treasure. I had no idea that a roast chicken could be this good...

Saturday, November 7, 2009

Chez Panisse Chicken au Poivre


Chez Panisse. The very words conjure up visions of superb food. I've never had the pleasure of eating there - in fact I haven't been within 300 hundred miles - but all the same, when I came across the Chez Panisse Cafe Cookbook on the shelves of my local library, I was tranfixed by the possibility of culinary adventures in my own kitchen.

n.o.e.'s notes:

- You can find the recipe, with some of my notes, at the end of this post. It's not particularly difficult to prepare, but has several steps. You can finished the sauce up to a day ahead of time.

-The ingredients include chicken breasts (skin on) and also chicken thighs, which are used to make the sauce for the breasts.

- The chicken breasts I bought were on the bone. I de-boned them using this link which describes how it's done.

- According to the instructions, we are to cut the chicken legs in 4 pieces each. I had to wonder, for a basic home cook with ordinary kitchen equipment how is this practicable??? (And why? They're just going to get browned, then simmer in stock.) I wasn't going to cut crosswise through bones, so I got out my most cleaver-like knife and cut through each leg at the joint then cut each piece in half lengthwise, along the bone.

- The herbs were from my garden.

the verdict:

This chicken dish had the most wonderful layers of flavors. The subtle richness of the sauce complemented the spiciness of the cracked black peppercorns perfectly. This recipe is a definite keeper.


the recipe:


Chez Panisse Grilled Chicken Breasts au Poivre
(adapted)

serves 6

6 large boneless chicken breast halves skin on

2 chicken legs

extra virgin olive oil

1/2 cup white wine

2 quarts basic chicken stock (I used 1 quart homemade and 1 quart purchase

2 sprigs parsley

2 thyme branches

2 garlic cloves

3 T peppercorns

Salt

Optional: red wine vinegar


Directions for the sauce (can be prepared several hours ahead, or even the day before):

1. remove the fillets from the chicken breasts. With a cleaver, chop each leg into 4 pieces.

2. in a large, deep saucepan, brown the chicken leg pieces and the fillets in a little olive oil. When they are well-browned, deglaze with the white wine and cover with the chicken stock.

3. Bring to a boil, reduce to a simmer, and add the parsley, thyme, garlic, and 1 tsp of peppercorns. Simmer hour, then strain, reserving the cooked meat for another purpose, if desired.

4. Skim off the fat, then reduce the broth until rich and slightly thickened; only about 1 1/2 cups should remain. (I actually measured)

Directions for the chicken:

1. Prepare a moderately hot grill (I used a grill pan on the stovetop)

2. Carefully pound the chicken breasts to flatten slightly

3. Crack the remaining peppercorns in mortar and pestle or using the bottom of a heavy pan (I used spice grinder)

4. Coat the breasts lightly with olive oil and season with salt and the cracked peppercorns.

5. Grill the chicken breasts skin side down, rotating for even cooking. When 2/3 cooked, turn the breasts to finish cooking, about 8 minutes in all. Let the breasts stand for a few minutes.

6. Warm the sauce, check seasonings, and add a few drops of red wine vinegar, if desired.

7. Serve the breasts whole or slice each diagonally into 4 slices.

Wednesday, September 23, 2009

Ultimate Chicken Salad


Last week I had a bunch of shredded cooked chicken and I needed a recipe, so I turned to Tyler Florence and his Ultimate Chicken Salad Sandwich. Tyler layered his sandwiches with sliced apples and cranberry sauce (and brie cheese) on top of the chicken salad. I was planning to serve my chicken salad on a bed of greens rather than as a sandwich, so I adapted the recipe accordingly.

n.o.e.'s notes:

- I liked Tyler's idea of pairing the chicken with sweet/tart fruit, so I put the apples and cranberries right into the chicken salad, which made a sort of hybrid waldorf/chicken salad. The apple was straight from my farm box, so I don't even know what kind it was, other than yummy!

- I substituted Greek yogurt for half of the mayonnaise.

- The dressing had a surprising (to me) ingredient: olive oil was stirred in with the mayonnaise (and yogurt). I'm a huge fan of olive oil, so I was glad to see it there.

- To me there was a pronounced flavor of mustard in the dressing (I'm not the world's biggest mustard fan), but when combined with the chicken, fruit and nuts it settled down nicely.

the verdict:

We totally enjoyed our chicken salad dinner plate. There was a nice combination of tastes and textures, and we were quite happy to have the leftovers a couple of nights later!


I'm submitting this post to Tyler Florence Fridays. Check out the roundup on Friday and see what folks are cooking up from Tyler's recipes.

Wednesday, July 8, 2009

Martha's Perfect Roast Chicken


I'm pretty sure I need to invest in a pair of blinders to keep in my car for when I make a Costco run. As it is now, I'm unable to walk past the book aisle without giving just a little side-long glance (or ten) at the piles of cookbooks. And the lure of those low prices and beautiful cookbooks is nearly irresistible. Anyway, the last time I was in Costco I happened to leave with a copy of Martha Stewart's Cooking School, not that I needed another Martha cookbook, much less another cookbook at all.

If you've ever wondered, "how does it look when the parchment is folded for papillote?" or "can you show me how to de-bone the Dover sole that I just cooked?" then this is the cookbook for you. Martha explains and shows through detailed photos exactly how to prepare lots of classic dishes.

The first recipe I tried from this cookbook (well, the only recipe to date) is the Perfect Roast Chicken (see notes, below for recipe link.) Not only are there explicit directions, there's a whole page of step-by-step photos of the process, and another page of photos showing how to carve the chicken.

Back in the spring, my farm box people offered some pastured organic chickens. Due to the vagaries of various state laws, the chickens had to be sold frozen. I stocked up, and deposited 5 of them directly into my freezer, planning to roast each one of them with a different recipe. The first chicken was roasted with a recipe from the Union Square Cafe Cookbook, and we loved how the flavors of the fresh vegetables found their way into the chicken as it cooked. Martha's chicken recipe had its work cut out for it, if it wanted to top that!

n.o.e.'s notes:

- You can find the recipe on this blogger's post(scroll down a bit). Martha also has a somewhat different "Perfect Roast Chicken" recipe that you can find here.

- This recipe uses a cool technique, and calls for the chicken to roast at high heat in cast iron skillet. Martha calls it "fast and high" roasting. The only drawback is when you hit the 450 degree skillet handle with your wrist when you're testing the chicken for done-ness.

- Martha advises that the chicken should be dried as much as possible because moisture turns to steam in the oven, which will keep the skin from getting crispy. Maybe I've been under a rock for the past several decades (entirely possible) but I've never heard that before.

- The chicken cavity is stuffed with lemon, garlic, and herbs. Unless it's my chicken, in which case the garlic gets inadvertently omitted.

- At the end, the recipe calls for adding 1/2 cup of wine or stock to the pan juices and reducing to a nice and concentrated pan sauce.

the verdict:

We thoroughly enjoyed this chicken. It was very moist and tender, with a delicious crispy skin. (I'm going to sound like such a barbarian, but skin is my favorite part of roasted or fried chicken.) We liked it every bit as much, if not more, than the Union Square recipe. In fact, if I'd remembered to include the garlic in the cavity, it might have had the edge! We loved the lemony and herbal notes, which were different from the flavors of the roasted veggies from the first chicken.

Saturday, June 27, 2009

White Chicken Chili


Even though I blanketed this chili with chopped fresh parsley (which usualy does the trick) it still looks pretty dreadful in the picture. But don't let the appearance stop you from trying this recipe - it's a delicious and healthy alternative to red chili; perfect for summer!

I've been making this recipe for so long, I can't remember exactly where I found it. It's very similar to one that Williams-Sonoma had, but I've made enough changes over the years that I like to think of it as mine! This is one of my favorite recipes for using leftover chicken (white meat or a combination, as in the batch pictured). When my husband used to go camping with another dad and all the kids, I always made this chili for them to heat over the campfire.


White Chili

1 lb dried great northern white beans, rinsed and picked over (or can use canned white beans, see note below)
2 lb boneless chicken breasts (or use cooked chicken)
1 T. olive oil
2 med. onions, chopped
4 garlic cloves
2 4-oz cans chopped green chilies
2 tsp ground cumin
1 ½ tsp dried oregano, crumbled
¼ tsp gr. cloves
¼ tsp cayenne
1 cup frozen white shoepeg corn, thawed
6 cups chicken stock or broth (or less, if thicker chili desired)
1 T. lime juice
3 c. grated Monterey jack cheese (12 oz)
sour cream, salsa, chopped cilantro

1. place beans in pot, cover by 3 in water and soak overnight

2. cook chicken, cut into cubes

3. drain beans. heat oil in same pot over med-hi heat. Add onions and sauté until translucent (10 min)

4. stir in garlic, chilies, cumin, oregano, cloves, cayenne and sauté 2 min.

5. add beans and stock and bring to boil. reduce heat and simmer 2 hrs, until beans very tender.

6. add lime juice, chicken, corn and 1 c. cheese, and stir until cheese melts.

7. season with salt and pepper.

8. serve with remaining cheese, cilantro, salsa and sour cream.

note:
This is easier if you have cooked chicken on hand and you use canned great northern beans. You’d use about 1 ½ of the 15 oz size cans of beans per recipe (so it’s easiest to double the recipe and use 3 cans! Or freeze ½ can for next time.) If using canned beans, skip step #1, and step #5. Reduce the amount of stock by at least 1/3. Add the stock and canned beans with the chicken, corn, and cheese in step #6, and just cook until heated through. This recipe freezes well – prepare through step 5, and freeze with or without cooked chicken. After thawing, continue starting with step 6.

Thursday, May 14, 2009

union square herb roasted chicken

My farm box pe0ple have been working very hard to find a good source of pasture-raised poultry to offer to us members. They located a wonderful farm and were able to purchase a load of chickens, which they have offered for order. There may not be another opportunity to obtain chickens from that farm until the end of summer, so I've purchased several (which come frozen, per state regulations). As a result, I'm embarking on a whole-chicken cooking adventure. While I know that I could cut these chicken up, and cook them in any number of ways (and I might do that), I really love the smell and taste of a roast chicken - and I love using the leftover meat for soups and other dishes, and the bones for making stock.

After looking through a bunch of my cookbooks (and really, doesn't every cookbook have a method of roasting chicken?) I settled on an enticing recipe from the Union Square Cafe Cookbook. You can find the recipe embedded in this interesting article, "In Search of the Perfect Roast Chicken" which compares several roast chicken recipes.

n.o.e.'s notes:

- Two keys to this recipe: season the chicken with salt and pepper well in advance of cooking it, and add the vegetables after the chicken has cooked part way.

- I didn't have tarragon, so subbed some oregano and sage, both of which I have in my herb garden in abundance.

- the pan juices were very thin once I added the requisite 2 cups of stock.

the verdict:

This was the best roast chicken that I've ever made. I'm not sure how much of the deliciousness comes from the quality of this chicken and how much from the cooking method, however.

The meat was tender and moist and, while the pan juices had fantastic savory flavor I might be tempted to thicken them up and make more of a gravy from them. Mmm, gravy!

Although this is a very early stage in my roast chicken quest, I can say that Union Square has come up with a solid recipe that makes an excellent roast chicken.

As a foot note, Jenny from All Things Edible, has been on the search for the perfect roast chicken, and you can read about her latest adventure.

Thursday, April 9, 2009

Roasted "Airline" Chicken Breasts

For the past few months my freezer has been holding a carefully wrapped package of 4 boneless "airline" chicken breasts (boneless breasts with the bottom wing joint attached) that I purchased at a specialty market, figuring I'd find a good recipe for them. When I saw this Tyler Florence recipe for Roasted Airline Chicken Breast I decided to try it. It took a couple of weeks to get to the actual cooking, and during that time, the anticipation built. The recipe sounded so good; I was intrigued by the combination of black eyed peas, bacon, rice and chicken.

n.o.e.'s notes:

- I've cooked (mostly) low fat for around 20 years. Using large quantities of things like butter and cream tends to give me the willies, though I'll make an exception for special occasions. But when I'm trying new recipes regularly and they call for significant amounts of bacon fat, butter, or cream - or in this case, all three - I'm just going to have to cut fat. So I trimmed back the ingredients in this recipe where I could, but there was still plenty of the rich stuff.

- I used about half the bacon amount - the Benton's bacon that I use has quite a strong flavor. Tyler's directions call for cooking the bacon in olive oil. He's done this in other recipes, and I'm guessing this step is meant to built flavor layers (it's not like bacon is lacking in fat or anything!) I used about half the olive oil. Note: bacon does not get "crispy" in 3-4 minutes of "slow" cooking.

- My first instincts were to halve the the rice part of the recipe, and I should have listened to that little voice. There was way too much risotto for 4 pieces of chicken - the amount was more like 8 servings of rice. I ended up giving some to my neighbors; and they really liked it.

- I'm never very confident in my risotto technique, and in fact, I'm not so sure I'm even temperamentally suited to making risotto.

- Tyler's recipe uses butter, parmesan and heavy cream to finish the rice. I skipped the butter, reduced the cheese, and used 1/4 cup half-and-half instead of 1 cup of cream. Even so, the rice was plenty creamy.

This chicken smelled amazing while it was browning!
the verdict:

I had been eagerly anticipating this recipe and the bottom line is that I was disappointed. It wasn't a total bust; this was a tasty chicken + rice dish. We enjoyed it the first night and we enjoyed the leftovers all week (lots of rice!). But it wasn't spectacular, especially given the two major strikes against it: (1) it's exceptionally heart and waist unfriendly - tons of butter in the chicken, and bacon/cream/butter/cheese in the rice, and (2) it's unusually labor-intensive for my style of cooking. Without huge payoffs in the taste department I'm not likely to take the trouble of cooking it again.

On the positive side, I loved the taste of the fresh thyme + black pepper compound butter, so I might play around with those flavors in a simplified olive-oil based chicken dish.

I'm sending this off to Tyler Florence Fridays, a weekly roundup of blog posts that feature Tyler's recipes - check it out to see what everyone's cooking up!

Sunday, March 29, 2009

CI's Coq Au Vin

This was another joint cooking effort with my husband on a Sunday afternoon. A few days earlier he had been paging through my impulse-buy Cook's Illustrated Winter 2009 Soups and Stews issue and stopped at page 46. "I love Coq au Vin," he said, "Let's make this recipe." When Sunday rolled around, that's just what we did.
[general recipe at end of this post]

n.o.e.'s notes:

- Here's what this recipe claims:
"Put together and on the table far faster than I would have thought (in about one hour, give or take), this coq au vin proves that classic French, cooking can fit into any schedule."
A word to the wise: don't rely on this promise. You can immediately disprove it by reading through the recipe, at which point you will see that the the times specified for the individual steps add up to nearly 2 hours, without even counting time for chopping and prep. This recipe took us 2.5 - 3 hours, start to eating (one step, reducing the sauce, took us double the estimated time).

- This is a classic braised dish: brown chicken and set aside, saute vegetables in the same pan, add liquid and simmer chicken + vegetables until chicken is tender. Then reduce/thicken the sauce before serving all together.

- We used just over 4 lbs chicken - 2 large breasts and 6 small thighs.

- I had just 7 oz of mushrooms, so we were a bit short.

- 2 cups of pearl onions weighed 8 oz or more, not the 5 oz. the recipe says. We used the 8 oz. This would have been too many onions if we'd had the proper amount of mushrooms.

- Because of the size of our chicken pieces, we put the light meat and dark meat in at the same time, and it was all cooked in about 35 minutes of simmering.

- Reducing the sauce took a really long time. I don't think I'd reduce the sauce quite so much next time - 2 cups of sauce for 8 pieces of chicken means just 1/4 cup per piece - not much to cover a piece of chicken and some noodles! It would also be nice to have less time standing at the stove!

- We served the chicken with Light 'n Fluffy Extra Wide Egg Noodles - which are the noodles that are the highest rated by the Cook's Illustrated tasters (along with Black Forest Girl brand).

- For once, I think the number of servings in the recipe was too low - this would serve 6 people rather than 4 (at 4 servings, that would be a pound of chicken per person).

the verdict:

The end result was well worth the time and effort! The sauce was rich and brown and the layers of flavors and aromas were fantastic. Even though the chicken was nice and tender my husband said he'd simmer the chicken longer next time so it would be falling off the bones. The thigh meat was far better than the breast - we would do all dark meat in the future.

Goodness knows I'm not one to shy away from bacon, but we actually thought the bacon garnish detracted from the other flavors. Next time I'd skip the bacon and just use some reserved bacon fat from my freezer for browning the chicken.

The noodles were great with this dish.

This recipe is a serious contender for being our favorite "Fairly Complicated Chicken Recipe." We spent a bit of time debating whether it was more delicious than the Country Captain that we made a few weeks ago, and then finally realized it was like trying to choose a favorite child! (note to our children: although you are very different, you are equally wonderful and we love you both the same!) OK, Coq au Vin when you need a special "chicken + noodles" dish and Country Captain when you need that wonderful "chicken + rice". . .

I'm sending this over to Ruth for this week's Presto Pasta Night roundup (#107). Head over there on Friday to see a wonderful variety of noodle-y dishes.

the recipe:

Coq au Vin
Here are the ingredients:

6 oz thick-cut bacon, chopped medium (I used 4 oz of Benton's bacon)
4 lb. bone-in skin-on chicken pieces (CI says to use at least half dark meat for maximum flavor)
10 oz. white mushrooms (I used 5 oz white + 2 oz wild mushrooms)
5 oz frozen pearl onions, thawed (c. 2 cups)
1 T. tomato paste
2 medium garlic cloves, minced
3 T. unbleached flour
1 bottle - 750 ml - red wine (medium body)
2.5 cups chicken broth
1 tsp minced fresh thyme leaves (1/4 tsp dried)
2 bay leaves
2 T. unsalted butter
2 T. minced fresh parsley leaves

... And summarized directions:

First cook the bacon, remove it, then brown the chicken pieces in two batches, removing them to a plate when cooked.

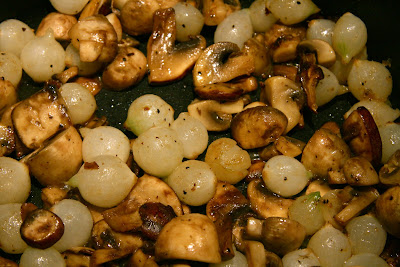
Pour off most of the fat. Brown the mushrooms and onions, then add garlic and tomato paste, cook briefly, then add the flour for a minute.

Add the wine, broth, thyme and bay leaves to the pot, then the chicken. Cover and simmered until the chicken is fully cooked and tender - about an hour for the dark meat. (White meat cooks faster, so should be added after the dark has cooked for a while. We judged this based on the size of our pieces of chicken.)

Remove the cooked chicken and let it rest while the sauce reduces to around 2 cups (the recipe says 20 minutes, but it was well over 40 minutes. I wouldn't reduce it so much - the extra sauce will not go to waste!) Then stir in the butter and season the sauce. Pour over the chicken pieces, garnish with bacon and parsley.

Voila!!

Sunday, March 1, 2009

Ultimate "Chicken" "Noodle" Soup

Meatballs? Yes please! I have never met a meatball that I haven't liked. Swedish meatballs from IKEA? I've bought them by the bagful. Meatballs made with grape jelly (those mainstays of Junior League cookbooks) served at cocktail parties? I'll be standing right there at the chafing dish. My mother's spaghetti and meatballs? This is what I'd likely consume at my 'last meal.'

I do have a problem with meatballs, though. They are a pain in the neck to make. I really dislike browning a big pile of meatballs on top of the stove. For spaghetti and meatballs, I try for the brown-on-6-side approach. They end up looking like oversized dice, rather than balls, but they still taste amazing. Because of the high "bother factor", I make meatballs rarely. (I should probably try baking my meatballs in the oven, but I really like the taste they get from browning in a skillet with olive oil)

Why all this meatball talk in a post about chicken noodle soup? Good question! Tyler Florence featured this soup on his Rainy Saturday episode of Tyler's Ultimate, and he presented it as the ultimate chicken noodle soup. Now I'll bet there are lots of grannies out there who would wag their fingers about this soup passing for chicken noodle. It has a chicken broth for a base, but the "chicken" is chicken meatballs and the "noodle" is tortellini. Really, this is an Italian Wedding soup without the spinach.

No matter what it's called, when I watched the episode with this soup, I decided to brave the meatball experience to try the recipe.

n.o.e.'s notes:

I cooked this soup the same week that I watched this episode, and even took notes, but when the time came to prepare the recipe I couldn't find my notes and didn't remember some of the steps and tips. Here are the things I learned from making this recipe (a lot of meatball-making tips!):

- The most important thing is to be sure to use fresh - raw - sausage. The comments section of the online recipe is filled with tales of meatball woes, and many of the people used the fully cooked sausages, which do not work with this recipe. If you want to use those cooked sausages, just slice them and add them to the soup (you will save the meatball-making hassle, but the flavor will suffer a bit, imo).

- I couldn't find raw chicken apple sausage (the flavor Tyler used), so I purchased chicken Italian sausage - which was fine b/c of the tortellini and parmesan gave it a slight Italian flavor. (Shredded basil could be added to the soup at the end to further empasize the Italian aspect.) I found the sausage at Whole Foods, used 5 links, .8 lb total, and removed the casings.

- I don't think it would be very difficult to start with ground chicken and add some spices to make homemade bulk sausage.

- There's a mysterious lack of direction in the recipe. You use half the garlic for the broth part and then it doesn't say what you do with the other half. I put it in with the meat.

- I thought the food processor was unnecessary for the meatballs - and I just hate washing it when I don't need to use it! In fact, as the recipe is written, the mixture ends up overprocessed by the time the parsley is chopped. The next time I would either: 1. chop the parsley and mix the meatballs by hand instead of in the fp. Or 2. put the onions and parsley in, process, then add the other ingredients just to incorporate.

- Because the meatball mixture was kind of wet I added some panko crumbs. Crumbled bread would work also.

- I took Tyler's tip to use a 1 tsp disher to form the meatballs. (When I make my bigger meatballs for spaghetti, I roll them between my palms. This mixture was a lot wetter than meatballs I usually make.)

- These meatballs were so small that I couldn't give them the six-sided dice browning treatment. Instead, it was more like browning on 5 or even 4 sides. They went into the frying pan as adorable little balls and came out with funny angles and flat places.

- I used a 9 oz pkg of Whole Wheat Tortellini from Monterey Pasta Company, in Classic Italian Cheese flavor. This is my favorite brand of the pre-made pastas - it comes in a refrigerator case but I when I buy it I always throw it right in my freezer until I'm ready to use it. I always have a couple of packages of these in the freezer for those "desperation dinners!"

- Half the broth was my homemade turkey stock. Because my stock was so strong, I didn't want to use it for all the soup's liquid. I filled in with purchased chicken broth.

- I added "hot salt" (a salt blended with hot red peppers) to the broth and the meat mixture. I also added ground black pepper, which is not in the recipe.

- Tyler served this soup with grilled cheese sandwiches and brownies for lunch. Whoa, that's a lot of food for lunch! We enjoyed the soup with a salad and bread for dinner.

the verdict:

This was tasty soup! Making and browning the meatballs was a bit of a bother, but luckily we got enough servings out of the soup to make more than two dinners for the two of us. To be honest, a good part of the great flavor was from the homemade turkey stock I used.

My biggest beef with this "ultimate" chicken noodle soup is that your really can't call it that. It isn't chicken noodle - not from the perspective of the chicken or the noodles. It is, however, a really good soup that features meatballs and tortellini - and "ultimately" that's a good thing.

I'm submitting this to to Tyler Florence Fridays, a group devoted to exploring Tyler's recipes on a weekly basis. Stop by and see what the Tyleristas are cooking up!

Thursday, February 5, 2009

Country Captain

There is a chicken thigh under all that wonderful sauce and garnish!
Over breakfast on Sunday, my husband reads the newspaper. Last week he paused in his perusal of the Times Magazine to share with me the featured recipe for Country Captain, a chicken dish. (The whole article accompanying the recipe is well written and well worth a read.) "Why don't we make this tonight?" Jim asked. And so we did.

I have heard of Country Captain, and frequently paged past recipes for the dish in many of my (regional) cookbooks. But it took the New York Times to make me pay attention to this quintessential Southern dish.

Cooking this recipe on a Sunday afternoon was a return to a practice we'd let fall by the wayside. About 15 years ago, my husband and I had a habit of cooking Sunday dinners together. Those afternoons of chopping and sauteing, along with weekly breakfasts at our local coffee shop, were valuable opportunities to stay in touch with each other amid the whirl of carpool, scouting, dance classes, work, and the million other distractions of a busy household. As a bonus, we developed a small but mighty arsenal of delicious recipes (with the Times frequently playing a contributing role).

Last week I realized anew what a wonderful job Jim does of chopping vegetables (and he remembered how relaxing he finds that to be). The recipe, while not a difficult one, takes some time to prepare. Working together didn't cut the prep time in half, really, but it more than doubled the fun of cooking. One of the perks of cooking with this man is that he cleans as he goes (whereas I, ahem, do not) and we end up with a cooked dinner and a clean kitchen to boot!

Check out those beautifully chopped veggies!
n.o.e.'s notes:

- I used around 3.5 lb chicken thighs with bone in and skin on, although I couldn't help myself from trimming some overhanging skin/fat from the thighs.

- When I ran out of dried thyme (seriously, how does one even do that?) I rounded out the teaspoon with Italian seasoning.

- Instead of cooking the bacon and then crumbling it, we cut 4 slices of bacon (Benton's) into lardons before cooking it to crispness. We poured off half the bacon grease (although the recipe contemplates using it all) before adding the vegetables.

- We used curry paste (Patak's hot curry paste which I have ordered online if I can't find it in the store) instead of curry powder. I love this stuff!

- The medium onion weighed around 200 grams (for future reference).

- We used diced san marzano tomatoes (rather than the chopped tomatoes the recipe specifies).

The chicken, just out of the oven and ready to be scarfed, er, served

the verdict


In the words of my husband:

"This recipe caught my eye in NYT mag over bagel and coffee this a.m. because it listed diced onions, celery and bell peppers - the Holy Trinity where I come from (land of Galatoires) - and minced garlic - the Pope. Also chicken thighs and bacon (which for us means only one thing, Benton's from Tennessee). Served over rice. First taste: The name 'Country Captain' is a shameful travesty. Instant field commission to 'InterGalactic Field Marshal'.
"

From what I can tell, this is probably my husband's new favorite chicken recipe. As for me: I'd put it on the top rung, at least. It's really delicious. The rice really worked to complement the flavors in this dish. The currants, bacon, and almonds were great additions, although we didn't need all of the bacon. Benton's is a very intense smoky bacon, and we only needed to sprinkle on a little bit or we'd have run the risk of the bacon overpowering the chicken and sauce. In the future, 3 slices would be fine.

Wednesday, November 26, 2008

{Simple Soup Supper} Busy Day Chicken Tortellini Soup


This hardly qualifies as a real recipe, but busy times call for dinners with shortcuts! The original inspiration for this soup was on a label of Swanson's chicken broth that I came across years ago, and have significantly embellished. Depending on whether I use homemade stock and chicken (as opposed to canned or cubes of stock, and a rotisserie chicken) and freshly chopped veggies and herbs, this can be a little or a lot better than a can of soup. In this busy week before Thanksgiving, a little simple soup really hit the spot, combined with some hot multigrain bread and a green salad.

Busy Day Chicken Tortellini Soup

1 T. olive oil

1 large carrot, sliced (about 3/4 cup)

1/3 cup celery, chopped

1/3 cup onion, chopped

1 tsp. minced garlic

1/4 tsp red pepper flakes

2 qt. chicken stock, homemade or purchased

1 cup (weight: 4 oz.) dried tortellini, such as Barilla (or 1 package frozen tortellini)

1 1/2 cups shredded cooked chicken

1-2 tsp. chopped fresh herbs, such as Italian parsley, oregano, or thyme (or 1/2 tsp dried)

1. Heat olive oil in large saucepan, and saute carrot, onion, and celery for 3 minutes.

2. Add garlic and red pepper flakes, and cook an additional minute.

3. Add chicken stock and bring to a boil over medium-high heat.

4. Reduce heat to medium, add tortellini, and simmer for 10-15 minutes until tortellini are cooked through and vegetables are tender. (If using frozen tortellini, follow the cooking time on the package, and let the veggies simmer in the stock for a few minutes before adding the tortellini.)

5. Stir in fresh herbs and chicken. Bring soup to a boil and serve.


{Note: I'm celebrating my first 100 blog posts with a cookbook giveaway - to enter, go here and leave a comment before December 3}

Wednesday, November 19, 2008

Ultimate Enchiladas in Salsa Verde

This was one of those at-the-gym-watching-Food-Network finds (in fact the same gym session as Guy Fieri's bacon+pasta show!) Tyler Florence cooked Ultimate Chicken Enhiladas, and he had me at the roasted tomatillos. I couldn't wait to try making these myself, and am very glad that I did.

cook's notes:

- If your tomatillas are of different sizes, cut the larger ones or roast them for a longer time to make sure that they are all cooked through.

- Roast the garlic unpeeled. You can easily slip it out of the peel after it's cooked.

- I used hot finger peppers instead of jalapenos. We like the extra heat.

- When making the salsa verde, add the lime and cilantro last, adjusting to taste. I used half the cilantro, and all of the lime. For a while it seemed like it might have been too much lime, but by the time I mixed everything else together it was perfectly balanced.

- If you use a purchased rotisserie chicken, check that it's 3 pounds. The one that I bought was only 1.5 pounds, so I had to make a half recipe. The 1.5 pound chicken yielded 3/4 pound of shredded meat. I often use leftover cooked chicken that I try to keep in my freezer. A full recipe would require 1.5 pounds of shredded chicken.

- Use a whisk when adding the chicken stock to the pan for the veloute to keep lumps from forming (or to break up lumps that have already formed). It took about 5 minutes of simmering for my sauce to thicken.

- I added water to the salsa when it came time to dip the tortillas. There are lots of things that the salsa is needed for, and I wanted to have enough.

- I used half white tortillas and half whole wheat tortillas. We preferred the whole wheat.

- I used a bag of pre-shredded Mexican blend cheese.

- An 8x8" pyrex baking dish was a good size for half a recipe.

the verdict

This really was the ultimate chicken enchilada! It was a bit of work, but the flavors had an amazing complexity from the different steps. Well worth the effort.

My husband gave this a 10 out of 10. I can't remember a better Mexican dish that I've put on the table.

for next time/ time saving tips

To save time, I plan to make a large batch of the salsa verde and freeze it. Doubling the salsa verde recipe would be easy, as there's very little chopping. But it would have to be pureed in 2 batches in the food processor, I think.

Using pre-shredded chicken, in addition to the pre-shredded cheese would also save time.

Wednesday, September 24, 2008

From one sunny clime to another: Greek Chicken


Foraging for Monday's dinner, I found 6 skin-on bone-gone chicken breasts in the freezer. Then came a recipe search. I wanted chicken with a crispy, tasty skin, but still relatively healthy (fried chicken was "right out".) And it had to be one that I could make without going to the grocery store.

The recipe I selected is from the Williams Sonoma book Meats & Poultry in the series "The Best of the Kitchen Library." I have to say that everything I've cooked from this book has been outstanding. The recipe, as written, called for 2 chickens split in half. Since I had boneless breasts, I had to adjust quantities and modify the recipe's techniques.

The recipe seemed perfectly appropriate for our very warm, sunny, dry (ugh, the drought continues) early Fall weather.

Greek Chicken with Oregano, (adapted from Williams Sonoma - update: the original recipe is at the end of this post)

6 boneless chicken breast halves, with skin (around 3 lbs)
1/3 cup olive oil
juice of 1 lemon
1 T. dried oregano
1 large onion (I used vidalia) cut into wedges
2 cloves of garlic, minced
salt and pepper
1/4-1/3 cup dry white wine
10 oz baby spinach, stemmed and washed
fresh oregano sprigs for garnish

1. Preheat oven to 390 degrees

2. In a small bowl, combine the olive oil, lemon juice, and oregano. Stir.

3. Brush the mixture on both sides of the chicken, and lay each breast skin-side down in a roasting pan.

4. Tuck onions and garlic among the chicken pieces, and sprinkle everything with salt and pepper.

5. Place in oven and roast for 10 minutes. Turn chicken skin side up, stir the wine into the pan juices, and baste the chicken.

6. Continue to roast until chicken is nearly cooked through, approximately 15 - 20 minutes. Remove pan from oven.

7*. Transfer chicken to plate and cover to keep warm.

8*. Place roasting pan on the stove top and reduce the pan juices over med-high heat until onions are slightly caramelized and juices are thickened to a sauce.

9*. Put chicken back into the roasting pan and place under broiler until skin is lightly browned.

10. Arrange a bed of spinach leaves on a platter and place the chicken on top. Arrange the onions and pour the sauce over all. Garnish with the oregano sprigs.


* Steps 7 - 9 are my additions. My version is a reduced proportion of lemon juice from the original recipe. In my culinary life, I have regretted using too much citrus juice but have rarely regretted using too little.

I served this with a side salad of chopped tomatoes, cucumbers, and onion, with fresh oregano leaves (from my herb garden!), salt and pepper.

The Verdict:

This chicken was absolutely fantastic. The oregano and lemon were a lovely combination, and the caramelized onions were delicious with the seasoned chicken. There ended up being a fair amount of liquid in the roasting pan, so I'm really glad I thought to reduce it. The resulting sauce was full of nicely concentrated flavors.


Since there are only two of us at home, I was able to freeze two batches of chicken for later.

Food in the freezer is like money in the bank... or these days maybe better!

{update} Here's the original recipe, slightly condensed because I got tired of typing. I wasn't able to find it online:

2 chickens, about 2 1/2 lb each, halved lengthwise
1/2 c (4 fl oz/125 ml) olive oil
juice of 2 lemons
2 T dried oregano
2 yellow onions, cut into wedges
4 cloves garlic, minced
salt and freshly ground pepper
1/2 c (4 fl oz/125 ml) dry white wine, or as needed
1 bunch spinach, stemmed and well washed (I'd use more for all that chicken)
4 fresh oregano sprigs

1. Preheat oven to 400 degrees

2. In a small bowl, combine the olive oil, lemon juice, and oregano. Stir.

3. Brush the mixture on both sides of the chicken, including under the wings, and place skin-side down in a roasting pan.

4. Tuck onions and garlic into the hollows of the chicken pieces, and sprinkle with salt and pepper.

5. Place in oven and roast for 20 minutes. Turn chicken skin side up, stir the wine into the pan juices, and baste the chicken.

6. Continue to roast, basting with the pan juices, until chicken is tender and the juices run clear when a thigh joint is pierced with a knife, 30 minutes longer. Add more wine to pan if necessary to keep chicken moist.

7. Arrange a bed of spinach leaves on a platter and place the chicken on top. Strain the pan juices and pour over the chicken. Garnish with the oregano sprigs.

Monday, September 8, 2008

Blue and yellow and green all over


We love to eat Mexican food. I was browsing over at Simply Recipes, and this recipe for Chicken Enchiladas Verdes caught my eye. The recipe gives directions for a delicious-sounding homemade tomatillo sauce, but also gives the option of making this dish with bottled salsa verde. I'd love to experiment with tomatillos some day, but for this weeknight dinner, it was the jarred stuff all the way!


I kept pretty much to the recipe, using chicken thighs and cooking them as instructed. The meat turned out tender and fragrant. I softened the blue and yellow corn tortillas with the recipe's method (in a skillet with oil), dipped the tortillas in salsa verde, then filled them with a spicy chicken mixture and rolled the echiladas.


For the sauce, I substituted Greek Yogurt (2%) for the specified sour cream, spooned it on top of the enchiladas, sprinkled onions and organic shredded pepper jack cheese on top, and ran the dish under the broiler to melt the cheese. My enchiladas were nowhere near as beautiful as those over at Simply Recipes, but they had a great cheesy appeal of their own!

I served these with guacamole, salsa, chips, and a green salad.

The Verdict:
These enchiladas are excellent, and I will definitely make them again. The key is to get a salsa verde that is great, because the flavor is prominent. The salsa I used was quite tangy but tasty. The Greek yogurt worked perfectly in the sauce, and I'd do it again, possibly with nonfat yogurt.

I'd take a few shortcuts next time:
1. If possible, cook and shred the chicken in advance. This is a great recipe for using leftover roast chicken or turkey.
2. I'd soften the tortillas by putting them in the microwave between damp paper towels. This is easy and fast, and eliminates the added oil and dirty frying pan.
3. I'd skip the step of dipping the tortillas in the tomatillo sauce. Instead, I'd try making the recipe as a casserole: fill and roll the softened tortillas, place them in a baking dish, make up the sauce and spoon it over the rolls. Then sprinkle the cheese, cover with foil and bake in the oven until hot and melty. I'd serve with chopped onion, cilantro, chopped hot peppers and chopped tomatoes on the side, to be added as desired.

{Update November 19, 2008: I've now discovered a salsa verde/ enchilade recipe that I like even better! You can find the entry here.}