
This week's Tuesdays With Dorie assignment is the
French Yogurt Cake. I have had my eyes on this recipe for a while, so I was excited to get the chance to bake it. The basic cake is an oil- and yogurt-based cake that can be made in just two bowls. After the
Chocolate Grand Marnier Cake of a few weeks ago, this was a welcome respite from a sink filled with dishes!
When I read through the recipe, I was immediately drawn to one of the variations. The Riviera Yogurt Cake uses strained (Greek) yogurt, olive oil, and chopped rosemary. I love using savory herbs in my sweets (see last week's
Bay Custard Cups), so this sounded perfect to me!
 n.o.e.'s notes:
- I love the subtle contribution that thyme and rosemary make to my very
favorite coffee cake recipe, so I used both herbs in this cake. I chopped some fresh thyme and rosemary leaves very very fine, and rubbed 1/2 tsp of the combination into the sugar with the lemon zest.
- I used ground almonds. Sometimes I have Trader Joe's almond meal on hand, which is very finely ground, but this time I ground some almonds in my food processor, which produced a coarser grind.
- For yogurt, I stirred some lowfat and nonfat Greek yogurts together (mostly nonfat).
- I used regular extra virgin olive oil, but I later remembered that I had some wonderful Italian lemon olive that I should have used! For Christmas last year, my daughters
adopted an olive tree for my husband and me. We received shipments of oil from "our" tree; the last shipment contained three different flavored oils - including lemon. I always forget to use them!
- In lieu of the 3 eggs in the recipe, I substituted 3/4 cup Egg Beaters. With the mono-unsaturated olive oil, the mostly-nonfat yogurt, and the egg subsitute, this cake was actually pretty low in fat, and the Greek yogurt and almonds increased the protein content. Practically a health food! Next time I might throw in some white whole wheat flour.
- In keeping with the Riviera theme, I left the cake topless.
- Truth be told, I completely ran out of steam when it came time to contemplate a topping glaze. I knew I didn't have lemon marmalade. I also knew that I was not going to purchase lemon marmalade, given my vast
jam holdings (which by the way, grew by several jars over the holidays). The final thing I knew is that I wasn't going to get creative and devise an alternate topping. This cake was going to have to stand on its own without the help of a glaze.
- I sliced up half and served it to my book group plain, and popped the leftover half loaf in the freezer. [more about that second half, below]
 the verdict:
The cake is sturdy, dense, and moist. And very good! And very easy!!
In the Riveriera variation, the almonds and olive oil each lent their subtle flavor, the herbs gave just the slightest woody hint, and the sunny lemon shone through everything.
I will make this cake again (and again) in this Riviera version - the recipe is so easy, moist, healthy, and good.
I'd also like to make the regular version of this recipe as a layer cake with a simple frosting, perhaps cocoa buttercream.
I love this cake!
...read on....
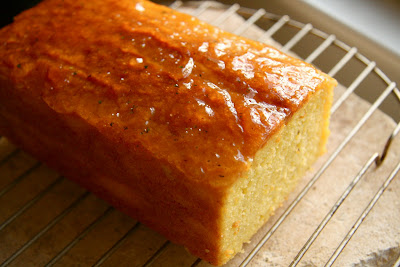 Riviera cake 2.0:
I initially baked this cake the very day that the recipe was selected (as part of my marathon Pre-Lenten baking frenzy) and served it that evening. I can now report that this cake freezes and thaws beautifully. Last Thursday I served the second half of the cake (also to my book group) but this time I decided to give it a proper covering. I made a glaze of 1/4 c. grapefruit marmalade (which I had in my fridge), which I thinned with about a teaspoon of Meyer lemon juice, then heated in a small saucepan with 1/2 tsp of chopped thyme. I strained it directly onto the cake top.
The citrus glaze was a fantastic complement to the basic cake. I think everyone liked the glazed cake, although they had really enjoyed the cake plain at the previous meeting.
Another time I'd like to experiment with a fig and thyme glaze.

I need to thank Liliana of
My Cookbook Addiction for choosing the
French Yogurt Cake with Marmalade Glaze. If you'd like to try this recipe, it's on pages 224-225 of Dorie Greenspan's
book Baking From My Home to Yours, or check out Liliana's
post where you will find it online.
P.S.
Happy St. Patrick's Day!! I had fond hopes of baking up a wonderful Irish Soda Bread, and even had a recipe all printed out, but it just didn't happen. I did, however, use Irish cheddar cheese this past weekend in my macaroni and cheese and in my scrambled eggs (they were not green, Sam-I-Am)!
Note to my fellow food bloggers - In addition to giving up sweets for Lent I've also given up Google Reader and general surfing of other cooking blogs. So that's the reason that you've seen fewer of my comments lately. I've been following the maxim"speak when spoken to;" if you comment on my blog, I'll likely visit you and return the favor.


