Showing posts with label make it quick. Show all posts

Sunday, May 27, 2012

Olive Oil-Poached Halibut


I own more than my fair share of cookbooks.  I have the best of intentions to use every book that I keep on my shelves (and conversely, not to keep books that I don't use), but invariably there are cookbooks that I find myself reaching for without even thinking.  One of these is the big yellow Gourmet Cookbook, edited by Ruth Reichl.  I have never been disappointed by any of its recipes, so when I saw a recipe for Oil Poached Fish I had enough confidence to try this new-to-me technique with my very favorite fish, halibut.

n.o.e.'s notes:

-  Although I found the recipe in my copy of the yellow Gourmet cookbook, the good news is that you can find the recipe online, here.  Although really you won't go wrong if you purchase the cookbook.  And guess what? I just checked at Amazon, and the price right now is $7.17.  You can hardly afford not to buy the book!

-  The recipe has just five ingredients: fish, lemon, capers, olive oil and parsley, along with salt and pepper.  I made half a recipe in an oval Pyrex dish.

-  It's a quick matter to throw the fish together, but it is baked low and slow - at 250 degrees for an hour or more.

the verdict:

This fish was velvety, tender, and subtly but clearly flavored with citrus, herb and salty elements.  I'll definitely return to this recipe.  As I wrote in my notes: 
the fish was not oily tasting
the oil was not fishy tasting

Although the recipe says that you can re-use the oil for other purposes, that's not exactly my forte, so I'll admit that I didn't keep the oil.

My friend Di of the blog Di's Kitchen Notebook is once again hosting a seasonal blog event.  The theme this time around is "Cooking The Books" and I'm submitting this recipe from one of my favorite cookbooks.  Click over to her post to see the other fun things that bloggers have cooked and baked from their books.

Tuesday, April 17, 2012

Lemon Loaf


There's one thing to be said for the Lemon Loaf cake that was assigned for this week's recipe by the Tuesdays With Dorie; Baking With Julia baking group: it's really easy. Really, really easy.  I arrived home very late on this rainy Tuesday afternoon and stood in my kitchen debating with myself whether I had time to bake this cake.  Or more importantly, whether there would be enough daylight after the cake was baked to photograph it so that I could actually post it on time.  When I saw how short the recipe is, I started pulling out ingredients and before I knew it, the cake was in the oven.  And was baked, cooled (mostly) and sliced in time to photograph in natural light on the back deck, thanks in just a small measure to Daylight Savings Time.

n.o.e.'s notes:

-  You can find the recipe for the Lemon Loaf on the blogs of this week's hosts:
Truc of Treats and Michelle of The Beauty of Life

-  The virtue of this recipe is that it is made in a bowl with a whisk; no mixer or creaming of butter required.  Instead, the butter is melted and folded into the cake batter at the end.

-  I baked 1/2 recipe, in a little skinny loaf pan that my daughter JDE brought back from her 2011 trip to Hong Kong.

-  All of the lemon flavor of the recipe is from lemon zest.  I wanted that zest to contribute its lemony limits, so I used a favorite Dorie Greenspan tip: first I rubbed the zest into the sugar with my fingers, until the sugar was a bit damp and very fragrant.  Then I whisked the sugar/zest mixture with the salt and eggs as directed by the recipe.

-  I deviated a tiny bit from the recipe by adding a healthy dose of lemon oil to the batter (about 1/2 teaspoon for my half recipe).


the verdict:

This had a wonderfully dense, moist crumb, but wasn't in the least bit heavy or dull.  The lemon flavor was subtle, but noticeable (in part from the lemon oil I'm guessing).  It made a wonderful dessert with some sliced strawberries.  This is a great recipe to keep bookmarked for those occasions where you need a not-fussy, quick, easily transportable cake.  Although I kept mine plain, the cake could easily be gussied up by adding a lemon glaze or soaking it with a lemon syrup.

Saturday, June 4, 2011

Chicken with Prosciutto and Parmesan


British chef Jamie Oliver has become a champion of simple but tasty and unprocessed food, in schools and homes, both in the UK and in the USA. His website and his books are a great source of easy but delicious recipes, and I've found myself turning to them again and again when time is tight and inspiration is lacking.

One recent weekday I was faced with a package of boneless chicken breasts. None of my usual standby recipes appealed to me, but Jamie's recipe Parmesan Chicken Breasts with Crispy Posh Ham caught my attention, and I decided to give it a try.

n.o.e.'s notes:

- You can find the recipe here

- I try to keep a package of Prosciutto in the freezer; it's wonderful for draping over ripe cantaloupe or jazzing up a salad. It also comes in handy for this recipe!

- I have a bad attitude about pounding chicken breasts. Although I know that it keeps them tender and makes them a uniform thickness so that they cook more evenly, I always dread pounding them. And every time, I realize that it wasn't so bad after all.

- The recipe is a snap and introduced me to a new technique for pounding chicken breasts. First you score one side of the meat and sprinkle it with seasonings and grated parmesan cheese, then lay sliced prosciutto or ham over the top. Then cover with a bit of plastic wrap and pound the breasts. Not only does the pounding thin the meat, it also imbeds the seasoning and the cheese into the meat and adheres the ham to the surface of the chicken.

- The chicken could be prepared in advance and cooked at the last minute. After a quick pan-saute, the chicken is ready to eat.

the verdict:

After I cooked the chicken and plated it, I realized how pretty it was, and I was a little regretful that I was wasting it on a weeknight dinner. It would be perfect for company. You absolutely cannot tell from looking or tasting how easy this was to make. The salty ham was a great counterpoint to the chicken, and the cheese and the thyme added tons of savory flavors.

Sunday, September 13, 2009

Flash-Roasted Halibut on Green Herbs


I love popping into my local library and browsing the cookbook section. I've found some wonderful books there, ones that I've added to my own library, and others that I've politely returned. One that I've enjoyed is The Splendid Table's How to Eat Supper cookbook. Although I haven't listened to the radio show, the book itself is quite inventive in layout and is so interesting that it can double as bedtime reading.

One of the first recipes that I bookmarked was for Flash-Roasted Trout on Green Herbs. I love fish and this sounded like a quick and tasty weeknight dish. I substituted my favorite fish, halibut.

n.o.e.'s notes:

- The fish didn't get as browned as I would have liked, but that was mostly an aesthetic objection.

- I wish I'd removed the bottom skin from the pieces of fish so the herbs would have steeped up through the fish as it cooked. As it was the herbs still gave delicious flavor to the fish.

the verdict:

Served with steamed broccoli, a bountiful summer salad, and some crusty ciabatta (still store-bought), this was a wonderful dinner. I loved being able to step outside to my herb plants and pick everything I needed for the bed of herbs, and, even more, I loved finding a delicious recipe from a great new cookbook.

the recipe:

Flash-Roasted Halibut on Green Herbs
Adapted from The Splendid Table's How to Eat Supper

Extra virgin olive oil
6 or 7 sprigs each of fresh herbs similar to herbes de Provence, a total of 38 sprigs
4 whole scallions, coarse chopped
4 whole farmed rainbow trout, rinsed and patted dry (I substituted halibut filets)
4 garlic cloves, crushed
Salt and fresh-ground black pepper
Juice of 1 lemon
1 large lemon cut into 4 wedges

1. Preheat the oven to 450 degrees. Lightly oil a large shallow roasting pan and preheat in middle of oven.

2. Rinse herbs and scallions and dry them on paper towels.

3. Make 3 slashed in the skin side of the fish. Rub olive oil on the outside of the fish and into the slashes. Put crushed garlic into slashes and salt and pepper the fish.

4. Scatter herbs and scallions on the heated pan to create a nest for the fish; lay the fish on top, with room between the pieces of fish. Roast until fish is nearly opaque.

5. With two spatulas, lift fish on the herbs onto serving platter. Squeeze lemon juice over the fish and garnish with lemon wedges.

Friday, June 19, 2009

Pim's "15 minute" Fresh Tomato Sauce

No matter how far afield I stray culinarily, I’m always glad to return to the familiar territory of pasta with tomato sauce. There are good jarred tomato sauces to be found, but it’s so satisfying to prepare one from scratch, especially one that promises to be both easy and delicious. I came across 15 Minute Tomato Sauce on the blog Chez Pim and was instantly intrigued. A super-quick sauce made from fresh tomatoes? This is one I just had to try.

n.o.e.'s notes:

- Pim has illustrated her recipe post with step by step photos which is useful and reassuring, even for a simple recipe.

- The first time I made this, I may have let the tomatoes break down a little bit too long – I ended up with a lot of juice and not a lot of pulp. You can see that in the picture below. I was much happier with my sauce the second batch, pictured up top.


the verdict:


I served this sauce over short pasta, alongside grilled hot Italian chicken sausage. There was enough sauce for two dinner-sized servings of pasta, so if you are feeding a (hungry) crowd, you’ll have to increase the recipe accordingly. The sauce was bright and fresh, and I how the nice acidic taste of the tomatoes comes through to the finished sauce.

This recipe is a great choice if you need a fast sauce and you have fresh tomatoes.


If you have less time and/or no fresh tomatoes, you can make Heidi Swanson’s 5 Minute Tomato Sauce with nice quality crushed tomatoes: I made it here.

If you have fresh tomatoes and a bit more time, here’s a great recipe from Delia Smith for Classic Fresh Tomato Sauce, a long-simmered tomato sauce: I posted it early in my blogging days.

And there you have it, a veritable quiver of tomato sauce recipes, fit for any occasion or type of tomatoes!


Thursday, June 18, 2009

Grilled Potato Salad with Vinaigrette


My husband claims it's my German heritage, but I have never met a potato that I didn't love! (He's more of a rice man himself, but we both agree on the fabulousness of pasta.) A week or two ago I had some lovely fingerling potatoes in my farm box and figured they'd be delicious in potato salad. I turned to my new favorite cookbook, Mark Bittman's How To Cook Everything and prepared his Grilled Potato Salad, with a Vinaigrette also inspired by the book.

The best part about the HTCE book is that in addition to the hundreds of recipes, Bittman also has lots of charts and tables with options for varying each type of recipe. You are free to branch out as much as you'd like, but he is there providing structure to advise and support you. This potato salad was a perfect case in point.

Making this simple dish (and it was simple) involved flipping among 3 different recipes/methods in the book:

1) his instructions for potato salad, choosing the grilled version

2) his method of grilling potatoes, using the broiled version

3) his recipe for vinaigrette, where I loosely combined many of the optional ingredients that he lists (my version is detailed in the notes, below)

n.o.e.'s notes:

- My potatoes were small red fingerlings.

- To cook the potatoes, I tossed them with olive oil, salt and pepper, and broiled them 6" from a medium-high broiler for 12 minutes then turned and broiled 10 more minutes.

- Here's the approximate vinaigrette that I made (did not use all for my 1/2 pound of potatoes):
3T olive oil
2 T white wine vinegar
1/2 tsp salt
1/4 tsp black pepper
3/4 tsp chopped garlic
1 T chopped spring onion
1 T fluffy parmesan from microplane
- I shook the vinaigrette and poured it over potatoes while they were hot. Then I sprinkled the salad with a couple sprigs of chopped Italian parsley and oregano, stirring until coated.

- I cooled the salad before serving.

- Sorry about the picture; I did not take a good shot of the salad itself before we ate it all!

the verdict:

This was a nice, simple, fresh way to enjoy new potatoes in the early summer! I love having a simple recipe like this in my arsenal, and I love the flexibility it provided me to use what I had on hand and produce a lovely salad.

Tuesday, June 9, 2009

{TWD} Parisian Apple (and Peach and Plum) Tartlets


This week’s Tuesdays With Dorie assignment, the Parisian Apple Tartlet, has got to be the fastest and easiest recipe in Dorie Greenspan’s cookbook, Baking From My Home to Yours. It takes no longer than 5 minutes to assemble, and in about half an hour, there’s dessert! If you do what I did, make 4 tarts with different types of fruit, then you add about another 5 minutes to the assembly time. And that’s it! Perfect for me this week, as I am extra-busy, and this recipe fit right into my crazy day on Sunday.


And to match the short recipe, this post will be uncharacteristically brief. You can all breathe a sigh of relief!


n.o.e.’s notes:


- Dorie’s recipe calls for store-bought all-butter puff pastry. I located a 1 lb box at Trader Joe’s. From reading this week’s P&Q I gathered that having a strikingly easy assignment wasn’t as welcome to some of my fellow bakers as it was to me; there was lots of discussion about making puff pastry at home rather than reaching for a handy box of Trader Joe’s, or Dufour, or even good old Pepperidge Farm. I'm very impressed with their energy, and no doubt I'll be even more impressed with their pastry! Someday I may try making my own, but for this week I was grateful to open a box and be done with it.


- I cut my tartlet circles using my little tartlet molds, which are just under 4".


- I peeled the apple and the peach but left the skin on the plum.


- My tarts were pretty juicy, especially the plum one ,which ran all over the baking sheet. They were a tiny bit soggy on the bottom, so in the future I might not use the silicone or the double cookie sheets (I keep my cushion-aire baking sheet in the oven and just put everything I bake on it). And maybe do something about that juicy fruit!


- A few minutes before the end of baking I sprinkled some more brown sugar on the tarts, so they'd be pretty.


the verdict:


These tarts were good, and I'll have to say, they have a special place in my heart because of how easy they are!


We thought that we would like the peach ones the best (which is why I made two of them) and we did enjoy them. What's not to like about ripe peaches and warm pastry? But we liked the other fruits even more. My husband preferred the apple. I could not get him to taste the plum - he claimed that he was too full! What? When has that ever stopped dessert at our house? Anyway, I loved the plum. This particular plum was quite tart, which was a nice contrast to the rich and refined pastry. I think that I'll sprinkle on some cinnamon along with the brown sugar next time I bake these.


As I was eating my tart(s) I was trying to figure how how to evaluate the recipe. It was quite delicious, but certainly not in the same league as the French Pear Tart or the Tartest Lemon Tart. But the sheer simplicity of the recipe (well, for those of us who used the boxed puff pastry, that is!) helps these tarts to cut closer to the front of the line. I was reminded of the blog Effort to Deliciousness, where Margot evaluates recipes based on a combination of effort and, well, deliciousness. While I can't replicate Margot's scientific approach, I can say that this recipe delivers - both in taste and appearance - far beyond the 5 minutes it takes to throw it in the oven.


Thanks to Jessica of My Baking Heart for picking this delicious dessert for us this week.


Here's a little sneak peek at the TWD recipe for two weeks from now...!

Tuesday, April 14, 2009

{TWD} 16 Minute Magic: Chocolate Almond Torte

If ever there were ever a week when a 15-minute TWD recipe would come in handy, this one would be it. I waited until yesterday - Monday - to bake this week's Tuesdays with Dorie assignment, which didn't seem too risky of a plan, seeing as I had the day fairly free, and this was billed as a quick cake. In fact the name of the recipe is 15 Minute Magic: Chocolate Amaretti Torte. But on Monday morning our electricity fell victim to some high winds, and I had no electrical power from 10:00am to around 4:30pm. Once the power was restored to our neighborhood I realized that if this cake were going to be made during daylight hours, I'd have to hustle.

I set my timer to clock whether I could indeed have the cake in the oven in 15 minutes. I didn't count the time it took me to measure the butter (mine comes in a 1 lb block), nor, of course, the time it took for the butter and eggs to come to room temp (speeded by the microwave and a bowl of warm water respectively), and for the melted chocolate to cool (aided by the fridge).

Everything else really was very quick, and the timer rang just as I was scraping the last of the cake batter off of the food processor blade. If I'd sprayed the pan instead of rubbing it with butter, the cake would have actually made it into the oven within the 15 minutes! Nice as that was, the real magic would have been if the dishes had cleaned themselves!!

n.o.e.'s notes:

- The TWD bakers had quite a lively discussion about the amaretti/amarettini cookies that are used in this recipe. They are not particularly easy to find, especially at a reasonable price. Back in January I was going to bake a recipe that called for these cookies as an ingredient. I searched several stores with no luck, and then finally located some. But, (and this makes me sound hopelessly clueless) not only can I not remember where I finally found the cookies, I can't remember which recipe I was going to make! Luckily I did remember where I'd put them... Anyway, my best guess is that they came from World Market. The are called Amaretti Cookie Snaps, and the brand is Lazzaroni (although the writing on the package looks like it spells "Larzaroni"). This is the brand that Dorie says she prefers. Just for comparison purposes I picked up a pack of amaretti cookies from my neighborhood Starbucks - these "Amaretti del Chiostro Autentici" claim to be the original almond cookie from the Cloister of Saronno, Italy. The two brands of cookie are similar in texture and ingredient list, although I will say that the Lazzaroni ones have a pronounced almond flavor (although neither almonds nor almond flavoring are on the list of ingredients).

Amaretti Autentici (bought from Starbucks) on the left
Lazzaroni Amaretti Cookie Snaps on the right
both: imported from Italy

A major ingredient in both is - surprisingly - apricot kernels! I would not hesitate to use either one, or a combination of the two, for this torte (this time I used the Lazzaroni). The key is to use 2.75 oz of the ground up cookie.

- I baked my torte for 26 min - it was, as Dorie describes it: dry, puffed up, and a bit cracked. When I tested for doneness, the knife deflated the cake and it ended up flat, and yes, very thin.


- And here's where I have a confession to make:
I knew that I wanted to freeze this cake, and that it would be easier to freeze without the ganache glaze on it. At the same time, I had a whole bowl of leftover ganache in the fridge from Sweet Melissa's Brooklyn Brownout Cake. Sooo, I cut a little slice of Dorie's torte, spooned a bit of Melissa's ganache on top of the slice, whipped up a bit of cream, and barely eked out a photo in the last light of the day. Then I tasted the cake slice and froze the rest unglazed.

- When I thaw this cake and serve it, I plan to make the glaze that is supposed to go with it - I promise! I really love Dorie's bittersweet-based ganache glazes (The one I used, Melissa's, is a semisweet-based ganache). I will come back to this post and update it with a full report on how the cake tastes with its intended finishing touches.

the verdict:

This is a slim and sophisticated European-type torte. I love the technique of using crushed cookies and almonds in place of flour in this torte, and I equally love that the whole thing can be made in a matter of, well, 16 minutes. As for the taste, the almond flavor really comes through, along with the slightly crunchy texture of the cookies and the nuts. There's plenty of chocolate richness, so a little piece packs a powerful flavor payoff.

If I had to choose just one slim chocolate cake/torte from Dorie's book I'd have to give the edge to the Chocolate Armagnac Cake (that I baked with Grand Marnier), but this almond torte is also a keeper. Its lovely elegance is impressive and its chocolate + almond flavor is memorable. The 16 minute preparation time is a bonus, and if the dishes did magically wash themselves, it would be the clear winner! (I actually typed that "the clean winner"!! Guess who still has a sinkful of dirty dishes from this cake?)

Thanks to Holly of Phe/MOM/enon- for choosing this week's delicious cake. If you'd like to bake this yourself, the recipe is on pages 276-277 of Dorie Greenspan's book Baking From My Home to Yours, or you can check out Holly's post where you will find the recipe online.

Sunday, January 11, 2009

Pasta All'Aglio e Olio

I've made this classic Roman dish, many times, from different cooks' recipes (but really, this is a simple pasta, so there's not a whole lot of difference how it's done). This time I thought I'd try Mark Bittman's Linguine with Garlic and Oil, from his book How to Cook Everything (a Christmas gift), and use his Fresh Herb variation. Here's his recipe which includes some of the variations, but not the one I chose, so here's the Fresh Herb variation: (from the book)

[you skip the parsley in the basic recipe, and] "When the garlic is done, toss in a mixture of 1 cup or more fresh herbs, whatever you have on hand.... The mixture will absorb all the oil, so, ... when you toss it with the pasta, be sure to add more oil or some of the pasta-cooking water. Garnish with more chopped herbs."

cook's notes:

- My olive oil of choice for this dish was a nice Spanish (shh!) one.

- I threw in a generous shake of hot pepper flakes. We love our food good and spicy. You can add as much or as little as you'd like.

- I chopped a scant cup of: basil, sage, oregano and thyme. About half was basil, with a tablespoon or so of each of the others. I didn't have time to chop any more herbs or I would have used a bit more, and would have saved some for garnish.

- My pasta was done just a few minutes before my oil+herbs so I stirred in some olive oil and some of the pasta water.

- Just before tossing the pasta into the oil and herbs, I added in some pre-toasted pine nuts (I keep these in my freezer). I contemplated adding some bacon lardons (I also keep these in my freezer) but decided that would be overkill. If you add untoasted pine nuts, put them in the pan and toast them before cooking the garlic.

- This recipe works with any pasta shape. I had some that I was dying to use, and this recipe was a perfect vehicle for it.

the verdict:

This was a really good weeknight dinner for us, combined with an arugula, tomato and parmesan salad. It would have been good with even more herbs, but I ran out of time to strip and chop them. The pine nuts were a great addition and the bacon a good omission.

Since blog cooking roundups seem to work for me, I'm going to try something new, and submit this dish to Presto Pasta Nights. This week's host is Ivy of Kopiaste. I've got to thank the creator of PPN, Ruth of Once Upon a Feast, who makes it all happen! To see some fantastic pasta dishes, hop over to Ivy's blog on Friday and view this week's Roundup.

Friday, January 9, 2009

TFF: Salt and Pepper Salmon

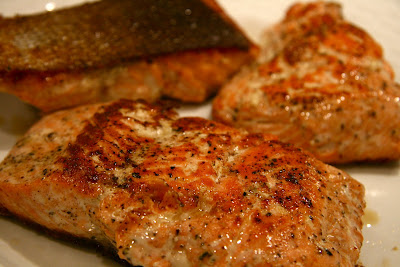
I'm almost embarrassed to post about this recipe for Salt and Pepper Salmon because it is dead easy, and took me 10 minutes start to finish. But I was thrilled to learn the technique, and the results, well, just read on!

cook's notes:

- If you have salmon, you have the ingredients you need for this recipe (salmon, salt, pepper, olive oil, and butter). I did an internet search for "Tyler Florence" and "salmon" and minutes later I was on my way. The most complicated thing was pulling out a few pinbones (well, OK, a lot of them).

- I used some wild-caught previously-frozen sockeye salmon.

- Tyler seems really big on getting the skin nice and crispy. None of us actually ate the skin, but it certainly scored high on the crisp-o-meter.

the verdict:

The three of us loved this fish and finished every morsel; not much left for the poor doggies. The salmon was beautiful in presentation and delicious in flavor. The oil and butter paired nicely and who knew salt and pepper could be the perfect way to season salmon?

This recipe is most definitely a keeper!

I've got to extol the virtues of Tyler Florence Fridays! It is the easiest cooking group ever - members each get to choose a recipe and can participate each week or not. We can even post on any day we choose - the TFF roundup is posted each Friday and if you've posted that week you're included. How cool is that? Very cool, I say, especially since Tyler Florence's recipes are scrumptious!

Sunday, January 4, 2009

Greens, Peas, Beans, and New Year's notes

We've received so many fabulous greens in our farm box, that I've been looking for ways to do them justice. I found this recipe for Sauteed Greens with Cannellini Beans and Garlic a Bon Appétit recipe on epicurious.com. It's quickly become my favorite way to enjoy greens. In the picture above, I've used kale and canned white beans, although I've also made it without any beans.

Here in the South, New Year's Day is traditionally celebrated with a meal of (collard) greens and (black eyed) peas. Of course black eyed peas are really a dried bean, so I figured this recipe was a perfect vehicle for luck in the New Year. On January 1, I made it with kale and some field peas that I'd cooked with lardons in the summer and frozen.

cook's notes:

- Kale is my favorite green for this recipe.

- I use half the amount of broth that the recipe specifies.

- I've made this recipe with and without the white beans, and it's good both ways.

the verdict:

We love this method of eating greens! The greens are just tender and the sherry vinegar adds a little bite to the garlicky oil that lightly coats the greens.

I think the dried beans are fantastic combined with the greens, but my husband prefers his greens in their unadorned glory. Actually, he probably prefers them boiled up and doused with Bruce's hot sauce, the way he ate them growing up!

2009:

In my forays in the foodie-net I've read lots of bloggy posts that celebrate the start of the new year. There are round-ups of the past year, resolutions for the new year, and cooking goals.

While I'm not organized enough to post a round-up, nor disciplined enough to make a list of resolutions, I do have a few cooking aspirations for 2009. The first is to take on yeast cookery. I'd also like to make some fresh pasta. My weekly cooking will probably included more lentils and dried beans. And I will continue to balance expanding my baking repertory without expanding my waistline!

Wednesday, November 26, 2008

{Simple Soup Supper} Busy Day Chicken Tortellini Soup


This hardly qualifies as a real recipe, but busy times call for dinners with shortcuts! The original inspiration for this soup was on a label of Swanson's chicken broth that I came across years ago, and have significantly embellished. Depending on whether I use homemade stock and chicken (as opposed to canned or cubes of stock, and a rotisserie chicken) and freshly chopped veggies and herbs, this can be a little or a lot better than a can of soup. In this busy week before Thanksgiving, a little simple soup really hit the spot, combined with some hot multigrain bread and a green salad.

Busy Day Chicken Tortellini Soup

1 T. olive oil

1 large carrot, sliced (about 3/4 cup)

1/3 cup celery, chopped

1/3 cup onion, chopped

1 tsp. minced garlic

1/4 tsp red pepper flakes

2 qt. chicken stock, homemade or purchased

1 cup (weight: 4 oz.) dried tortellini, such as Barilla (or 1 package frozen tortellini)

1 1/2 cups shredded cooked chicken

1-2 tsp. chopped fresh herbs, such as Italian parsley, oregano, or thyme (or 1/2 tsp dried)

1. Heat olive oil in large saucepan, and saute carrot, onion, and celery for 3 minutes.

2. Add garlic and red pepper flakes, and cook an additional minute.

3. Add chicken stock and bring to a boil over medium-high heat.

4. Reduce heat to medium, add tortellini, and simmer for 10-15 minutes until tortellini are cooked through and vegetables are tender. (If using frozen tortellini, follow the cooking time on the package, and let the veggies simmer in the stock for a few minutes before adding the tortellini.)

5. Stir in fresh herbs and chicken. Bring soup to a boil and serve.


{Note: I'm celebrating my first 100 blog posts with a cookbook giveaway - to enter, go here and leave a comment before December 3}

Thursday, October 16, 2008

{Make it Quick} Roasted Halibut with Sage

I have a nice little herb garden, and for some reason I tend to neglect using the sage. This year I've been cooking with it a lot more, which is great because my husband and I both love sage's flavor. So much so that now sage has become one of my culinary obsessions.

On Tuesday I bought some halibut (which sadly is about to go out of season). I visited with my friend Google to look for a recipe combining halibut and sage. I ended up with this recipe for Roasted Halibut with Sage, from a fish blog called "Beyond Salmon."

Sorry for this dismal picture - dinner was late and I had two seconds to shoot something!
cook's notes


-The recipe calls for duck fat, but allows for a butter substitution for those of us pathetic cooks who don't have a ready supply of duck fat in the fridge. I used olive oil for the first step and butter for the finishing of the sauce.

- I didn't have any pan juices after taking the fish out of the oven, but just put the butter and wine in the dry pan and smooshed the sage around in it.

- My fish pieces broke when I was trying to transfer them out of the pan.

- Cod, monkfish, or striped bass can be used in place of the halibut.

the verdict


This was a simple, quick, and delicious way to prepare halibut AND to use some of my homegrown sage. My husband and I both loved it. The subtle taste of the fish was front and center complemented nicely by the sage/wine/butter/salt/pepper.

Thursday, September 18, 2008

Make it Quick: 5 Minute Tomato Sauce


I love a good tomato sauce on pasta. The simpler the better. Earlier this year, I tried Delia Smith's sauce, made from fresh tomatoes. It is easy and delicious, but takes a lot of stove top simmering until it is done. A perfect cold weather recipe.

Cookbook author Heidi Swanson, of the vegetarian recipe blog 101 Cookbooks, makes some extravagant claims about the superiority of this recipe for tomato sauce. Not only that, she asserts that it can be thrown together in 5 minutes' time.

Cooking Notes:
1. My crushed tomatoes, Hunt's Organic, were more of a puree in consistency. I would have preferred a less smooth texture.
2. I had a hard time getting the olive oil to incorporate with the tomato.
3. I used the zest from a very small lemon, and it was enough.
4. My sauce had a generous measuring of red pepper flakes, probably closer to 2 tsp., and had quite a kick.
5. The recipe is very quick; with the measuring and chopping, I'd say it took me 10-12 minutes. Can be made while the pasta water is coming to a boil.
6. I'd recommend that you zest your lemon away from the sauce pan. If you drop the lemon in the sauce while zesting, the sauce will splatter all over your kitchen. Trust me on this one.

The Verdict:

This was a fantastic addition to my busy-day-dinner repertoire. I served it plain, over whole wheat spaghetti, with an arugula and parmesan salad and hot crusty Tuscan bread. My husband gives the sauce a 9 out of 10. I agree. Next time I will use crushed tomatoes with a more rustic texture.

I've frozen the remainder for future uses. mmm, food in the freezer is like money in the bank!

I can see why Heidi says this sauce "is the little black dress of my cooking repertoire." I will make it again and again, but I'm not sure it will completely supplant Delia's sauce (or my mother's tomato sauce recipe, for that matter). Also, I want to try Chez Pim's 15-Minute Tomato Sauce.