Tuesday, May 31, 2011

{TWD} Caramel Pots de Creme


It has been one day short of three months since we made Chocolate Pots de Creme for the Tuesdays With Dorie baking group. I must have been living under some sort of rock, because until that time pots de creme had been totally under my radar. After discovering the magic of pots de creme, however, I embarked, along with my partner-in-creme, daughter JDE, on a quest to try as many flavors of this creamy dessert as possible. And in the past few weeks, despite four out-of-town trips and weekly baking for TWD, we managed to try - and enjoy - two other pots de creme recipes (which will make an appearance in this space in due time.)

And that brings us to the excitement that is this week's Tuesdays With Dorie selection: Caramel Pots de Creme - an opportunity to try yet another flavor of luscious rich custardy heaven, while simultaneously crossing off another in the dwindling list of unbaked recipes in Dorie Greenspan's delightful book Baking: From My Home to Yours.

n.o.e.'s notes:

- This recipe calls for a couple of previously-tricky steps that I can now tackle with relative ease, although I'm not above holding my breath when making caramel, and I always, always keep a bowl of ice water on hand in case of molten sugar contact. That stuff burns wickedly.

- Some of the sugar in the recipe is caramelized and some is reserved in granulated form to be added to the eggs. I used golden palm sugar, which has a naturally caramel-like flavor, for the reserved sugar, and white sugar for making the caramel.

- Too late I realized that I should have added a pinch of salt to the recipe.

- I lowered the baking temperature to 285 degrees, and took the pots out of the oven in 33 minutes' time.

- The technique of sealing the pots + roasting pan they bake in with plastic wrap is very useful to know. The wrap doesn't melt at those low temperatures, and you can see through the plastic to check the jiggliness of the custard without uncovering it.

the verdict:

A full recipe of pots de creme is always welcome at our house, and this flavor variation was no exception. Eight teacups split between two people makes for a very nice math problem indeed!

These pots de cream were not quite as unctuous as others I've made. They were a tiny bit spongy when warm from the oven, and while they compacted when chilled, they didn't have the silkiness of the chocolate pots de creme we made in March. The flavor was excellent, however; a subtle, but unmistakeable smokiness of caramel in each creamy, rich spoonful.

Saturday, May 28, 2011

Summer Fruit Salad with Mint Sugar


While I know, and almanac.com confirms, that summer doesn't technically begin until June 21, I've always counted Memorial Day as the beginning of Summer. After all, don't the swimming pools open this weekend? Also it's the first day that it's appropriate to wear white, and nothing signals summer quite like a pair of white jeans (or shorts, if you happen to live in a place where it's just too darned hot to wear long jeans between Memorial Day and Labor Day.)

Holiday weekends are perfect for parties and eating out-of-doors. When we were invited to a picnic and asked to bring a side dish, I knew I wanted to use some of the beautiful fruit my fridge was harboring. This recipe for Summer Fruit Salad with Mint Sugar sounded like it would be pretty and tasty without being fussy and time-consuming to prepare.

n.o.e.'s notes:

- I found the recipe in my big yellow Gourmet Cookbook. This book, which I recommended in my Christmas cookbook post, is a serious goldmine of fantastic recipes. I've not hit on a dud yet, including the three that I've prepared in the past few days. If you don't have the cookbook, you can find the recipe here.

- The cookbook cautions, "simplicity is the key to a successful fruit salad, so don't yield to the impulse to include every fruit you see on your cruise through the produce section." The recipe mentions grapes, sweet cherries and peaches. Although I had cherries, I didn't end up using them because I had four other fruits begging to be included - strawberries, grapes, blueberries and cantaloupe - and I didn't want to push my luck.

- The mint sugar is simple to throw together in a mini-food processor, and then it's sprinkled on the cut and mixed fruit. Voila! A finished dish in minutes.

the verdict:

This salad was lovely and quite refreshing as a side dish at a cookout on a very warm (euphemism for very hot) day. The mint gave the fruit an extra kick of flavor and brightness, not to mention a pretty green color note.

Tuesday, May 24, 2011

{TWD} Nutmeg Oatmeal Scones

Thanks to my daughter for taking these lovely photos for my blog post!

Is there any baked good as well-mannered as a scone? Scones conjure up images of pinky-raised cream teas, where they display their good breeding on silver platters. But their manners really shine when they effortlessly fit into other, more humble settings. Scones are also graciously quite at home at everyday breakfasts and quick snacks on the run.

In the case of this week's recipe for the Tuesdays With Dorie baking group, Oatmeal Nutmeg Scones, we enjoyed them in varying degrees of formality. We baked them on a well-worn baking sheet in the oven of a salvaged gas range, then plated them on some china that was hand-painted by my daughters' great-grandmother, and finally, tucked the leftovers into brown paper bags to be eaten at lunch on the job.

n.o.e.'s notes:

- This week's hostess is Patricia from Life with a Whisk; you can find the recipe on her scones post. Thanks for choosing this recipe, Patricia; I bookmarked it months ago and am very glad to finally have the opportunity to try the scones.

- I baked these for breakfast when I was visiting my daughter ALE in Buffalo. I measured the dry ingredients the evening before and left them on the counter, covered with a serving plate. I also put the butter in the freezer for an overnight chill. The next morning, all I had to do was add an egg, some buttermilk – actually, yogurt in my case – and grate the butter.

- The dough didn’t come together as quickly as I hoped it would, and I had to knead it quite a bit. I worried that the scones would be tough, but luckily they weren't.

- This batch of scones was the first time I've strayed from Dorie’s scone directions. Her method is to divide the batter into two discs, then cut each into six portions, producing twelve dainty scones. This time I decided to experiment a bit. I formed just one disc from the dough, and cut six large wedges, separating them slightly before baking.

- I brushed the tops with milk then sprinkled with nutmeg before popping them in the oven.

the verdict:

We ate these scones warm from the oven, and they were delicious with butter and/or jam. I like these the best of any scones I've baked. They are hearty without being heavy, yet still moist and tender. The nutmeg had an opportunity to shine in its solo spice role, and provided a delicate spicy warmth.

The scones were a big hit with the housemates at breakfast, and I hope they were just as good when pulled out of lunchbags a few hours later.

Thursday, May 19, 2011

Pea Shoot Spring Salad


There are certain ingredients whose appearance in Spring is so fleeting, and whose flavor is so delicate, that they beg to be prepared in ways that allow them to show their charms before they are gone for another year. I love it when I can find pea shoots, either at the market or in my farm box, and I devised this simple salad to showcase their flavor.

n.o.e.'s notes:

- First I wash and dry the pea shoots, then divide them among my salad plates. Over the top I arrange sliced spring onions, toasted walnuts, sliced tiny radishes, chopped cucumbers, and crumbled soft goat cheese.

- I dress the salad with a simple vinaigrette:
Whisk together 3 Tablespoons of walnut oil, 1 Tablespoon of white wine vinegar, a dab of prepared mustard, salt, pepper.

the verdict:

To me, this salad is the essence of Spring! I happily return to it again and again as long as pea shoots are available.

Tuesday, May 17, 2011

{TWD} Maple Cornmeal Drop Biscuits

IMG_2453

I'm busy this week dashing to and fro, so this post will be short and sweet. Which is perfect because these biscuits were exactly the same: quick to throw together, and just sweet enough to make me feel that I was eating something a little bit special.

n.o.e.'s notes:

- This week Lindsay from A Little Something...Sweet chose the recipes for the Tuesdays With Dorie members to bake. If you'd have a couple of minutes available for baking, and would like to try these biscuits, you can find the recipe on her post.

- I made 1/4 recipe and ended up with 3 biscuits.

- The recipe honestly could not be easier. The biscuits have both flour and cornmeal, and maple syrup provides the sole sweetener.

- I followed a tip from Caitlin of Engineerbaker and grated frozen butter into my dough and it worked perfectly - the butter gets mixed into the flour without working the dough too much.


IMG_2459

the verdict:

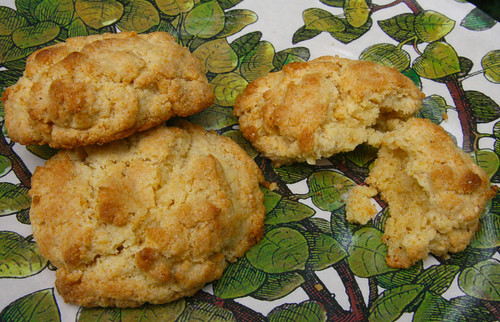
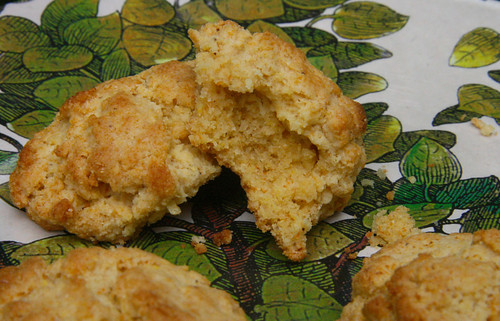
The biscuits were lovely and moist inside but a little bit crumbly. We liked the crispy outside edges and the little crunch of the cornmeal. The maple flavor added wonderful flavor.

Tuesday, May 10, 2011

[TWD} Pecan Brown Sugar Bundt Cake

IMG_2395 - Version 2


Being one among a couple of hundred members of the Tuesdays With Dorie baking group has shown me the seemingly infinite variation among bakers, particularly when it comes to recipes preferred by the group's members. Case in point: the recipe that appealed to me most when I first opened my copy of Dorie Greenspan 's Baking: From My Home to Yours - the Swedish Visiting Cake - was still available for me to choose when my hosting turn rolled around, more than 2 years after the group started. Another example: when my daughter JDE bought Dorie's book three years ago, the Brown Sugar Bundt Cake was one of the first recipes she baked, but it wasn't chosen for the group until this week; more than 150 recipes were chosen ahead of it!

A testament to the quality and depth of this book is that these recipes that we are baking in the group's final year, far from being "dregs," are producing some of the tastiest baked goods to date!

n.o.e.'s notes:

- Peggy, of the blog Pantry Revisited, is this week's hostess; you can find the recipe on her blog post. I love reading Peggy's blog because she is always cooking up something fun in her kitchen. Besides, we Southern bloggers need to stick together, right?

- JDE joined me in the kitchen and we baked the bundt together. We made half recipe in a small pudding mold/tube cake pan.

- As written, the recipe calls for adding pieces of pear and chopped prunes to the batter. The ever-helpful Dorie suggests that apples would be a good substitute for the pears and any kind of dried fruit could stand in for prunes. Dorie gives a further option for making a nutty brown sugar bundt cake, and because I love pecans with brown sugar I decided to go that direction and bake a super-pecan bundt. I used King Arthur Flour's Pecan Meal in place of some of the all-purpose flour, substituted 2 oz of pecan oil (which I had bought a couple of months ago when I visited B&B Pecans in Fairhope, AL) for 2 oz of the butter, and stirred in a generous handful of deeply-toasted pecans (also from B&B Pecans). I also added some teensy currants. The flavorings were almond and vanilla extracts.

- The brown sugar I used was pretty dark, but I'm never one to object to a more intense brown sugar flavor.

- The cake crumbled when I sliced it, but I think that might be because I cut into it before it was completely cooled. It definitely was not a dry cake.

the verdict:

This cake was delicious, very moist and nutty with a distinctive flavor of brown sugar. I thought it was great plain but I certainly wouldn't argue with a little whipped cream on top. As much as we enjoyed it the first evening, warm from the oven - and we did enjoy it, each of us going back for second helpings! - it was even better the next day when the flavors had a chance to settle and combine. The pecan version was delicious, but I'm betting the cake would be equally good with walnuts and walnut oil.

Sunday, May 8, 2011

Mama's Angel Food Cake for Mother's Day


From the title of this post, you'd be justified in assuming that I baked my mother's recipe for angel food cake. But you'd be mistaken - or more accurately, misled. This cake is from Virginia Willis' own Mama, and knowing what a great baker Virginia is, I was excited to try her mother's recipe: Mama's Angel Food Cake.

I baked it in the angel food cake pan that was my own mother's, and her mother's before that. All in all, it seemed a perfect way to celebrate Mother's Day!


n.o.e.'s notes:

- You can find the recipe here -

- Angel food cake is a great way to use up a lot of egg whites. The recipe calls for 12 whites; I always have extra egg whites from all of the ice cream that I make (ice cream base usually uses yolks) For this cake I pulled a bunch of egg whites out of the freezer. I used 360 total grams of egg white (my general rule of thumb is that each egg white weighs 30 grams)

- The accompanying Bourbon Creme Anglaise - recipe here - on the other hand, uses yolks only. I didn't want to orphan more whites than absolutely necessary, so I made half recipe (3 yolks) of the creme anglaise. It turned out to be plenty for the whole cake.

- The cake directions are clear and the cake came together exactly as described.

- Angel food cakes are baked in ungreased pans, presumably so that the cake can cling to the sides as it rises. My America's Test Kitchen Family Cookbook gives a great hint to line the bottom of the pan with parchment paper. My grandmother's pan has a decorative ridged bottom, however, so I couldn't put parchment there. I was a little nervous about whether the cake would release after it baked.

- In addition to the ridges on the bottom, my grandmother's cake pan has faceted sides and is shallower than many other angel food cake pans. I suspected that it might not hold a full recipe of cake batter, so I had a small loaf pan handy for possible leftover batter. I ended up putting nearly two cups of cake batter into the loaf pan.

- As the cake baked, it rose and filled the pan completely. Once the cake comes out of the oven it is supposed to cool in the pan - in an inverted position - for approximately two hours. One way to keep the pan inverted is to rest the pan on a wine bottle. The center post of my cake pan was not the right size to fit around a wine bottle. But the post was about an inch taller than the rest of the pan, so I could balance the pan upside down on my counter, with none of the cake touching the counter.

- When the time came to unmold the cake, I loosened the cake's edges with a plastic knife and held my breath. The cake did release, but the browned edges of the cake stayed in the pan. It was still quite pretty to me, with its snow white crumb showing. I'm wondering if I should grease the bottom of the pan the next time I bake this cake.


the verdict:

I served the cake at a family Kentucky Derby/Mother's Day gathering. All nine of us loved it! It was definitely the best angel food cake that any of us had ever tasted. There was no hint of dryness in this cake; it was impossibly tender, soft and moist, with the most delicate vanilla flavor. I loved seeing the little vanilla beans speckling the cake's crumb.

The creme anglaise was a perfect complement to the cake, with just a whisper of bourbon (so appropriate for the Derby!) The combination was, as I said at the time, "swoon-worthy"! I've never really cared much about angel food cake, but this one had me coming back for seconds and looking forward to leftovers.

Tuesday, May 3, 2011

{TWD} Black & White Chocolate Peppermint Marble Loaf

IMG_2355 - Version 2


Marble Cake. I was very excited that the Basic Marbled Loaf Cake was chosen as one of May's recipes for the Tuesdays With Dorie baking group. The best part about making a marbled cake: the marbling itself provides endless opportunities for amusement, entirely apart from the merits of the actual cake! It's fun to assemble the cake, but the real adventure comes after the cake is cooled. Then it's time to cut it and see the actual marbling pattern. Each slice shows a different design, so the fun continues until the cake is gone.

My first marbling experience was in the summerof 2008, the third recipe I baked after joining TWD. Learning cool new techniques and enjoying the delicious results has been the hallmark of my three years with the group. The only marbling I'd done in the meanwhile was a botched attempt at some marbled dinner rolls, so I was ready for another try.

n.o.e.'s notes:

- The recipe was chosen for the group this week by Carol from the blog The Bake More. Her marble cake post has the recipe, if you'd like to give it a swirl.

- Dorie sets up the recipe in a way that requires us to select a flavor/color combination. The basic recipe is just that: basic, and it gives no flavors. Instead, Dorie lists several possible choices, and encourages flavor experiments.

- So before I could even start to make this cake, I needed to choose flavors for my two halves of the batter. I was very very tempted to make Dorie's cardamom + coffee variation but I had already baked a marbled coffee loaf with my first TWD marbling experience.

- I love the look of a classic black and white marble loaf. But with all that leeway to play around I didn't want to bake a simple chocolate + vanilla version. I looked at the suggested variations and saw one for chocolate and peppermint. One half of the batter is made with bittersweet chocolate and the other half has both white chocolate and peppermint extract. I actually don't care for peppermint baked goods and also dislike white chocolate, so this gave me a moment's pause. But I was baking this for an eventual book group meeting and many people aren't as unreasonably picky about mint and/or white chocolate as I am. My buddy Mike baked this cake a few days before I did and his tweets raved about the delicious peppermint taste, so that sealed the deal for me. I had (unopened) peppermint extract in the cupboard and a lot of white chocolate on hand, so there was even more reason to choose that option!

- For the white chocolate/peppermint half of the batter, I used up a bunch of bits of white chocolate of various brands: Guittard, Ghiradelli, and Callebaut.

- My biggest objection to white chocolate is its cloying sweetness, so to make up for the extra sweetness from the white chocolate, I cut the quantity of sugar in the cake batter ever so slightly.

- I baked my loaf in my favorite vintage long slim loaf pan. I stumbled upon a cache of these pans and have sent them to several of my baking buddies. From what I hear, a number of them used their pans for this week's recipe.

- With this flavor variation, Dorie advises us to marble sparingly so that the peppermint flavor of the light batter doesn't get muddled with the dark flavor. I layered the two batters carefully and very gingerly sliced a knife through them.

- The loaf rose well in the oven, rising above the rim of the pan.

- My loaf seemed to take forever to bake, even in this thinner loaf pan, which is usually much quicker than regular pans. The light part of the cake kept testing liquid.

- I baked this cake just as I was heading out of town for a week, so once the cake cooled, I just sliced off the end and wrapped the rest and tucked it into the freezer.

the verdict:

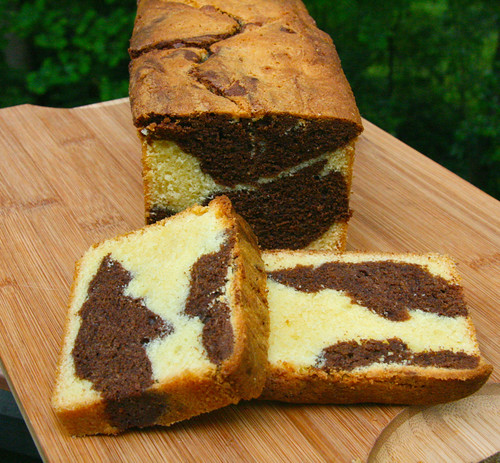
It's always an adventure cutting into a marbled cake - you never know what patterns will emerge. In this case, because I marbled the cake so timidly, the resulting pattern wasn't very pretty.

I was surprised at how much I liked this cake. The white chocolate taste pretty much disappeared and the peppermint was present but not brash. The cake had a tight and even crumb. My biggest quibble is that the piece I sliced from the end was a bit dry. The flavor was excellent, though, and I'm hoping that when I pull it from the freezer we will find that the inner pieces of cake are moister. At any rate, it will be delicious with a mint ice cream or mint-infused whipped cream.