Pages
▼
Sunday, November 29, 2009
Split Personality Sweet Potato Casserole
In any large group of people gathered to share Thanksgiving dinner there are those who like their sweet potato casserole topped with marshmallows and those who prefer nuts and brown sugar. Last November I found a recipe that provides the perfect solution to the sweet potato divide: a casserole with a half-and-half topping, one side marshmallow, the other nuts. I prepared a different sweet potato dish last year for our very small Thanksgiving meal, but this year our Thanksgiving dinner included people from three different families, so I gave the recipe a test drive and everyone was happy with one side or the other of this side dish.
n.o.e.'s notes:
- You can find the recipe on Saveur's site, by clicking here.
- This is a great make-ahead dish - the sweet potato mixture can be prepared a few days in advance. The nut topping can also be made early and refrigerated until time to assemble and bake the casserole.
- I used mostly fresh sweet potatoes which I braised in a covered pan with a bit of water and butter on the stove top until tender. I didn't have quite enough sweet potatoes so I supplemented with a can of mashed sweet potatoes (the most convenient thing ever!)
- After I mixed the sweet potatoes with the other ingredients, I gave a little taste. The filling was not very sweet at all, so, very unusual for me, I actually added sugar (3 T brown sugar)
- I've never seen cashews as a sweet potato topping - pecans are much more common in these parts - but I decided to give them a try.
- At first the amount of marshmallows seemed meager compared to piled-up nut topping on the other side of the baking dish, so I added more. I later realized that the marshmallows puff up in the oven. My brother's family doesn't eat red meat, so I used the natural fish-gelatin marshmallows from Whole Foods. They got a little dry and hard in the oven, but softened up once I covered the casserole with foil to keep it warm.
the verdict:
This casserole was absolutely adorable on the Thanksgiving buffet, and proved to be quite a hit. I can report that the marshmallow side disappeared faster than the nut one (all of the children present opted for the marshmallow part, in fact some of them opted for only the marshmallows and no sweet potatoes at all!)
I loved that this recipe is far less rich than others I've made - the relatively low amounts of butter and sugar in the sweet potatoes was balance nicely by the sweetness of both toppings. In fact, I really didn't need to have added the extra bit of brown sugar.
I'm sure that this split personality sweet potato dish will become a regular offering on my Thanksgiving table.
Tuesday, November 24, 2009
{TWD} Variations on Chestnut Cake
Back in October when I saw that this month's assigned recipes for the Tuesdays With Dorie baking group included the Chocolate Caramel Chestnut Cake, I took a sharp breath. The cake as pictured in Dorie Greenspan's book, Baking: From My Home to Yours is a show-stopper: elegant, square, perfectly smooth, and topped with gilded chestnuts. It looked challenging, and reading the recipe confirmed that impression. The cake comprises 4 elements - cake layers, a boozy syrup, a caramel ganache, and a dark chocolate glaze - and incorporates ingredients such as vanilla chestnut puree (imported from France), jarred chestnuts (imported from Italy), and gold dust (edible gold dust, to boot!)
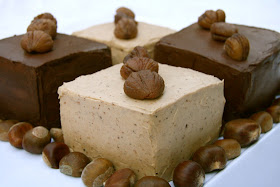
If I was going to bake a cake so luxurious and complex (and I was), I wanted to bake it exactly as Dorie wrote the recipe. At the same time I wanted my husband to be able to enjoy this confection, and he's allergic to chocolate. The cake layers have no chocolate, so I decided to bake a full recipe, frosting half with chocolate and the other half with a non-chocolate frosting. And finally, while the brandy syrup sounded delicious, I also wanted to try a non-alcoholic syrup. My solution? Cut the larger cake's layers into 4 smaller squares, assembling them them with and without chocolate, with and without brandy.
n.o.e.'s notes:
- I'm not going to detail all of the crazy calculations and steps I took to produce the 4 little cakes. But I made 6 different elements (and wish I'd made a 7th!) and managed to put the cakes together without any errors. Decorated cakes are a real challenge for me, but I was happy with how my little cakes looked.
- I baked a full recipe of the cake in a new deep square pan with a removable bottom. It was a 9" pan - or so it clearly indicated - see the picture, below. After I baked the cake I realized that despite the label on the pan it actually measured exactly 8"! Luckily it was deep and the batter did not overflow the pan, although it rose quite high and took eons longer to cook. In the end, the taller cake was much easier to split into layers (I cut the big square cake into 4 smaller squares, then split each quarter horizontally to make three layers. The cake baked fairly nice and flat, although after frosting the first cake I realized I should to trim the layers for the other three cakes a tiny bit so they'd be more level.
- Because of the way I cut up my cakes, I needed nearly as much chocolate frosting for two quarter-cakes as I would have for a single whole cake. (This also means that I had a higher frosting-to-cake ratio for each slice.) I made 2/3 recipe of the ganache, and 3/4 recipe of the glaze.
- For the caramel ganache, instead of putting the cinnamon stick in with the caramelizing sugar, I followed a tip from the P&Q, and heated the cream and steeped cinnamon stick in it. I got the cinnamon flavor, but didn't have to deal with the stick. Also adding warm cream helped with making the caramel, as did adding a few drops of lemon juice after caramelizing and before cream. I was very relieved that the caramel turned out!
- I mixed up the brandy syrup for two of my little cakes. For the other two, I thinned some chestnut honey with water to make a syrup of the same consistency as the brandy one.
- I wasn't able to locate the edible gold, so my chestnuts are un-gilded. Luckily this was an optional ingredient
- Somehow the bittersweet chocolate glaze got a shade past pourable and ended up at spreadable.
- To frost the non-chocolate versions of the cake, I mixed 6 ounces of softened cream cheese, 10 ounces of mascarpone, and 6 ounces of the leftover vanilla chestnut cream with 1/4 cup confectioner's sugar. It made a lovely soft coffee-colored frosting with a bit of tang and a hint of chestnut. There wasn't a ton of frosting, and I hoped it would stretch for the two little cakes.
- It was only in retrospect that I realized that I should have made extra caramel to use as filling for the non-chocolate cakes. It would have saved the scarce frosting for the outside of the cakes (and the flavor would have been fantastic with the other elements of the cake). As it turned out, I had enough frosting to fill and frost the two little cakes, but just barely. The frosting layers were mighty thin, as you can see in the photo of the slice of cake, below.
the verdict:
Gilded chestnuts would have been very fun, but as it was, the cake was quite striking, almost as striking as the picture of the cake on p. 269 of Dorie's book. I served it to book group, and as the members of the group arrived last Thursday and walked into the kitchen they stopped in their tracks when they saw the cake gracing the center of my kitchen island. They were very reluctant to dig in, and kept asking me if I had made sure to photograph the cakes.
Most of my tasters thought the chocolate caramel version was very good - "near great" - layer cake. (One member is not a chestnut fan, so he chose vanilla ice cream rather than the cake.) The chestnut cream gave the cake layers a wonderful woodsy richness. The cake was dense and although the medium brown color kept making me think it would be dry, it really was plenty moist. The cake kept beautifully in the fridge for several days.
One tester, HY, said, "It's good, but some of the other chocolate desserts you've made are better." I think she's right - the 15 minute magic chocolate torte, the chocolate armagnac cake, the caramel chocolate tart are better (and, I might add, a LOT less work). Although, to be fair to this cake, it isn't chocolate, but has chocolate frosting
The non-chocolate cake was well received. One taster, AF (who usually loves chocolate), actually preferred it. My husband loved it, cutting himself two generous pieces. Another taster thought it was too plain. One tester suggested adding another element, and I agree. I think if I'd done a caramel filling it would have been delicious with the mascarpone/chestnut frosting. I was a little proud at how the frosting turned out (since it was my concoction!)
As for the different syrups, I'm sorry to report that I didn't find either one detectable in the finished cake, so there wasn't an appreciable difference between the brandy and the honey versions of the cakes.
Overall I'm very glad that I baked the cake. It's a seasonal and sophisticated take on a layer cake, and I was happy that my cake turned out successfully. But given all the time required to bake it, I'll be unlikely to reach for this recipe again.
This seasonal cake was chosen by Katya of Second Dinner. You can find the recipe on her post. I loved reading about her love for chestnuts and her excitement to be able to choose this recipe.
Saturday, November 21, 2009
Sweet Potato Black Bean Salad
Ah, Fall! Thank you for the abundance of orange foods - pumpkins, butternut squash, sweet potatoes - and a plethora of ways to enjoy them. Sweet potatoes are most commonly prepared to emphasize their sweetness, with added brown sugar and cinnamon, but they can be fantastic in a spicy, savory dish, such as Mark Bittman's Sweet Potato Black Bean Salad.
n.o.e.'s notes:
- I didn't have red bell pepper, so used an orange one. It tasted the same, but wasn't as pretty.
- To amp up the heat, I threw in some additional chopped hot peppers.
- Just in case we might find the citrus overwhelming, I added half the lime juice.
- This versatile dish can be served warm or cold
the verdict:
I had high hopes for this salad, and it met and exceeded them! Despite the extra peppers that I added, there wasn't a ton of heat in this dish, but it was flavorful and delicious. I love that it can be served at any temperature, and can serve as a filling lunch or a side dish at Thanksgiving.
Tuesday, November 17, 2009
{TWD} All-in-One Holiday Bundt Cake
November is the month for giving thanks, and I'm thankful that we have permission to post the November Tuesdays With Dorie recipes in any order, and I have another week to get the time-intensive Chocolate Caramel Chestnut Cake baked! The recipe that I'm posting this week is the All in One Holiday Bundt Cake.
When I saw this recipe I was skeptical. I don't have a very good history with Dorie's hybrid desserts, especially where pumpkin and/or spices are concerned. (Last Thanksgiving's Twofer Pie (Pumpkin + Pecan) and the Chocolate Gingerbread were not successful combinations in my opinion.) I hoped that the cranberries and apples (and pecans) in this recipe would give the underlying pumpkin cake an interesting twist, but I worried that it would be a hodge-podge of disparate flavors from the multiple ingredients.
n.o.e.'s notes:
- For once I used the full amount of all-purpose flour, without adding any whole grain flour! I figured that I was making enough adjustments to the recipe as it was.
- Cranberry bread/cake is one of Winter's little joys, and the more cranberries the better. I didn't want insipid widely-scattered cranberries, so I increased the quantity of cranberries to 1 1/3 cups. I correspondingly I decreased the amount of apple (I used 1 cup of apple, which is equivalent to a medium apple rather than the recipe's specified large one)
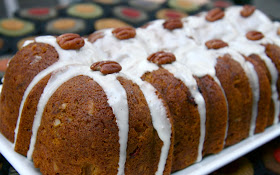
- Although you really can't tell from the pictures, I cut the cranberrries in half (while they were still frozen) rather than chopping them. That's what we did with the cranberries in our cranberry bread when I was growing up, and I love the way they look.
- To build a little intensity in the cake I increased all the spices by half, except the fresh-ground nutmeg, which I mistakenly tripled. Instead of light brown sugar, I used the dark stuff.
- I substituted light tasting olive oil for 2 tablespoons of the butter.
- My bundt loaf pan is 10 cup capacity, and it was the perfect size for this recipe. I spooned a bit of the batter into a single silicone cupcake mold and baked it so that I could have a taste without cutting into the big cake.
- The bottom of the cake got a little soft after the first day or so, probably from the moisture of the apples. I think that if I were to bake this cake again that I'd decrease the quantity of apple a bit more - or maybe use dried apples - and definitely increase the cranberries.
the verdict:
Upon tasting the little cupcake, my first reaction was that it needed more salt. Then I realized that I had forgotten to put any salt in the cake at all.
Despite my apprehension, I found this to be a lovely cake. the combination works surprisingly well. The apple transforms the cake into a whole new dessert - sweet and tart, fresh and spiced - with all the different flavors contributing to the whole rather than fighting with each other. I loved the cranberries the most, and was very glad I'd increased the amount. In fact, I wish there were even more cranberries! The maple glaze dressed up the appearance of the cake, and had a nice flavor, but I wouldn't say it was necessary.
I brought the cake to a neighborhood supper club and it held its own next to a store-bought cheesecake and a store-bought caramel layer cake. (Our street has been meeting for supper club for 20 years, and I don't remember ever seeing store-bought desserts, but I will spare you an extended rant.)
And now I have a confession to make, something that wouldn't have crossed my mine before I started food blogging: I brought the cake over whole, figuring that there would be a lot of cake left over (this is a bundt cake after all, and can serve a ton of people - there are always leftovers!) and I could photograph a slice the next day. When dessert time arrived, I saw that the hostess had cut up the entire huge cake into small pieces. My first thought was: "Oh, no! What am I going to do about my pictures?" All was forgiven when she - and her sons - loved the cake and were excited to keep half the leftovers. The next day I put some of the little half slices on a plate, and took pictures, which were just fine.
Thanks to Britin of The Nitty Britty for choosing this lovely All in One Holiday Bundt Cake on pages 186 and 187 of of Dorie Greenspan's book, Baking: From My Home to Yours. The recipe is up on Britin's blog - click here - and on November 24, she will have her own bundt cake posted on her blog.
Sunday, November 15, 2009
Blackberry Jam Bundt Cake
Today is National Bundt (Pan) Day!
I often find out about daily food themes on the actual day itself (if you follow @Foodimentary on Twitter you can also) but at that point it's too late for me to do a tie-in post on my blog. This time, however, not only do I know it's National Bundt Day, I baked a bundt cake, photographed it, and am posting it on the day! I certainly cannot take credit for this massive level of organization; I owe it all to The Food Librarian.
To say that Mary (that's the Food Librarian's real name) is obsessed with bundts would be an understatement. She has featured many beautiful bundt cakes in the past, and back in August when it was her turn to choose a recipe for the Tuesdays With Dorie baking group, Mary of course chose a bundt - the first one ever picked for TWD. That was the fabulous Classic Banana Bundt, definitley the best bundt I've ever baked.
But all of Mary's past bundt cake love pales in the face of her most recent project. She has just completed a 30 day marathon of bundt cake baking and posting, culminating today with her National Bundt Day wrapup/summary post. Mary called her project "I Like Big Bundts."
In theory I like big bundts too. But therein lies the problem. Bundts are big. A bundt recipe make a whole lot of cake. Countless slices can be hewn from one massive ring of cake and hardly make a dent. (Luckily, most bundts freeze well, so you can spring the same cake on your unsuspecting friends and family in the future.)
An alternative approach to the big bundt cake is to bake a big quantity of smaller cakes. Most of the time when I bake a bundt recipe, I use 2 loaf pans, or a bunch of mini-loaves. When you split a batch of cake batter, you have enough for every mood and occasion:
I found the recipe for this Blackberry Jam Cake in Nick Malgieri's The Modern Baker. Although I've had the book for six months this is the first recipe I've baked from it. Malgieri based this cake on American recipes that were more than a century old.
n.o.e.'s notes:
- The recipe as I baked it at the end of this post.
- Apparently some of the old blackberry jam cake recipes used cocoa powder and some did not. I was baking the cakes for a variety of people, a few of whom cannot eat chocolate, so I made the cakes both with and without cocoa powder. Similarly, I skipped the nuts in some of the cakes. I won't go into all of the calculations and variables to assemble the correct amount of batter with the correct types of ingredients for the correct pan sizes, but I managed to pull it off without an errors.
- Malgieri introduced me to a cool technique to keep molded cakes from sticking to the pan: butter the pan, dust it with fine dry bread crumbs, then spray the crumbs with cooking spray. I made my own crumbs from pound cake and corn muffin remnants which I dried in oven then processed in a mini food processor. When I coated the pan with the crumbs, the layer was not precisely even. Since the crumbs were lighter in color than the cake my finished cakes looked a little mottled. Nothing a dusting of confectioner's sugar or a glaze wouldn't fix.
- Even though my raisins were brand new, they were not soft so I plumped them in some hot apple cider.
- I used full amount of butter although I was very tempted to substitute some plain yogurt, or even some extra-light olive oil.
- Jam is very sweet, and I didn't want the finished cake to be too sweet, so I cut the sugar by a tiny bit. I would cut more next time.
- I used my batter to make a 6-cup round fluted cake (served to my book group), two 2-cup mini bundt loaves (gave to two friends) and 6 airplane-shaped small cakes (for my husband who loves planes.)
- I used a kugelhopf pan for the round cake, which I thought was appropriate because apparently the bundt pan is an American descendant of European kugelhopf pans.
- The cake would have been very pretty with a glaze but I knew that the cake was sweet enough without it.
the verdict:
This cake tastes fantastic - a little bit spicy, a little hint of fruitiness, nice and moist with a soft crumb. Although it had a tendency to crumble (especially when it was warm) it wasn't at all dry. The cake was a bit on the sweet side, so I think I'd reduce the sugar even more the next time. I like nuts and raisins in baked goods, but I think this cake would be great without them - a lovely fruity spice cake.
I liked the airplanes the best - the edges of the wings were nice and chewy. Also, these didn't have cocoa, so the blackberry flavor was clearer. My husband loved the airplane shape and really enjoyed eating them for breakfast with coffee.
My book group liked the cake too, and were happy to split the leftovers. One of them, H, suggested that a tart lemon glaze would be a great counterpoint to the sweetness of the cake. I mailed the small bundt loaves to two friends. One of them, W, said it was "yummy!" and the other told me she enjoyed it with ice cream and warm blackberry sauce - now there's a great idea!
For more bundt-y goodness, check out 8 very tempting bundts from The Kitchn.
the recipe:
Blackberry Jam Cake
adapted from Nick Malgieri’s The Modern Baker
Makes one 10-inch tube cake, about 24 slices
Ingredients:
1 1/2 cups all-purpose flour
1 1/2 cups white whole wheat flour (recipe called for 3 cups all-purpose)
2 tbsp alkalized (Dutch process) cocoa (I omitted in some of my cakes; added equivalent amount of flour)
2 tsp ground allspice
2 tsp ground cinnamon
1 tsp baking soda
16 tbsp (2 sticks) unsalted butter, softened
1 3/4 cups sugar (recipe called for 2 cups)
4 large eggs
1 cup dark raisins
1 cup chopped walnuts or pecans (I omitted in one small bundt loaf)
1 cup buttermilk
1 cup seedless blackberry jam,
One 12-cup tube or Bundt pan, buttered, coated with fine, dry breadcrumbs, and sprayed with vegetable oil cooking spray
Directions:
Set a rack in the lower third of the oven and preheat to 350℉.
For the cake batter, stir together the flour, cocoa, spices, and baking soda; set aside.
Beat the butter and sugar with the paddle on medium speed until light, about 5 minutes.
Beat in the eggs, one at a time, beating smooth after each addition.
Remove two tablespoons of the flour mixture and toss it with the raisins and walnuts to coat.
Beat in 1/3 of the flour mixture on lowest speed. Stop and scrape down the bowl and beat, then beat in half of the buttermilk. Beat in half of the remaining flour mixture. Beat in half of the remaining buttermilk, followed by the remaining flour mixture. Finally, beat in the jam, and then the raisins and walnuts.
Use a large rubber spatula to give a final stir to the batter, then scrape it into the prepared pan.
Bake the cake until it is well-risen and firm, and a toothpick inserted between the side of the pan and the central tube emerges dry, about an hour.
Cool the cake in the pan for 15 minutes, then unmold onto a rack to cool.
Storage: Wrap the cooled cake in plastic wrap and keep it at room temperature. Freeze for longer storage. Defrost the cake and bring it to room temperature before serving.
Friday, November 13, 2009
"Exactly As Written": Thomas Keller's Chocolate Chip Cookies and an Ad Hoc At Home Giveaway!
"Exactly As Written"
That approach to trying new recipes is very appealing, especially in theory - how else can you know how good a recipe truly is? For various (I think good) reasons however, in practice I often change recipes the first time I prepare them. But when on the hunt for the perfect chocolate chip cookie recipe, I'm not likely to stray from the recipe. Especially when the recipe's author is Thomas Keller.
I've been eagerly anticipating the release of Thomas Keller's cookbook Ad Hoc at Home. His other books, notably The French Laundry Cookbook and Bouchon, while beautiful and undoubtedly filled with amazing recipes, are a little beyond my culinary reach. But Ad Hoc, the restaurant Keller opened to celebrate home-style and home-y food, seems a lot more accessible and I was hoping the cookbook would be as well.
My copy of Ad Hoc at Home arrived on my doorstep this week, and my intentions to save it for Christmas lasted about a nano-second. Before I knew it, the shrink wrap was off of the book and - oh, my! - what beautiful photography and delicious sounding recipes are inside the book.
It seemed easiest to start with a cookie. And what cookie is more iconic than a homemade chocolate chip cookie? Keller's recipe has some interesting twists, and I went into the baking session with the intention of following the recipe to the letter. I wanted to see what the Keller touches would produce. "How refreshing," I said to myself, "to be able to say, for once, that I made the cookies 'Exactly As Written'."
n.o.e.'s notes:
- You can find the recipe for the Ad Hoc Chocolate Chip Cookies here.
- The recipe calls for two different kinds of chocolate, one sweeter and one more intense: 55% (a semi sweet) and 70-72% (a bittersweet). In an attempt to meet the letter of the law, I visited a couple of stores to locate just the proper chocolate. Finding the 70% was simple, but I did have to settle for 54% rather than 55%.
- The recipe calls for "molasses sugar", and I'm pretty sure that's the same thing as dark muscovado sugar, which is readily available, if not exactly common.
- Keller's directions provide for chopping the solid chocolate, then sifting it in a fine mesh strainer to shake out the chocolate dust. I didn't do that when I baked the New York Times cookies, and you can see how the little bits of chocolate melted into the dough. I'm pretty sure that this is more an aesthetic consideration than a matter of taste.
- The butter is creamed in two parts, which is a step I've never come across in a cookie recipe.
- Before mixing, I measured each ingredient (Exactly As Written) and had it ready in a cup or bowl. Once my dought was mixed, I noticed 1/4 c of the sugar sitting on the counter, so I stirred it in. Then I re-read the recipe and discovered I'd forgotten 1 T flour, so I added that and stirred a bit more.
- For me, 2 tablespoons of dough weighed 40 grams. I weighed out that amount of dough for each cookie, then rolled it into a ball. I baked half a dozen (chilled in the fridge first, although the recipe doesn't say to chill it) and froze the rest for future baking sessions. The dough yielded around 2 dozen cookies.
- I wish I could report how long these cookies took to bake, but I forgot to set the timer. Luckily the recipe has a great done-ness test: bake "until the tops are no longer shiny."
the verdict:
There are many things that I love about these cookies. Love the two kinds of chocolate. Love the dark toffee flavor from the molasses-tinged sugar. Love the chewy centers. Love the precision of the recipe (even though I wasn't able to replicate it faithfully in my kitchen!) Are these THE chocolate chip cookie? I'm going to waffle here, and say that I need to bake them again, and maybe do a side to side taste test. I will say that they are much better once they've cooled than warm from the oven.
My cookies baked a little darker on the bottom than I'd like, so I'll have to fiddle with the temperature and oven rack placement in my oven when I thaw and bake the remaining cookies. And even though it isn't written in the recipe, I think I'll sprinkle a bit of sea salt on the tops (a la the New York Times Chocolate Chip Cookies and Dorie Greenspan's World Peace Cookies.)
As for the foray into "Exactly As Written" territory? I used the correct ingredients, but still I hit the inevitable, for me, snags. No matter what virtues I may have in the kitchen, it seems that I cannot stick to a recipe even when I'm trying! But now I've read the "get organized" section of the cookbook and figured out where I probably went wrong: although I pre-measured all of the ingredients, I didn't immediately put the containers and packages away in their respective places. In other words, if my work surface had been neater, I probably wouldn't have overlooked the sugar on the counter. And careful reading would have clarified the correct amount of flour in the ingredient list. I'm pretty sure that stirring in these ingredients out of turn didn't make a huge difference in the finished product, but it's instructive nonetheless!
the giveaway:
This blog entry is the 300th time that I've hit the "Publish Post" button. I love marking the big round numbers by giving something to the folks who stop by my corner of the food blogisphere; this time around I'm giving a copy of Thomas Keller's book Ad Hoc at Home. It's hot off the presses, and is already a runaway hit! Check out Michael Ruhlman's blog post about the book reaching the New York Times best seller list, and here's a clip of Thomas Keller talking about Ad Hoc at Home:
You'll no doubt be seeing Keller's recipes on food sites all over the internet, but here is your opportunity to own your very own copy of this gorgeous - and hefty! - cookbook. All you have to do is leave a comment on this blog post by 5:00pm Eastern Standard Time on Wednesday, November 18, 2009. I'd love it if you'd answer any or all of these questions in your comment (but it's not required):
When trying a new recipe, do you make it Exactly As Written (and can you do it successfully)?I'll let a random number generator choose the winning comment.
What's your favorite chocolate chip recipe?
What's your favorite comfort food dish?
Tuesday, November 10, 2009
{TWD} Molasses Spice Cookies
The TV show Sesame Street turns 40 years old today. It was the first consciously "educational" children's show and made quite the splash when it first aired. I used to babysit for a family as a full time summer job in high school, and I watched a lot of episodes of the early seasons with my preschool charges. The mom appreciated the educational aspect of the show and asked me to turn it on for them. (And when they napped, I watched the Watergate hearings!)
While I thought the show was creative and clever, it definitely annoyed me that none of the early Sesame Street Muppets were female (Bert, Ernie, Big Bird, Oscar, Grover, and on and on, all male. And when they finally introduced some female Muppets they were pretty insipid - Prairie Dawn, really?) But that didn't stop me from having my favorite my favorite Muppets: Grover self-described as "lovable and furry," and Cookie Monster, totally obsessed with eating cookies, as shown in the classic song "C" is for Cookie:
* *
A couple of seasons ago, Sesame Street's "curriculum" theme was healthy eating, and on air Cookie Monster was busy scarfing up fruits and veggies. But I know that in his heart, he would much rather get his hands on these Molasses Spice Cookies that Pamela of Cookies With Boys chose for her Tuesdays With Dorie pick.
n.o.e.'s notes:
- I used a mixture of all purpose and white whole wheat flour.
- We love spiced cookies, so I used heaping measures of the recipe's spices and a generous pinch of the black pepper. I also added some freshly ground cloves and nutmeg.
- The dough was quite sticky, so I rolled it into two logs and popped them into the freezer for 45 minutes or so. Then I just sliced off discs of dough, placed them on the cookie sheet, sprinkled some coarse sparkly sugar over them, and baked them. It was much easier than rolling balls of dough and flattening them.
- My cookies came out much deeper and darker in appearance than the ones in the book. I think this was from the new brand of organic molasses that I used and also the Trader Joe's brown sugar, which is darker than most "light brown sugar" is.
the verdict:
There was nothing sweet and subtle about these cookies - they were bold and brash with a pronounced dusky spiciness. I brought a plateful of cookies to a chili party on Halloween. The tasters were convinced that there was chocolate in the cookies, they were that dark and complex. I'm pretty sure that with milder sweeteners they would be smoother and more restrained. But for a 40th anniversary - or a chili party on Halloween for that matter - one might as well have wild cookies. Cookie Monster would definitely approve!
If you want to bake these cookies for your very own cookie monster, Pamela will have the recipe on her blog on November 17, or you can find it on pages 76 and 77 of Dorie Greenspan's book, Baking: From My Home to Yours.
Saturday, November 7, 2009
Chez Panisse Chicken au Poivre
Chez Panisse. The very words conjure up visions of superb food. I've never had the pleasure of eating there - in fact I haven't been within 300 hundred miles - but all the same, when I came across the Chez Panisse Cafe Cookbook on the shelves of my local library, I was tranfixed by the possibility of culinary adventures in my own kitchen.
n.o.e.'s notes:
- You can find the recipe, with some of my notes, at the end of this post. It's not particularly difficult to prepare, but has several steps. You can finished the sauce up to a day ahead of time.
-The ingredients include chicken breasts (skin on) and also chicken thighs, which are used to make the sauce for the breasts.
- The chicken breasts I bought were on the bone. I de-boned them using this link which describes how it's done.
- According to the instructions, we are to cut the chicken legs in 4 pieces each. I had to wonder, for a basic home cook with ordinary kitchen equipment how is this practicable??? (And why? They're just going to get browned, then simmer in stock.) I wasn't going to cut crosswise through bones, so I got out my most cleaver-like knife and cut through each leg at the joint then cut each piece in half lengthwise, along the bone.
- The herbs were from my garden.
the verdict:
This chicken dish had the most wonderful layers of flavors. The subtle richness of the sauce complemented the spiciness of the cracked black peppercorns perfectly. This recipe is a definite keeper.
the recipe:
Chez Panisse Grilled Chicken Breasts au Poivre
(adapted)serves 6
6 large boneless chicken breast halves skin on
2 chicken legs
extra virgin olive oil
1/2 cup white wine
2 quarts basic chicken stock (I used 1 quart homemade and 1 quart purchase
2 sprigs parsley
2 thyme branches
2 garlic cloves
3 T peppercorns
Salt
Optional: red wine vinegar
Directions for the sauce (can be prepared several hours ahead, or even the day before):
1. remove the fillets from the chicken breasts. With a cleaver, chop each leg into 4 pieces.
2. in a large, deep saucepan, brown the chicken leg pieces and the fillets in a little olive oil. When they are well-browned, deglaze with the white wine and cover with the chicken stock.
3. Bring to a boil, reduce to a simmer, and add the parsley, thyme, garlic, and 1 tsp of peppercorns. Simmer hour, then strain, reserving the cooked meat for another purpose, if desired.
4. Skim off the fat, then reduce the broth until rich and slightly thickened; only about 1 1/2 cups should remain. (I actually measured)
Directions for the chicken:
1. Prepare a moderately hot grill (I used a grill pan on the stovetop)
2. Carefully pound the chicken breasts to flatten slightly
3. Crack the remaining peppercorns in mortar and pestle or using the bottom of a heavy pan (I used spice grinder)
4. Coat the breasts lightly with olive oil and season with salt and the cracked peppercorns.
5. Grill the chicken breasts skin side down, rotating for even cooking. When 2/3 cooked, turn the breasts to finish cooking, about 8 minutes in all. Let the breasts stand for a few minutes.
6. Warm the sauce, check seasonings, and add a few drops of red wine vinegar, if desired.
7. Serve the breasts whole or slice each diagonally into 4 slices.
Tuesday, November 3, 2009
{TWD} Cran-Apple Crisp
The recipes chosen for November in the Tuesdays With Dorie baking group are all quite seasonal, variously featuring the flavors of apple, cranberry, pumpkin, molasses, and chestnut (and chocolate, too, we can't have a month without chocolate!) Since any of these recipes could find a place on the Thanksgiving dessert table, the TWD powers-that-be have relaxed the rules for this month. The TWD bakers are free to bake and post the four recipes in any order, as long as we post on Tuesdays (and even that rule is suspended for the week of Thanksgiving, when we can post on any day of the week).
So, although technically this week's assigned recipe is the Chestnut Chocolate Cake, chosen by Katya of Second Dinner, I baked the Cran-Apple Crisp, chosen by Em of The Repressed Pastry Chef. Are you sufficiently confused?
Let's move right to the crisp then, shall we?
n.o.e.'s notes:
- Preparing this crisp couldn't have been easier. The topping ingredients are quickly mixed then chilled until it is time to assemble the crisp - in my case a day or two later. The fruit is tossed together in a bowl with a bit of flour and sugar. Then the two are layered and popped into the oven. Done!
- For the topping I was working with such small quantities (I was making 1/4 recipe) that my mini food processor was just the thing for mixing. I used whole grain flour, which I think works beautifully in a crumb topping. I substituted chopped toasted pecans for the sweetened coconut because I was only using 1/8 cup, and it didn't seem worthwhile to open a package of coconut for that little dab. I also added a pinch of salt to the topping.
- I had some local cooking apples from my farm box, and some other local apples from a fruit stand. I cut up one small apple of each kind, but I don't know the name of either apple variety.
- Instead of sugar, I tossed the apples and cranberries (two kinds: frozen and dried) with some molasses granules, which I'd just bought and was dying to use. We love the flavor of molasses, and the granules make for an easy substitution for granulated white sugar. [Edit: I ordered the molasses granules online from Prepared Pantry. I also picked up cinnamon chips, maple chips, honey granules.]
- I baked the crisp in one small baking dish. There was plenty of topping even though the dish was very shallow.
- There was just enough crisp to serve two.
the verdict:
This was a delightful crisp! The flavors of apple and cranberry were very well balanced. I loved the different textures and flavors from the dried and fresh (frozen) cranberries. The best thing about a crisp is that you get the wonderful fruit flavor and crumbly topping of a pie without having to take the time (and ingredients/calories) that go along with pie-making. The crisp was good with homemade vanilla ice cream and it was good on its own.
This recipe is a keeper - simple and delicious, what could be better?
Thanks to Em for choosing this recipe. Look for the recipe on her blog as of next Tuesday, November 10, or you can find it on page 422 of Dorie Greenspan's book, Baking: From My Home to Yours.