Tuesday, March 24, 2009

{TWD} A Tale of Two Crumb Cakes

My favorite crumb cake of all time is a whole grain Maple Huckleberry Coffeecake with crumb topping about a mile deep that Heidi Swanson posted on her blog 101 Cookbooks about 6 months ago. I've lost track of how many times I've baked it; even though it is a bit more complicated than most quick breads, it's totally worth the extra effort. In fact, I have a loaf in the freezer right now. We don't get huckleberries in these parts, so I made my first one with blackberries and loved it so much I haven't veered from that path, although I keep telling myself to try it with blueberries (mmm, or even cranberries).

When I saw that Dorie's blueberry crumb cake was this week's TWD recipe, I was interested in seeing how it would compare with my now-standard coffeecake.

The blackberries gave my crumb cake an odd purplish cast!
n.o.e.'s notes:

- The first decision was what kind of berry to use. Big fat sweet cultivated blueberries, which are what is in my local produce section at the moment, don't do much for me - I much prefer the small tart intensely flavored wild blueberries. There is a bag of wild blueberries in my freezer, which I almost used for the recipe, but I had some blackberries in my fridge that needed to be used up. Who am I to turn away needy blackberries?

- I made this one almost totally "by the book", resisting all temptations to substitute whole grains and reduce fat. This was partly because I wanted to experience Dorie's recipe as written, and partly because my other coffee cake recipe is already healthified and whole grained. If I were to make changes, I'd end up turning Dorie's recipe into Heidi's!

- Remember those duck eggs that I used in the cup custards? I baked this cake several weeks ago, at the same time as I made the custards. I'd read that duck eggs are wonderful for muffins and breads so I set aside a medium one to bake a half recipe of this cake. The egg was just a bit bigger than a large chicken egg. I figured the extra bit of egg would just make the cake that much fluffier (no math skills needed!)

- I baked a half recipe - in a square pan that's about half the area of an 8x8.


- The blackberries were a week or two old and looked a tiny bit dry, so I figured they'd be perfect in the cake. But after washing, patting dry, cutting to blueberry size, gingerly stirring with flour, and folding gently into the batter, they were soft, juicy, and disintegrated into bits, leaving the batter purplish.

- I used 1/2 tsp of lime zest, because I had some already grated in the freezer.

- 340 degrees for 45 minutes.

the verdict:

The crumb cake was light and fluffy and delicious. The walnuts toasted in the topping as they cooked, and paired nicely with the blackberries. (Pecans would also be good.) It's been fun experimenting with the duck eggs. I haven't been able to get any more, but I will keep trying.

So, how do the two cakes compare? The recipes are very similar, except that Heidi's incorporates some finely chopped herbs and maple, has a much higher percentage of zest, vanilla, and crumb topping, and of course whole grains (oats and whole wheat flour). Dorie's would win a prize for "Best White Flour Crumb Cake" (my fellow bakers raved about this recipe on this week's p&q post). But I'd give the blue ribbon to Heidi's cake!

Thanks, Sihan, for choosing such a delicious and versatile recipe this week. If you'd like to make this crumb cake for yourself, you can find the recipe on page 192-193 of Dorie Greenspan's book Baking From My Home to Yours, or on Sihan's blog post. You can see lots of other lovely crumb cake variations (I've heard rumors of cranberry ones and apple ones) by visiting the TWD blogroll and clicking on each baker's blog.

Note to my fellow food bloggers - In addition to giving up sweets for Lent I've also given up Google Reader and general surfing of other cooking blogs. So that's the reason that you've seen fewer of my comments lately. I've been following the maxim"speak when spoken to;" if you comment on my blog, I'll likely visit you and return the favor.

Sunday, March 22, 2009

Ultimate "Grilled Cheese" Sandwich

The sandwich cooled when I was first photographing it, so I popped it in the microwave for a few seconds. It was warm and melty after that!
As my children - and some of their friends - can testify, I make a mean grilled cheese sandwich. It's not rocket science, really: just use a variety of sliced cheeses, spread the bread with a thin layer of butter, and cook the sandwiches low and slow in a covered frying pan (helps melt the cheese inside).

On the "Ultimate Rainy Day" episode of Tyler's Ultimate on the Food Network, Tyler cooked up an "ultimate grilled cheese" sandwich to accompany "ultimate chicken noodle soup." Now each to his or her respective own, but when I pair soup + sandwich, it's tomato soup + grilled cheese. But I do love chicken soup, so I tried Tyler's version of chicken noodle a few weeks ago. Now it was time for the sandwich.

When you watch the episode or read the recipe for Tyler's Ultimate Grilled Cheese sandwich you can see what a creative mood Tyler was in on that particular rainy day. His sandwich bears as much resemblance to a normal grilled cheese as his chicken meatball tortellini soup bears to regular chicken noodle soup. It is a grilled sandwich, true. And it has cheese inside. But imo when you add things like pesto and sliced tomatoes it veers out of the boundaries of Grilled Cheese Land. No matter, the sandwich sounded great so I prepared it for a meatless dinner on a Friday in Lent, accompanied by a big salad.

n.o.e.'s notes:

- I keep a stash of pesto in my freezer, made with last summer's basil. My pesto recipe is a bit different from the one Tyler features; his has some parsley in addition to basil. If I hadn't been lazy - and if I'd thought about it - I could have stirred some chopped parsley into my pesto before spreading it on the bread.

- I used pre-sliced mozarella cheese because I had some in my fridge.

- I added some sliced gruyere cheese - isn't everything better with a little sharp melty cheese?

- For bread, I used ciabiatta rather than sourdough.

- The olive oil gave a nice crisp toasted edge to the bread.

the verdict:

This sandwich filled the bill for a melty, toasty, savory sandwich. I love how the basil and tomatoes combined with the melty cheese and crusty bread. Olive oil completed the Mediterranean flavor theme.

Would I call this the ultimate grilled cheese sandwich? Truth be told, not really. It is a delicious sandwich which makes a great addition to the repertory. But it doesn't replace the good old grilled cheese that says "comfort" to me.

I'm submitting this sandwich to Tyler Florence Fridays, which is an online group dedicated to cooking Tyler's recipes. If you want to see some truly delicious food, hop on over to the roundup on Friday and check out what each blogger has cooked up.

Saturday, March 21, 2009

Brownie Bliss


We've just passed the halfway mark of Lent (24 days down, 22 days to go) and it seems like the perfect time to share my very own pre-Lenten Fat Tuesday indulgence: I baked a whole pan of brownies for no reason other than I wanted to eat really good brownies before my 6.5 weeks without sweets of any kind.

I have to confess that when it comes to brownies, I'd always been a Duncan Hines girl. Or Ghiradelli mix from Costco, which has the double benefit of being yummy AND cheap! Once I began food blogging - and the attendant food site surfing - I started bookmarking brownie recipes, but I've never taken the opportunity to try them other than Dorie Greenspan's Quintuple Chocolate Brownies. Honestly, the Tuesdays With Dorie weekly assignments take up most of my sweets-baking time, energy, and calorie allotment, so I haven't made much of a dent in the ever growing mountain of brownie recipes. Luckily there are a few people who are making a project of baking through brownie recipes, so I can happily ride on their testing coattails!

When Fat Tuesday rolled around I decided that what I really really craved (yes, aside from the Chocolate Grand Marnier cake and the Caramel Crunch bars, and the four other TWD selections that I baked that week!) was a great brownie.

I'll spare you the ponderings and indecision of the recipe selection process (I printed off several recipes, sure that they would be The One that I'd bake). In the end I baked the "BAKED" brownie recipe. And boy was it delicious!!

n.o.e.'s notes

- I used up a bunch of different odds and ends of dark chocolate (60-70% cocoa) in my baking drawer.

- Even though this was my Fat Tuesday indulgence I couldn't bring myself to put in 5 eggs. so I used 3 whole eggs and the equivalent of 1.5 eggs in egg substitute - that's all I had. I figured the scant measure on the eggs would make for a fudgier brownie.

- After adding the sugars, the mixture was really grainy.

- I typically have the worst time with doneness testing of brownies. This time I used the King Arthur "divot" method and it worked! My brownies were perfectly baked.

the verdict:

These are intensely chocolaty and very moist, but with that nice thin crackly crust on the top. I cut big generous servings - none of that brownie bite stuff this time!

And the taste? These were the best brownies I've ever eaten, much less made. This brownie recipe is a keeper! And luckily, so were most of the brownies. After demolishing a respectable percentage of the brownie pan's acreage, I packed the rest up in the freezer.

I pulled them out of the freezer to serve to book group, and I can tell you that the brownies caused quite the sensation. My chocolate-allergic husband was absent that evening, and H and I had given them up for Lent, but the other 5 members just dove in. Many brownies and a few crumbs later, the general consensus was that these brownies were chocolate heaven!

Thursday, March 19, 2009

Fettuccine with Sausage, Garlic, and Mushrooms

A couple of years ago when I was browsing the Costco book tables - honestly those stacks of books can be a veritable treasure-trove - I picked up the Williams Sonoma cookbook Meats & Poultry in the series "The Best of the Kitchen Library." Every single recipe that I've tried from the book has been absolutely great (so good that I have now aquired several more titles in the same W-S series, also at Costco). So when I chose the Fettucine with Sausage, Garlic, and Mushrooms I figured it would be at least a decent plate of pasta. And I'm happy to report that WS came through again! [recipe at the end of this post]

n.o.e.'s notes:

- I ran out of white wine so I splashed in a bit of red too.

- I sliced up some Aidell's Chicken Andouille for the sausage

- When cooking the garlic, I added a shake of red pepper flakes.

- The pasta was a garlic and parsley flavored fettucine, made by Al Dente. I love this brand of pasta; the flavors are good and it cooks very quickly (2-3 minutes). [update: I've found this pasta at Whole Foods and also at our local Publix supermarket. The company's website is here]

the verdict:

This pasta recipe is excellent! My husband liked it so much that he went back for seconds when his first serving was only half gone! The garlic and the mushroom liquid combine for a fantastic earthy flavor. I think it could be just as good with chicken stock and a touch of vinegar as with the wine. We enjoyed the little kick from the spicy sausage and the red pepper.

I love that this pasta recipe is neither tomato-based nor dairy-based - makes for a nice variety.

I can also report that the leftovers were great from the freezer!


I'm submitting this to Presto Pasta Nights , a wonderful roundup of noodle-based dishes. This week's hostess is Pam of Sidewalk Shoes , so stop over there on Friday to check out all the delicious pasta dishes!

the recipe:

Fettucine with Sausage, Garlic, and Mushrooms

3/4 lb cooked low-fat smoked chicken sausages
1 T olive oil
2 lg cloves garlic, minced
1 lb white or cremini mushrooms, brushed clean and thinly sliced
1 cup dry white wine
1/4 cup minced fresh flat-leaf parsley
Salt and freshly ground black pepper
1 lb dried fettucine

1. Slice the sausages into rounds about 1/4 inch thick.

2. In a large nonstick frying pan over medium heat, heat the olive oil. When it is hot, add the sausage slices. Cook, stirring often, until lightly browned, about 3-4 minutes.

3. Add the garlic and mushrooms and stir until the mushrooms have softened and released some of their liquid, about 3 minutes.

4. Add the wine, bring to a boil over medium heat, and cook until the mushrooms are tender, about 3 minutes longer. Stir in the parsley and season to taste with salt and pepper.

5. While the sauce is cooking, bring a pot of salted water to a boil. Add the fettucine, stir well, and cook until al dente, 8-10 minutes, or according to the package directions.

6. Drain the fettucine and place in a warmed shallow serving bowl. Pour the sauce over the top and toss briefly to combine. Serve at once (stopping just long enough to photograph, of course!)

serves 6

Tuesday, March 17, 2009

{TWD} French Riviera Cake, two ways

This week's Tuesdays With Dorie assignment is the French Yogurt Cake. I have had my eyes on this recipe for a while, so I was excited to get the chance to bake it. The basic cake is an oil- and yogurt-based cake that can be made in just two bowls. After the Chocolate Grand Marnier Cake of a few weeks ago, this was a welcome respite from a sink filled with dishes!

When I read through the recipe, I was immediately drawn to one of the variations. The Riviera Yogurt Cake uses strained (Greek) yogurt, olive oil, and chopped rosemary. I love using savory herbs in my sweets (see last week's Bay Custard Cups), so this sounded perfect to me!

n.o.e.'s notes:

- I love the subtle contribution that thyme and rosemary make to my very favorite coffee cake recipe, so I used both herbs in this cake. I chopped some fresh thyme and rosemary leaves very very fine, and rubbed 1/2 tsp of the combination into the sugar with the lemon zest.

- I used ground almonds. Sometimes I have Trader Joe's almond meal on hand, which is very finely ground, but this time I ground some almonds in my food processor, which produced a coarser grind.

- For yogurt, I stirred some lowfat and nonfat Greek yogurts together (mostly nonfat).

- I used regular extra virgin olive oil, but I later remembered that I had some wonderful Italian lemon olive that I should have used! For Christmas last year, my daughters adopted an olive tree for my husband and me. We received shipments of oil from "our" tree; the last shipment contained three different flavored oils - including lemon. I always forget to use them!

- In lieu of the 3 eggs in the recipe, I substituted 3/4 cup Egg Beaters. With the mono-unsaturated olive oil, the mostly-nonfat yogurt, and the egg subsitute, this cake was actually pretty low in fat, and the Greek yogurt and almonds increased the protein content. Practically a health food! Next time I might throw in some white whole wheat flour.

- In keeping with the Riviera theme, I left the cake topless.

- Truth be told, I completely ran out of steam when it came time to contemplate a topping glaze. I knew I didn't have lemon marmalade. I also knew that I was not going to purchase lemon marmalade, given my vast jam holdings (which by the way, grew by several jars over the holidays). The final thing I knew is that I wasn't going to get creative and devise an alternate topping. This cake was going to have to stand on its own without the help of a glaze.

- I sliced up half and served it to my book group plain, and popped the leftover half loaf in the freezer. [more about that second half, below]

the verdict:

The cake is sturdy, dense, and moist. And very good! And very easy!!

In the Riveriera variation, the almonds and olive oil each lent their subtle flavor, the herbs gave just the slightest woody hint, and the sunny lemon shone through everything.

I will make this cake again (and again) in this Riviera version - the recipe is so easy, moist, healthy, and good.

I'd also like to make the regular version of this recipe as a layer cake with a simple frosting, perhaps cocoa buttercream.

I love this cake!

...read on....

Riviera cake 2.0:

I initially baked this cake the very day that the recipe was selected (as part of my marathon Pre-Lenten baking frenzy) and served it that evening. I can now report that this cake freezes and thaws beautifully. Last Thursday I served the second half of the cake (also to my book group) but this time I decided to give it a proper covering. I made a glaze of 1/4 c. grapefruit marmalade (which I had in my fridge), which I thinned with about a teaspoon of Meyer lemon juice, then heated in a small saucepan with 1/2 tsp of chopped thyme. I strained it directly onto the cake top.

The citrus glaze was a fantastic complement to the basic cake. I think everyone liked the glazed cake, although they had really enjoyed the cake plain at the previous meeting.

Another time I'd like to experiment with a fig and thyme glaze.

I need to thank Liliana of My Cookbook Addiction for choosing the French Yogurt Cake with Marmalade Glaze. If you'd like to try this recipe, it's on pages 224-225 of Dorie Greenspan's book Baking From My Home to Yours, or check out Liliana's post where you will find it online.

P.S. Happy St. Patrick's Day!! I had fond hopes of baking up a wonderful Irish Soda Bread, and even had a recipe all printed out, but it just didn't happen. I did, however, use Irish cheddar cheese this past weekend in my macaroni and cheese and in my scrambled eggs (they were not green, Sam-I-Am)!

Note to my fellow food bloggers - In addition to giving up sweets for Lent I've also given up Google Reader and general surfing of other cooking blogs. So that's the reason that you've seen fewer of my comments lately. I've been following the maxim"speak when spoken to;" if you comment on my blog, I'll likely visit you and return the favor.

Saturday, March 14, 2009

{Adventures in Yeast} #6 - Exploring Kugelhopf

I will always, always have a fond spot in my heart for kugelhopf, a raisin-studded sweet bread, originally from Austria. It was the first yeasted thing that I've ever baked, and when it turned out beautifully risen, I was smitten. The delicate and delicious taste just added to the love-fest. My husband was so enamored of this sweet bread that I decided to buy him some proper kugelhopf molds for Christmas, accompanied by the promise that I'd bake more for him. I'd made the kugelhopf for TWD, and Dorie Greenspan's recipe calls for an 8 cup mold; the molds that I liked the best in my online mold shopping were 6-cup and 10-cup (this one was Nordicware from Sur la Table). I figured I could make a double batch of Dorie's recipe and use both molds.

my encounter with kugelhopf in its native habitat


In the meanwhile I traveled to Germany in December to visit my younger daughter (and take in some German Christmas markets). I'll have to say that I took lots of pictures and lots of notes about the food on this trip, with an eye towards posting my experiences on this blog, but when I got back it was three days before Christmas, and, well, I was pretty busy. I have a bunch of draft posts on different aspects of the trip; at some point I hope to have them finished - by then it will probably be summer and who is going to want to read Christmas posts then?

After I tooled around in Dusseldorf, Aachen and Cologne, I headed to Berlin for 5 days. I'd been there several times previously (we love that city) and have a few favorite haunts. One is a destination of just about every other tourist who visits Berlin: the KaDeWe department store. This store is impressive on a normal day, but it really pulled out the stops for Christmas.

After wandering enchantedly through the winter woodland themed decorations on the main level, I bought some lovely paper napkins and a wonderful kitchen apron. Then it was time for the 6th floor: the largest department store food hall in the world! We've bought various things there over the years (tea, coffee, chocolates, kirschwasser) but we always stop at the pastry case.

The KaDeWe bakers make some of the best tortes in existence! I stood there in December, admiring the beautiful and colorful Yule logs, when suddenly - what did I see?
Could it be kugelhopf? Yes, it was (only they call it "gugelhopf" in Germany; no matter, it's the same thing) And, yes, I could buy it by the slice. Which I did, packed up to go so that I could enjoy it in my hotel after dinner. Check out the cross section in the photo below - can you believe how TALL that kugelhopf is?

I'll have to say that it tasted good, but really not as good as the one I baked at home using Dorie's recipe. It had a soft delicate texture and a lovely flavor, but I didn't care for the raw alcohol taste of the rum that was brushed on the outside before the powdered sugar was dusted (dumped?) on. It was also a bit drier and not as soft as Dorie's. All the same, I savored every morsel.


Baking my second kugelhopf

Valentine's Day seemed like the perfect opportunity to make kugelhopf for my husband (yup, I'm just a little behind on my yeast postings!) I even toyed with the thought of using dried cherries - to keep with the seasonal color theme - but Jim really likes raisins much better, so I kept to the traditional fruit choice.

Although we adored Dorie's recipe for kugelhopf, I figured I'd see how a new recipe compared. I had a bunch of contenders and finally chose the one in the Fannie Farmer Baking Book. [recipe at the end of this post]

As an aside, although Dorie's book indicates that kugelhopf is best eaten right away or stale the next day as toast, some of the other cookbooks I consulted were a bit more optimistic about the longevity of the bread. According to Fannie Farmer, "Europeans like Kugelhopf a day for two old, when it's slightly dry - it makes delicious toast. If you want it to remain fresh, freeze what you won't eat within a couple of days."

Nearly all the recipes called for a 10" pan, including the one I'd selected. Most 10" pans have a 12 cup capacity, including most bundt pans; my larger kugelhopf pan holds 10 cups. I didn't want to overflow the pan, so I scaled the recipe to 80% for the key ingredients. For the stir-ins I roughly estimated a heaping 3/4 of the recipe's amount.

Once I had scaled the recipe and measured out the ingredients, I unwrapped my new kugelhopf mold and saw that there was a recipe right on the inside of the wrapper - scaled, of course, for the capacity of the mold! I might make that next time...

n.o.e. notes:

- For some of the flour I used KA organic all purpose. For the rest of the flour, I dipped into my stash of original White Lily flour, which is reputed to make soft and tender baked goods. (Last summer, White Lily stopped making flour in its long-time Tennessee plant; production is now in the Midwest and White Lily devotees believe they can taste a difference. I made sure to buy a bag before the switch was made.)

-Instead of dry yeast, I used instant yeast (added with the flour)

- For fruit, I used a mix of currants and golden raisins. I chopped the golden raisins to make them roughly the same size as the currants. The recipe called for rum. Before adding the rum to the dough, I first heated it and macerated the fruit in the warm rum. Then I drained the fruit and measured the remaining rum, making up the difference in milk.

- The recipe called for lining the pan with almonds. I didn't want to obscure the beautiful lines of my mold, so I used less than 1/4 cup of sliced almonds. I also omitted chopped almonds in the bread itself.

- The dough was
v-e-r-y
s-l-o-w
r-i-s-i-n-g.
I started with the dough in a spot that was average room temperature, but then I moved it to warmer and warmer spots. It finally doubled in about 4 hours. I've since purchased a package of SAF Gold label yeast, which is purportedly better for rich, sweet doughs, so we'll see with the next loaf...

- Unlike Dorie's recipe, this involved no overnight rest for the dough (although I'm sure I could have added that step). As it was, I put the dough in the pan and moved it into cool garage while we went to dinner. Back inside, in a warm spot, it filled the pan in a total time of 2.5 - 3 hours. Because I scaled the recipe for the pan, I was confident that the amounts were correct, so I could wait (patiently) for the dough to rise and fill the pan.
- The kitchen was filled with warm subtle wonderful smells while this was baking.

- I struggled a bit with the baking time/temperature. The recipe called for a hot oven for part of the time, then a reduced heat for the remainder. I tried to estimate the times for a smaller pan, and came up with:
-- 400 for 8 minutes
-- 350 for 15 minutes
-- then tented the pan and baked at 340 for 8 or 10 more minutes.
At this point the kugelhopf was golden brown and had puffed up above the rim of the pan. So beautiful!!

- It cooled for just a minute or two. The cake popped right out of the pan.

- I sifted a bit of confectioner's sugar over the top, but just a little because I wanted to see the pretty shape of the mold.
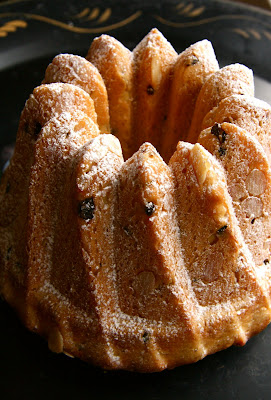
the verdict:

We didn't eat it right from the oven, but cut into it for breakfast about 12 hrs later. Sadly we found that it was a bit dry. But the flavors were very very good and it made really great toast. I think that because the pan is so tall the bread is narrow, so it cooked very quickly. Next time, I will have to pay even closer attention to the bread as it bakes, and adjust the temperatures and times. I will probably experiment with a different recipe, just for fun.

[update: After I baked this kugelhopf, I came across some other recipes that look quite intriguing:
David Lebovitz makes Nick Malgieri's recipe
and
Peter Reinhardt's recipe as posted at My Kitchen in Half Cups]

I'm also submittng this bread to Susan at YeastSpotting, a weekly compilation of wonderful yeast creations.

the recipe:

Kugelhopf
from the Fannie Farmer Baking Book
for 10" mold [approximately 12 cup capacity - such as a bundt pan]

1 pkg dry yeast
1/2 cup milk, warmed
1/2 cup sugar
2 tsp salt
5 eggs
1/4 cup rum or 1/4 cupadditional milk, warmed
2 tsp vanilla extract
1 T grated orange zest
1/4 tsp cinnamon
1/4 tsp nutmeg
8 T butter, softened
1/2 cup chopped almonds
1 cup raisins
1/2 cup sliced almonds

1. Stir the yeast into the warm milk (use 3/4 cup milk if you are omitting the rum) and let stand to dissolve.

2. Combine the sugar, salt, and eggs in a large bowl, andbeat well, then add the rum (if you are using it), vanilla, and orange zest, mixing well. Stir in the dissolved yeast.

3. Add 2 cups of the flour, the cinnamon, nutmeg, and butter, and beat until the batter is smooth and well blended.

4. Add the remaining flour, the chopped almonds and raisins, and beat again until smooth. The batter will be heavy and sticky.

5. Cover the bowl and let rise until double in bulk - maybe 3 hours or more.

6. Grease the Kugelhopf or tube pan thoroughly. Punch the dough down and place it in the pan, punching and patting it into place to fit evenly. Cover the bowl and let rise until double in bulk. Press on the top the sliced almonds.

7. Bake the bread in a preheated 400 degree oven for 10 minutes, then reduce to 350 degrees and continue baking for about 40 minutes. If the top becomes brown, cover loosely with foil for the last 20 minutes or so.

8. Remove from the oven and let cool in the pan for about 10 minutes, the turn out onto a rack to cool completely.

Tuesday, March 10, 2009

{TWD} Bay Custard Cups (Duck Egg)

This week's recipe was a lot of fun for me to play with. I got to: (a) be inspired by another recipe, (b) use a new ingredient, and (c) do lots of math!!

(a) Another recipe for inspiration:
I'd been planning to make Dan Lepard's Bay Custard Tarts for my book group. I measured all of the dry ingredients and was all ready to bake them up on the day of our meeting. But on Book Group Morning I learned that Dorie's French Yogurt Cake had been chosen as one of the March TWD recipes, and I immediately baked that instead (will be posted next week). I was on a mission to bake all of the March recipes in the few days before Lent began so that I could sample them, so the TWD recipes took baking priority.

A couple of days later the rest of the March recipes were announced and one was for a Lemon Cup Custard. Seeing as I had just made the lemon yogurt cake 2 days earlier I wasn't really in the mood for more lemon so I decided to take Dorie's permission and play around with the flavors. I cooked Dorie's custards with the bay flavor of Dan's recipe.
(b) A new ingredient:
I was lucky enough to get 1/2 dozen duck eggs through my farm box folks. They are not always offered and they sell out quickly, so I was pretty excited to experiment with this new-to-me ingredient. When I opened the carton I saw that the eggs were of wildly varying sizes. I used the two biggest ones for scrambled eggs (yummy, btw!). The two smallest eggs weighed in at 65 grams each - just a bit bigger than my 61 gram large chicken eggs. I used these small ones to make 1/2 recipe of custard (plus a little bit).
(c) An opportunity for quick math:
Although I was pretty sure I could just substitute the larger duck eggs for the chicken eggs, I thought I'd try an easy scaling of the recipe. There are only 3 ingredients, so it was pretty simple with the digital scale: I first measured the sugar and the milk, then for every 60 grams of weight, I increased the ingredient by 4 grams. There, that wasn't so painful, right?

n.o.e.'s notes:

- I didn't have whole milk, so I used approximately 3/4 of 2% milk and 1/4 half-and-half.

- Once the milk was hot, I steeped three dried bay leaves and a corner of a fresh one. I couldn't really tell whether Dan's recipe contemplated fresh or dried, so I went with dried since they were supposed to be "crumbled."

- My small glass custard cups were 1/2 cup each, which was perfect for 4 custards with the half recipe. (Dorie's recipe calls for 3/4 cup ramekins)

- The duck eggs had really large yolks. I figured this would be a good thing, since Dan's bay custard recipe was a yolk-only custard.

- I managed to temper the eggs without curdling them (a minor victory when considering my luck with a few previous TWD recipes).

- I grated fresh nutmeg over the tops and floated a fresh bay leaf on the surface.

- The water bath went off without a hitch. Unlike last time.

- I baked these at 315 degrees, which is lower than the recipe specifies. I did expect my smaller ramekins to cook a bit faster, but I was pretty surprised when I happened to check after 15 minutes and they were done! In fact, past done - they were firm and not jiggly at all. I grabbed them out of the oven, and then promptly forgot to take them out of the water bath, so they stayed there for a while, cooking even longer.

the verdict:

Luckily - miraculously? - the custards were not overcooked, or at least they were not rubbery. Or eggy. The custard had a rich silky texture - almost pudding-like. There was no danger of it falling off the spoon (as Dorie warns); it clung to the spoon lovingly. Some of that texture was no doubt from the duck eggs, with their extra rich flavor and large yolks. And I don't really know if my 2%/half+half mixture had more butterfat than whole milk or not. That was one equation I decided not to calculate.

The bay/nutmeg flavor was unusual and good. My husband liked these even more than I did; he thought the bay leaves gave the custards a "clean" taste. I could have used just a smidge less bay - maybe if I'd not put the fresh bay leaf on the top while it baked. But all in all, this is a nice dessert with a sophisticated flavor. I do want to try Dan Lepard's recipe to see what his tarts would taste like (I still have the dry ingredients all measured out). And I'd like to experiment with some of the custard flavor combinations that Dorie lists in the recipe, such as the lemon-clove or the orange-star anise.

This lovely recipe was chosen by Bridget of The Way the Cookie Crumbles. Judging from the P&Q post, the TWD bakers have had mixed success with this one. You can check out their experiences by visiting the TWD blogroll and clicking on each baker's blog. If you'd like to make this custard for yourself, you can find the recipe on page 387 of Dorie Greenspan's book Baking From My Home to Yours, or on Bridget's post.

Saturday, March 7, 2009

Shortcut Turkey and Andouille Jambalaya

One of my current resolutions is to cook from the freezer and pantry. I've managed to accumulate all sorts of great food, so this shouldn't be such a painful task. Another goal of mine is to concentrate on recipes from my ever-growing cookbook collection. It's so easy to dial up a wonderful recipe on the internet that it's become somewhat of a crutch for me.

I had some Aidell's chicken andouille sausage in the freezer, and decided to look for a Cajun-inspired dish. Mark Bittman's How to Cook Everything has a Jambalaya recipe, and one of the variations is Chicken and Sausage Jambalaya, also called "brown jambalaya." Sold!

n.o.e.'s notes:

Bittman's basic shrimp jambalaya recipe (red jambalaya) is found here. To make a brown jambalaya with chicken (turkey in my case) and sausage, you omit the ham, tomatoes, and shrimp, and add chicken and sausage and also increase the amount of stock. I made a few further changes to fit my ingredients, which also made the dish quicker to prepare:

- The recipe contemplates using uncooked sausage and chicken. My andouille was fully cooked and I also had cooked turkey pieces in the freezer.

- As written, the recipe serves 8. I decided to cut it in half. I used 6 oz. of the sausage (1/2 pack), which I cut into slices. The heaping cup of turkey scraps were bite-sized.

- I first cooked 1 cup each of onions and red bell peppers in olive oil with salt and pepper. My burner's medium-high was hotter than Mark Bittman's, though, because my veggies nearly burned in under 10 minutes of cooking.

- Next, I stirred in the 1 cup of rice, 1 T. garlic, 1/2 tsp cayenne, 1 tsp thyme, sausage and turkey over medium high heat for just a minute or two. Note that the linked recipe calls for par-boiled rice, but the book does not. I used uncooked white rice - medium grain. According to the book, you could use the same quantity of cooked brown rice, and I will try that some time.

- Then I poured in 3 c of chicken stock. At this point, the pot is supposed to simmer uncovered on medium for around 30 minutes. Although I turned my burner a bit lower than medium, it still cooked pretty fast. The stock was mostly absorbed in around 15 mintues. I covered it and let it rest for about 15 minutes. I took that opportunity to make up a big salad.

the verdict:

We loved this quick, easy and tasty dish. It made a perfect weeknight dinner. Sticking to the recipe and using uncooked andouille and chicken would be even better, as the sausage would flavor the vegetables and the chicken would absorb the flavors as it cooked. I think chicken thighs would be perfect in this recipe.

I used the recommended amount of cayenne pepper, and for us the jambalaya had a nice kick, but it wasn't too spicy as to be distracting. If you are sensitive to spicy food, however, I'd say to reduce the cayenne.

I would serve this to company in a heartbeat; the best part is that it could be made ahead.

My bayou-born husband gave this recipe his stamp of approval!

Thursday, March 5, 2009

{Adventures in Yeast} #5 - KA Oatmeal Honey Bread

I love how much oatmeal is in the ingredient list of the this King Arthur Oatmeal Honey bread - this is a true oatmeal bread! I baked this bread twice. The first time - about two weeks ago - I had trouble getting it to rise, even though my yeast-magician husband came by and tucked it under the covers with great care! It ended up dense and a bit undercooked (it did reach the specified internal temperature of 190 degrees). The flavor was so good that on a snowy afternoon in March (yes, snow in March. In Atlanta!) I gave it another try to see if I'd have any better luck the second time around.

I surmised that my problem with the first loaf was that I didn't mix/knead it enough and that I used softened butter when I probably should have melted it (the recipe doesn't specify). I also wanted to make sure I put it in my warmest spot to rise - the first time I'd put it in my medium-warm spot.

On the second go around, I kneaded it for several minutes until it seemed to have the right "springy" quality. It rose very well, doubling in about 2 hours. The second rise was a lot slower. I gave it a good long while, but the bread maxed out at 1" over the pan's rim, rather than the 1 1/2" the recipe was aiming for (but a bit higher than the first time). I finally decided to just bake it. This time I left it in the oven for a few extra minutes, until the thermometer registered 200 degrees. It still turned out moist and dense inside, but it was an improvement over the first loaf. The crust has a nice crunch, and, again, it tastes fantastic as toast.

The reviews on the KA site show that others have had problems with this bread's rising. I guess I could add some vital wheat gluten (I have a new package that I haven't tried yet), but I'd have to figure out how. Since I'm such a new bread baker, I don't know where and how things go wrong, or really how to fix them. Mostly I'm amazed every time a bread does rise and turn out well!

the verdict:

Despite the dense super-moist state of the bread, it had great flavor. It makes unbeatable toast. Although I would like it to have risen more (as the recipe seems to have expected) and have a slightly more open crumb, I'm not going to forget about this bread - it's one of my husband's favorites!

Tuesday, March 3, 2009

{TWD} Chocolate Grand Marnier Cake

Back in 1981 when I started my first full time job, one of my co-workers brought in a home-made cake for a birthday celebration. It was my first exposure to one of those "made with baby food plums" cakes. I ate it, and it was pretty good, but I regarded the concept of baby food in my cake as akin to an alien invasion. I stopped being so wierded-out by baby food when I had children and dealt with those little jars several times a day. Well, OK, baby food meat was still totally awful to even contemplate, but I realized the fruit was pretty yummy.

This week's cake is kinda like that plum baby food cake. A prominent entry in the ingredients list is: prunes. Now prunes continue to have odd associations for me despite the efforts of the prune industry to rebrand them as "dried plums" and despite the fact that they really are dried plums. Technically they aren't any different or worse than the previously-avoided baby food plums. But I had serious qualms about the prunes until this cake was baked, cut, and tasted. And then, my word, it didn't really matter what was in there, that cake was fabulous!

n.o.e.'s notes:

-I lightly toasted walnuts my walnuts before grinding them.

- Grand Marnier cognac was my choice instead of armagnac, mostly because I had it on the shelf and I didn't have armagnac (nor had I ever heard of it). I was talking with the liquor store guy after I made the cake and he said that Americans don't seem to have a taste for Armagnac so he doesn't carry it. He added that it was very similar to cognac. A little internet research shows that there are similarities and differences, as you can read here!

- This was a great recipe for me to use up odds and ends of chocolate in my drawer - in both the cake and the glaze I mixed a bit of semisweet in with the bittersweet chocolate.

- The prunes I used were very fresh and soft. They even looked like plums inside - they were still purple. (I've become a big fan of baked plums since making the Dimply Plum Cake about a million times.) I cut the prunes pretty small, but I might cut them even smaller next time and make sure they mooshed a lot when they were cooking.

- It was a little bit difficult to tell when the cake was done. Dorie says that a knife should come out "streaky." At one point I tested, and the knife seemed streaky, but the cake just didn't look quite done. I could tell it was moist enough that I wouldn't have to worry about drying it out, so I left it in the oven for several more minutes. At that point the knife was still streaky, but more clean than streaked. After cutting it I realized that it could have taken even a few more minutes in the oven, but it was great the way it was.

the verdict:

- I served this at book group and my testers were wild about this cake. One pronounced: "That's restaurant-worthy!" which I thought was fitting since Dorie riffed this recipe from a restaurant's signature dessert. I had no trouble splitting this cake up for everyone to take home. I kept that one wedge to photograph the next day.

The orange notes from the liqueur - and the zest - really came through. It was a nice orange + chocolate combination; just a little fruity and a lot of chocolate intensity.

The prunes gave fantastic texture to the cake without being really discernible, thank goodness. One of my testers called it "fudgy," which is a perfect description.

This is a grown-up, elegant cake. It's a perfect dessert for entertaining or a dessert buffet. It can be sliced very slender, and is rich enough to satisfy. It looks delightful standing up on the plate with that slick of chocolate on top.

This cake is definitely one that I will make again. My heartiest thanks to LyB of And then I do the dishes- for choosing this fabulous dessert for the TWD group to bake. If you'd like to bake this yourself, it's pages 279-281 of Dorie Greenspan's book Baking From My Home to Yours, or hop by and see LyB's post where you will find it online.


Just a few of the dishes this cake generated!
I am currently away from home and all traces of the internet. Before I left I scheduled this to post first thing Tuesday morning, and if I didn't make a mistake that's when it posted! [edit: well, I did make a mistake and this posted for a few hours on Sunday a.m. I took it off and rescheduled it for Tuesday, but I know it was in everyone's Google readers since Sunday - sorry!] If you leave me a comment, I'll try to come visit your blog when I return this weekend!

Monday, March 2, 2009

Kale and Collards Miniera

I found this recipe for greens in my big yellow Gourmet Cookbook. It is a Brazilian recipe, and is simple as can be (3 ingredients, including salt!) Gourmet says "this is a great way to work collards and other hearty greens into your weeknight culinary repertoire" and I agree!

Although the recipe's title is for collards, the intro says that in Brazil (where the recipe originated) it is used for kale. I had both kinds of greens in my fridge from a recent farm box order, so I used a mixture of kale and collards.

For this recipe, the greens are cut into very thin ribbons (Gourmet helpfully informs us that, "an old folktale says a woman isn't ready for marriage until she knows how to shred the greens just right.")

n.o.e.'s notes:

- I've found the easiest (and really fun) way to remove the center ribs from large leafy greens is to hold each leaf by the stem vertically in the air with one hand, and slice along each side of the stem with sweeping downward slashes of the knife.

- To get ribbons, the leaves are supposed to be rolled like a cigar and then sliced thinly crosswise. I've never actually rolled a cigar, so I just rolled as neatly as I could. The ribbons weren't that difficult to slice. But then again, I'm not trying to qualify as a Brazilian bride.

- I used a combination of Niman's Ranch bacon and Broadbent black pepper crusted bacon. These bacons are not as strong and smoky as Benton bacon, and I had them in the freezer.

the verdict:

This is a great easy recipe for greens. We really loved these, and as long as you don't mind a little bacon, this is a superb side dish. It's suited to the last minute (and doesn't take much more than that) but you could make it a bit earlier and let it rest in the pan, reheating it at serving time.

If you read all the comments about this recipe on Epicurious, you can see all kinds of things that people have added. I prepared this just as written in the cookbook (didn't even read the online version until I looked for the link for this post). I thought about adding garlic or red pepper flakes, but wanted to experience it just as it was. And it is an amazing recipe with just 3 ingredients: greens, bacon and salt!

Sunday, March 1, 2009

Ultimate "Chicken" "Noodle" Soup

Meatballs? Yes please! I have never met a meatball that I haven't liked. Swedish meatballs from IKEA? I've bought them by the bagful. Meatballs made with grape jelly (those mainstays of Junior League cookbooks) served at cocktail parties? I'll be standing right there at the chafing dish. My mother's spaghetti and meatballs? This is what I'd likely consume at my 'last meal.'

I do have a problem with meatballs, though. They are a pain in the neck to make. I really dislike browning a big pile of meatballs on top of the stove. For spaghetti and meatballs, I try for the brown-on-6-side approach. They end up looking like oversized dice, rather than balls, but they still taste amazing. Because of the high "bother factor", I make meatballs rarely. (I should probably try baking my meatballs in the oven, but I really like the taste they get from browning in a skillet with olive oil)

Why all this meatball talk in a post about chicken noodle soup? Good question! Tyler Florence featured this soup on his Rainy Saturday episode of Tyler's Ultimate, and he presented it as the ultimate chicken noodle soup. Now I'll bet there are lots of grannies out there who would wag their fingers about this soup passing for chicken noodle. It has a chicken broth for a base, but the "chicken" is chicken meatballs and the "noodle" is tortellini. Really, this is an Italian Wedding soup without the spinach.

No matter what it's called, when I watched the episode with this soup, I decided to brave the meatball experience to try the recipe.

n.o.e.'s notes:

I cooked this soup the same week that I watched this episode, and even took notes, but when the time came to prepare the recipe I couldn't find my notes and didn't remember some of the steps and tips. Here are the things I learned from making this recipe (a lot of meatball-making tips!):

- The most important thing is to be sure to use fresh - raw - sausage. The comments section of the online recipe is filled with tales of meatball woes, and many of the people used the fully cooked sausages, which do not work with this recipe. If you want to use those cooked sausages, just slice them and add them to the soup (you will save the meatball-making hassle, but the flavor will suffer a bit, imo).

- I couldn't find raw chicken apple sausage (the flavor Tyler used), so I purchased chicken Italian sausage - which was fine b/c of the tortellini and parmesan gave it a slight Italian flavor. (Shredded basil could be added to the soup at the end to further empasize the Italian aspect.) I found the sausage at Whole Foods, used 5 links, .8 lb total, and removed the casings.

- I don't think it would be very difficult to start with ground chicken and add some spices to make homemade bulk sausage.

- There's a mysterious lack of direction in the recipe. You use half the garlic for the broth part and then it doesn't say what you do with the other half. I put it in with the meat.

- I thought the food processor was unnecessary for the meatballs - and I just hate washing it when I don't need to use it! In fact, as the recipe is written, the mixture ends up overprocessed by the time the parsley is chopped. The next time I would either: 1. chop the parsley and mix the meatballs by hand instead of in the fp. Or 2. put the onions and parsley in, process, then add the other ingredients just to incorporate.

- Because the meatball mixture was kind of wet I added some panko crumbs. Crumbled bread would work also.

- I took Tyler's tip to use a 1 tsp disher to form the meatballs. (When I make my bigger meatballs for spaghetti, I roll them between my palms. This mixture was a lot wetter than meatballs I usually make.)

- These meatballs were so small that I couldn't give them the six-sided dice browning treatment. Instead, it was more like browning on 5 or even 4 sides. They went into the frying pan as adorable little balls and came out with funny angles and flat places.

- I used a 9 oz pkg of Whole Wheat Tortellini from Monterey Pasta Company, in Classic Italian Cheese flavor. This is my favorite brand of the pre-made pastas - it comes in a refrigerator case but I when I buy it I always throw it right in my freezer until I'm ready to use it. I always have a couple of packages of these in the freezer for those "desperation dinners!"

- Half the broth was my homemade turkey stock. Because my stock was so strong, I didn't want to use it for all the soup's liquid. I filled in with purchased chicken broth.

- I added "hot salt" (a salt blended with hot red peppers) to the broth and the meat mixture. I also added ground black pepper, which is not in the recipe.

- Tyler served this soup with grilled cheese sandwiches and brownies for lunch. Whoa, that's a lot of food for lunch! We enjoyed the soup with a salad and bread for dinner.

the verdict:

This was tasty soup! Making and browning the meatballs was a bit of a bother, but luckily we got enough servings out of the soup to make more than two dinners for the two of us. To be honest, a good part of the great flavor was from the homemade turkey stock I used.

My biggest beef with this "ultimate" chicken noodle soup is that your really can't call it that. It isn't chicken noodle - not from the perspective of the chicken or the noodles. It is, however, a really good soup that features meatballs and tortellini - and "ultimately" that's a good thing.

I'm submitting this to to Tyler Florence Fridays, a group devoted to exploring Tyler's recipes on a weekly basis. Stop by and see what the Tyleristas are cooking up!