Tuesday, March 30, 2010

{TWD} Coconut Lime Tea Cake


After nearly two years in the Tuesdays With Dorie baking group, I've learned that certain subjects are sure to generate strong opinions in the TWD baking community. Puddings, custards, and anything that could be described as "eggy" will cause about half the bakers to run away screaming. Ingredients sure to polarize public opinion include nuts, raisins and coconut. Yep, coconut, and in the month of March two out of the 5 chosen recipes featured coconut. The first was the Coconut Custard Tart and this week we baked the second coconut recipe: Coconut Tea Cake. I'm sure there were a few unhappy bakers, but the way I look at it, we're going to bake every recipe in the book at some point, so the coconut ones are bound to come up sooner or later.

Coconut used to be off limits for me (except in Mounds bars and macaroons, where I tolerated it), but, in the very recent past I've decided that I actually like coconut - as long as it's not in my savory foods (coconut curries are not my thing). In fact, tonight at dinner, I actually ordered a whole coconut, which came with the top cut off like a jack-o-lantern, and included a straw and a spoon. Yum!

n.o.e.'s notes:

- The tea cake recipe was chosen for us this week by Carmen of Carmen Cooks. She is a huge fan of coconut in every way, shape and form, so I'm happy for her that she got to choose a coconut recipe, even if it is a somewhat controversial choice. If you want to bake this cake, check out Carmen's blog, or turn to on pages 194 and 195 of the book Baking: From My Home to Yours by Dorie Greenspan.

- The coconut that I have on hand is unsweetened, and in gigantic flakes. I chopped them much smaller and left the coconut untoasted.

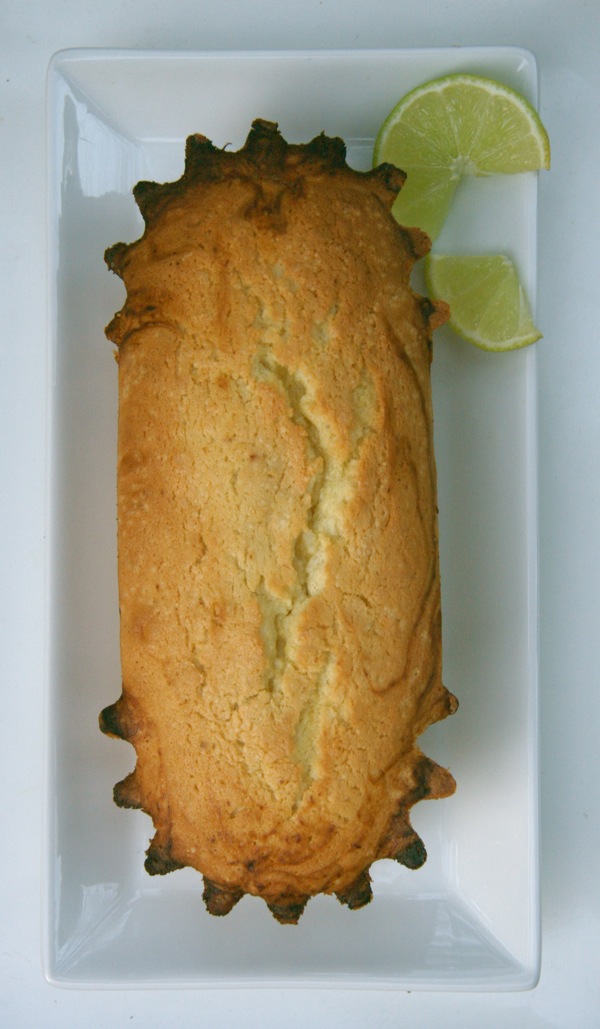
- The recipe calls for dark rum, and I made the optional lime variation. Coconut + lime + rum = delicious! (For lime/coconut cookies and a Sesame Street "Lime in the Coconut" video, click here.)

- I baked my cake in a loaf pan with fluted edges. The little flutes got a bit scorched in the oven, but most of the cake was fine.


the verdict:


Dorie recommends toasting this tea cake after it sits on the counter for a few days. Any sweets recipe that we can legitimately call "breakfast," especially toasted (!), is automatically a contender for favored status in our kitchen.

The cake was very moist and looked like a pound cake in the pan and even while I was cutting it, which was quite exciting. Upon eating it, however, we realized that it was much less dense than a pound cake, quite fluffy really, considering how moist it was - an unusual combination. My husband liked this loaf a good deal, plain or toasted, especially with ice cream. I couldn't get the idea of a coconut pound cake out of my head, so sometime I'll have to try baking one!

Friday, March 26, 2010

Ad Hoc Roast Chicken with Root Vegetables


Nearly every week in the cool-weather months - and frequently when it's warmer too - I will roast a chicken or whole turkey breast. I never tire of the flavors of beautifully-browned poultry fresh from the oven. Having leftover meat for other recipes and bones to make homemade stock only compound the pleasure from preparing a simple (usually) roast fowl. On a chilly weekend recently I turned to Thomas Keller's Ad Hoc at Home cookbook and prepared his Roast Chicken on a Bed of Root Vegetables.


noe's notes:

- A close adaptation of the recipe can be found on Simply Recipes, along with a lovely blog post about this chicken. (I included the leeks in my chicken, and was glad I did.)

- I had never removed the wishbone from a raw chicken but found it was very easy. The wishbone is the first bone that you come to in the cavity, and you can feel the shape of it through the meat. You just free it with a paring knife and snap it off.

- Keller, as is his wont, is very specific about the number and size of root vegetables to use (3 medium rutabagas, 2 medium turnips, 4 large carrots, 8 small new potatoes). I skipped the potatoes, and used the root vegetables that were in my fridge: 4 rutabagas of assorted sizes, 1 very large turnip, 2 parsnips, 3 carrots

- Rather than a cast iron skillet (I was too lazy to get it from the downstairs pot-and-pan overflow storage) I used my shallow enameled cast iron 3 qt pot.

- If you have an instant read digital thermometer, it takes the guesswork out of determining if the chicken is cooked sufficiently.


the verdict:

This roast chicken made for a perfect Sunday dinner; I loved the roasted root vegetables that were cooked in the same pot, although my husband wasn't as thrilled with them as I was. As far as the chicken itself: the taste didn't beat Thomas Keller's ultra-simple roast chicken from his Bouchon restaurant (my favorite roast chicken, which I blogged here), but it's a great cold weather dish when root vegetables are plentiful.

Tuesday, March 23, 2010

{TWD} Dulce de Leche Duos


the Tuesdays With Dorie baking group takes a turn for the sweet this week, with Dulce de Leche Duos, a sandwich cookie that uses a double hit of carmelized sweet milk - in the cookie batter and as a filling.

n.o.e.'s notes:

- Jodie of Beansy Loves Cake chose the cookies ths week. The recipe is on page 161 of the book Baking: From My Home to Yours by Dorie Greenspan. You can also find the recipe on Jodie's blog.

- Dulce de leche has a creamy consistency and a caramel flavor. Although it is easily available in ready-made form at the grocery store, it isn't terribly difficult to whip some up in your very own kitchen, without all of the scary steps involved in making caramel. If you check the special dulce de leche post on the TWD blog, or this week's P&Q post, you will find several methods of preparing dulce de leche - beginning either with whole milk or with a can (or two) of sweetened condensed milk.

- After several moments of paralyzing indecision while considering all of the different - highly praised - methods, I decided to try cooking dulce de leche from scratch, starting with whole milk and following Rick Bayless' directions. I immediately ran into a problem: I was fresh out of whole milk, or, more accurately, I was out of fresh whole milk.

- I went on to Plan B: a can of sweetened condensed milk submerged in water in the crock pot set on "low." Mine cooked for nearly 12 hours and when I opened the can, it was exactly the shade of peanut butter. While it was simmering under all that water the can did rust a bit on the outside (but luckily not the inside), so next time I'd probably wrap it in something to protect the white interior of my crock from rust spots (I was able to remove them this time).


- Aside from a bit of tricky math in scaling the recipe to 1/3, these cookies were a snap to throw together. I ended up with 24 acceptable single cookies and a couple of duds. I sandwiched three pairs of cookies and froze the rest. The extra dulce de leche is also ensconced in the freezer.

- When I was assembling the cookies, I spread dulce de leche on the flat bottoms of each cookie. Before sandwiching the two halves together, I sprinkled some fleur de sel on top of the dulce de leche layer, aiming for a salted caramel effect. I photographed the cookies, and then realized that the dulce de leche filling was oozing out. For the remaining sandwiches, I think I'll spread the filling in a thinner layer.

- These cookies seem like they would make excellent ice cream sandwiches (one of Dorie's suggestions), so I might try that with my extra cookies.


the verdict:

The cookies look and smell fabulous, but because my husband and I are not eating sweets for Lent we haven't tasted them. I fed a few crumbs to the dogs, and they said "woof" and gave two enthusiastic paws up. I baked these cookies at the last minute, so I'm posting this now, but I'm on the lookout for some human tasters, and I'll come back and update with appropriate quotes if I'm successful in finding any!

Saturday, March 20, 2010

Beef on Weck


One of the best parts of travel is exploring local food specialties. On our first visit to see my older daughter, who now lives in Buffalo, NY, we got a chance to sample the second-most famous specialty of the city: Beef on Weck (the most famous is Buffalo Wings, naturally. According to my daughter A, "the third is chicken finger subs, and the fourth is Bison dip, not counting the dishes of the substantial Polish and Italian communities.")

Beef on Weck is a roast beef sandwich served on a very salty caraway seed hard roll with the roast's jus and some strong horseradish. To learn more about the history of the sandwich, look here or in the Wikipedia article here.

A few weeks ago I happened to be making a roast beef and kaiser rolls on the same day, and decided to try for homemade beef on weck sandwiches.

n.o.e.'s notes:

- the most distinctive thing about Beef on Weck is the roll, called "kummelweck." There are recipes for German-style weck rolls, such as this recipe, but instead I adapted the Kaiser Rolls from Peter Reinhart's book The Bread Baker's Apprentice, adding salt and caraway seeds, to approximate kummelweck. (My kaiser roll post is on my bread blog.)

- For horseradish sauce, I followed Thomas Keller's recipe from Ad Hoc at Home. This sauce is mostly horseradish mixed into whisked thickened cream - scroll down to the end for the recipe. I thought it was delicious just as written, but my husband added a ton more horseradish to his.


the verdict:

This was a fantastic sandwich. The juice, the soft inside of the roll, the salty outer crust, the tender roast beef and the sharp horseradish all combined for a marvelous taste combination. My sancwich brought me right back to my time in Buffalo!

Horseradish Cream Recipe

makes about 1 cup

Ingredients for Horseradish Cream

½ cup very cold heavy cream
2 tablespoons sherry vinegar
About ¼ cup drained prepared horseradish
½ teaspoon fleur de sel, or to taste
½ teaspoon freshly ground black pepper, or to taste

Directions for Horseradish Cream

This is a basic, and very easy, horseradish sauce—prepared horseradish and cream, seasoned with salt and pepper and a little bit of sherry vinegar. It goes especially well with grilled or roasted beef, like this prime rib roast, and the Peppercorn-Crusted Beef Tenderloin (page 47).

Put the heavy cream and vinegar in a medium bowl and whisk until the cream holds a soft shape. Whisk in the horseradish, salt, and pepper.

Refrigerate in a covered container for up to 1 week.


Tuesday, March 16, 2010

{TWD} Soft Chocolate Blackberry Tarts


The overwhelming majority of Dorie Greenspan recipes that I've tried have been very good, but her tart recipes have been particularly outstanding. I'm always very excited the weeks when a tart assignment comes up in the Tuesdays With Dorie baking group, and a two-tart month like March is an unprecedented special thrill!

n.o.e.'s notes:

- Rachelle of Mommy? I’m Hungry! chose this tart for us to bake this week. You can find the recipe on her blog, or on page 354 of the book Baking: From My Home to Yours by Dorie Greenspan.

- I used the same batch of gluten-free nut crust for this tart that I used for the Coconut Custard Tart from two weeks ago. I made the recipes back-to-back, making minis of both, and I still have a 7" tart crust in the freezer for another occasion.

- The recipe calls for raspberries, but Dorie says that other berries work nicely also. I've tasted chocolate and raspberry flavors together plenty of times, so this time I decided to try blackberries because I was curious to see how they'd combine with chocolate (and because I love blackberries!)


- There are two kinds of chocolate in this recipe: milk chocolate and bittersweet chocolate. Dorie says the interplay of the two chocolate intensities is what makes this tart so good. I used Valrhona milk chocolate fevres, and a small block of Valrhona bittersweet chocolate. In the pictures you can see the two chocolates, the berries, and the nut crust.

- I made 1/3 recipe, which I was hoping would yield 3 mini tarts. I lined 3 baked tart crusts with blackberries, but there really was only enough filling for two, so my berry-to-chocolate ratio was only 2/3 of what it should have been.

- My tarts were in my oven at 280 degrees on "convect bake" for 18 minutes when I checked them and found them done (if not just a tad over-baked.) I was expecting the tart filling to be pudding-like in consistency, but mine looked a lot more like soft brownies.

- I served the tarts with soft whipped cream. My daughter was visiting home the weekend I baked them, and she had one for dessert after dinner Saturday and the other one for breakfast on her way to the airport the next morning. Both times were dark, so I'm sorry to say I didn't get decent pictures of the tarts before they were history. I had a bite of each of her tarts (quality control check, of course!)


the verdict:

The unusual taste combination of chocolate and blackberry was a wonderful find! I don't always love the fruit and chocolate combination, but I even wished that I'd put more blackberries in these tarts. I was also happy to find that the chocolate and berry flavors were strong enough to match well with the walnut/pecan crust.

Sunday, March 14, 2010

German Apple Pie for Pi Day


Pie is great any day, but especially when you can eat it in celebration of Pi Day! If you remember your math, the first digits in the number Pi are 3.14, and that's today: March 14! To mark this auspicious occasion, I'm featuring German Apple Pie, a family favorite around here, and a very easy way to enjoy delicious apple pie goodness.

n.o.e.'s notes:

- I found the recipe in the High Museum of Art Recipe Collection years ago, and it has become a cornerstone of my pie repertory. The recipe is at the end of this post, below. Here's a description of the nearly-30-year-old-cookbook:
"The High Museum of Art Recipe Collection, published by an art museum in Atlanta, Georgia, in 1981, contains four-color plates of museum paintings and features chapter headings such as "Dinner at Eight: Recipes for Seated Dinners at Home," which reveal a cosmopolitan community where gracious living and entertaining is the norm."
- "Community Cookbooks" topic on Answers.com
- I've served this pie at dinner parties, and it's perfect because the filling - including the apples - can be prepared in advance and kept it in your fridge. Then you can bring it to room temp, pour it in your pie shell and bake the afternoon of your party.

- My favorite pie crust is the vodka one from Cook's Illustrated, but in a pinch I've used the pie dough from the refrigerator case in the grocery store (Shhhh, don't tell!)

- I've used plain yogurt in place of the sour cream; both make a delicious pie.

- This time I subbed 1/3 brown sugar in filling, and 1/2 brown sugar in topping.

- I used toasted pecans in topping this time, but I often use rolled oats.

- Usually my pie comes out of the oven with a nicely browned crumb topping, but this time it looked a bit anemic, so I decided to run it under the broiler to brown the topping at the end, almost burning it in the process.

the verdict:

I can't pretend to be very objective about this pie, which I've baked dozens of times over the past 20 or so years. It will satisfy that apple-dessert-lover in your life but not keep you buried in apple peels. If you have some pie crust hanging around in your fridge or freezer you can toss this pie together in minutes and have a warm, streusel-y pie an hour or so later.

The pie pictured above is not the prettiest version of this pie that I've ever made, but it is a great - and easy - apple pie, and I highly recommend it.

Happy Pi Day!

the recipe:

German Apple Pie

2 T flour
1/8 tsp salt
3/4 c sugar
1 egg
1 cup sour cream or full fat plain yogurt
1 tsp vanilla
1/4 tsp nutmeg
2 cups sliced, peeled apples (about 2 medium apples)
1 deep dish pie shell, or deep baking dish for crustless pie

topping:
1/4 c sugar
1/4 c flour
3/4 tsp ground cinnamon
1/4 c chopped nuts or oatmeal
1/4 c butter

1. Combine flour, salt, sugar, egg, sour cream, vanilla and nutmeg; beat well with spoon or fork - do not use blender.

2. Fold in apples. Pour into a pie shell or deep dish of equal volume.

3. Mix all ingredients for topping until crumbly; set aside.

4. Bake in 400 degree oven for 15 minutes, then lower temperature to 350 degrees and bake 35 minutes longer.

5. Remove from oven, sprinkle with topping, then return to oven for 10 minutes or until lightly browned.

Recipe contributed to cookbook by Ms. Jane Stanaland

Friday, March 12, 2010

Blood Oranges, Dates, Parmesan, and Almonds (and Arugula, too)


I've come to realize that my very favorite kinds of salads combine greens with fruit, and cheese, and sometimes nuts/seeds. When I find a combination that I love, (such as this one with spinach, blackberries and goat cheese, or this one with grilled peaches and goat cheese) I will make it regularly as long as the fruit is in season.

Right now it's easy to find blood oranges in the market. For eating out of hand I prefer other types of oranges, but blood oranges really shine in this wonderful salad by Suzanne Goin, from her the book Sunday Suppers at Lucques (Knopf, 2005). I saw the salad on the lovely blog, Sara's Kitchen, and it looked so fresh and wonderful that I just had to try it. (Actually everything Sara cooks looks pretty fabulous! Her blog is on hiatus right now, but it's worth checking out her archives)

n.o.e.'s notes:

- The recipe is at the end of this post, below.

- The salad is a snap to make, only requiring slicing the blood oranges and deglet noor dates, and toasting the marcona almonds. The dressing is a drizzle of oil - fancy unfiltered almond oil, if you have/can get it, or olive oil otherwise (that's what I used).

the verdict:

I really love the wonderful combination of sweet, salty, and peppery flavors of this salad. It's made repeat appearances on my table in these cool months. I increase the amount of arugula and decrease the Parmesan and the oil; in fact, I often omit the oil entirely. (And when I'm not photographing the end result I cut the oranges, and dates in smaller pieces!)

the recipe:

1/2 cup raw almonds
15 Deglet Noor dates
4 large blood oranges
1/4 pound hunk Parmigiano-Reggiano
2 ounces arugula
2 tablespoons pure almond oil
Fleur de sel
freshly ground black pepper

1. Preheat the oven to 375°F (190°C).

2. Spread the almonds on a baking sheet, and toast 8 to 10 minutes, until they're slightly darkened and smell nutty. Cut the dates in half lengthwise and remove the pits.

3. Slice the stem and blossom ends from the blood oranges. Stand the blood oranges on one end and, following the contour of the fruit with your knife, remove the peel and white cottony pith. Work from top to bottom, rotating the fruit as you go. Slice each orange horizontally into 8 to 10 thin pinwheels.

4. Place the Parmigiano-Reggiano, flat side down, on a cutting board. Using a chef's knife, shave eighteen large thin slices of cheese from the hunk.

5. Scatter one-third of the arugula on a large platter. Arrange one-third of the oranges, dates, cheese, and nuts. Scatter another layer of arugula, and continue layering in the same manner, letting the ingredients intertwine together but not pile up on one another. Drizzle the almond oil over the salad, and season lightly with fleur de sel, pepper, and a squeeze of blood orange juice.

Note: Use an artisanal unfiltered almond oil, such as Huilerie Leblanc. The best nut oils are stone-ground and pressed into a pale brown full-flavored oil. If it's clear and looks like vegetable oil, it won't have the intense, toasted nut flavor we're looking for. If you can't find a good pressed nut oil, drizzle with your favorite extra-virgin olive oil instead. If blood oranges are out of season, you can use another delicious orange. The dish won't be as visually stunning, but it will still taste good

Tuesday, March 9, 2010

{TWD} Thumbprint Jam Cookies


I really wanted to bake these Thumbprints for Us Big Guys cookies at Christmas, but I ran out of time. I love jam, and any recipe that lets me use jam - better yet, lets me choose my own flavor of jam - has a head start to being on my "favorites" list. The fact that the cookies are a snap to bake just endears them to me even more.


n.o.e.'s notes:

- This recipe was chosen by Mike of Ugly Food for an Ugly Dude, and you can find the recipe on his blog, or, better yet, buy the book ( Baking: From My Home to Yours by Dorie Greenspan) for this and hundreds of other fabulous recipes.

- I baked 1/2 recipe.

- Rather than blanching and grinding my own hazelnuts, I was very happy to pull out the package of Bob's Red Mill hazelnut meal/flour, which had been sitting in my cupboard patiently waiting to be used for a recipe. This is essentially finely ground hazelnuts, but since the nuts aren't blanched, you can see dark flecks from the nut skins in my finished cookies.

- My first cookie sheet had cookies that were 15 g each. They spread a lot during cooking, and cracked distressingly. During baking the indentations got much shallower, so when I pulled the cookies out fo the oven I made new "thumbprints" in the hot cookies.

- For the second cookie sheet I used 10 g of cookie dough per cookie. These baked up in 10 minutes flat.

- After a bit of deliberation, I chose two kinds of jam: rhubarb/raspberry, and also three-citrus marmalade, I wanted to use jam that wasn't super sweet because I figured it would be a good foil for the sweet cookie base. At the last minute I dug in the fridge and pulled out a jar of orange-ginger curd with a few spoonfuls left, and used that for some of the cookies.

- To make the filling, the recipe specifies heating the jam in a microwave or on the stove top. It gets quite runny when hot, but as it cools it thickens up and becomes perfect filling. I'd recommend waiting to fill the cookies until the jam has cooled somewhat. The thin hot jam wants to seep into the cracks in the cookies. The curd does not need to get heated.


the verdict:

These cookies were very well received by my tasters. The marmalade was bitter rather than tart, which is great on toast but not quite perfect for this recipe. On the other hand the raspberry-rhubarb jam was nicely tart in flavor and paired well with the sweet, nutty cookies. The very best cookies, however, were the ones with the curd (that was a great jar of curd; thank you, Marshalls!) - the butter nut cookie was the perfect platform (so to speak) to let the bright tartness of the curd take the glory.

Tuesday, March 2, 2010

{TWD} Coconut Custard Tart


March is an unusual month for the Tuesday's With Dorie baking group. Out of the five recipes chosen, two are tarts and two are cookies. Two are coconut, and only one of the five is chocolate. So if you're looking for a chocolate post, odds are that you won't find it here on a Tuesday for a while!

Coconut Custard Tart is this week's recipe. This tart sounded insanely good to me (I've never been disappointed by a Dorie Greenspan tart recipe), so I was very excited to bake it and even more so when I realized that I had a perfect occasion. One of my dearest friends is a huge fan of coconut, and her birthday was last week. Perfect timing! I hinted to her that I was baking a treat for her and she implored me to make it either (a) small or (b) something that she could freeze in individual servings. Unfortunately, birthday or no, on our side of age 50 desserts tend to stick around as unwanted additions on the hips. The recipe didn't seem to be a good freezer candidate, so I made her some mini tarts.


n.o.e.'s notes:

- Beryl of Cinemon Girl chose this week's recipe, and she will have the recipe on her post, or you can find it on pages 344 & 345 of Dorie Greenspan's book, Baking: From My Home to Yours.

- I made 1/3 recipe of the filling and the topping.

- My friend is gluten-intolerant, so I made my gluten-free nut tart crust. I baked one medium-sized crust that is now in the freezer, and several mini crusts to use for this recipe and for the next tart that's coming up in a couple of weeks. Nothing like killing two or three birds with one stone.

- I baked the custard precisely as written (except, of course, scaled to 1/3). For the topping, I decided I wanted it to be pure white, so I skipped the dark rum, and used a heaping measure of vanilla. I got a chance (finally) to try out the clear vanilla that I'd bought a while back. I wish I'd whipped the topping a few seconds less because mine headed past creamy on the way to lumpy. It tasted pretty wonderful, however. I rarely sweeten or flavor my whipped cream so this was a real treat.

the verdict:

I got to taste the recipe with bits of leftover crust, custard, and topping. It was very good, with a slight hint of rum. I thought the coconut was almost too subtle; the toasted coconut garnish on top provided a good boost to the tart's CQ (coconut quotient). The nut crust threatened to overpower the flavors of the tart, so next time I'd use a less assertive nut than walnut.

My friend was very excited about her two little tarts. So much so that I almost wished that I'd made her a full sized recipe. She sent me two emails about the tarts. The subject line of the second email: "Enjoyed my second pie tonight...so much for will power..." There is nothing more rewarding than baking for someone who loves the finished product!