Tuesday, June 28, 2011

{TWD} Chocolate Sour Cream Cake Cookies


In case you've been keeping track, you'd have realized that this spring and early summer the chocolate recipes have been few and far between for the Tuesdays With Dorie baking group. So it really isn't overkill that we've baked two different chocolate cookies in three weeks' time. And they couldn't be more different: crunchy, twice-baked biscotti and this week's Chocolate Sour Cream Cake Cookies.

n.o.e.'s notes:

- This week's cookie recipe was chosen by Spike of Spike Bakes, and you can find the recipe over on her blog today.

- Once again, for this recipe I used , a very dark cocoa powder.

- I omitted cinnamon and added a few grindings of black pepper.

- Instead of raisins, I used tiny, tiny currants, which were nearly undetectable in the finished cookie.

- I baked a full recipe of these cookies and ended up with a yield of 51 cookies

- My cookies baked quickly; in about 10 minutes they were ready to come out of the oven..

- I froze most of the cookies for future use.

- With the remaining cookies; I combined several of them with some leftover cream cheese frosting. They made pretty wonderful whoopie pies.

the verdict:

As plain cookies these are quite good; they are like the top of a cupcake, but maybe just a bit firmer. I love that they're not super-sweet, which lets the chocolate flavor shine through. On
the second and third day, after refrigeration, the cookies got fudgier and firmer. I preferred them that way. But my very favorite way to enjoy these cookies was as mini-whoopie pies with the cream cheese frosting as the filling.

Tuesday, June 21, 2011

{TWD} Date-Nut Loaf


The Tuesdays With Dorie bakers have been baking a lot of cakes with brown sugar in recent weeks. We had the Pecan Brown Sugar Bundt Cake and the Blueberry Brown Sugar Plain Cake. And now, the Date-Nut Loaf, which is actually a brown sugar cake with dates and nuts added. I'm not complaining, however, because these cakes are wonderful: the brown sugar gives a touch of caramel flavor.

Date nut loaves are such an old-fashioned treat; something about the combination of the dates and the nuts is both reassuring and rewarding. I knew that my husband is a fan of date nut breads, so I planned to bake a whole loaf hoping that he would consume most of it.

n.o.e.'s notes:

- This week's recipe was chosen by my funny and creative baking buddy Mary of Popsicles and Sandy Feet. If you don't know her blog, click over there for the date loaf recipe and stay to read about all of the fun she has with her family in her kitchen.

- Dorie's recipe specifies plump, soft dates. I had a full container of dates in my dried fruit stash, but they were hard and dry. I reconstituted them by soaking them in a mixture of boiling water and rum for an hour or so.

- For a quarter of the flour, instead of all-purpose flour I used freshly milled hard red wheat flour. I talked about my mill on this post on my bread blog, and I must say that fresh whole grain gives breads an amazingly complex nutty flavor.

- I used dark brown sugar rather than the light stuff specified in the recipe because I always do. What's better than brown sugar flavor than more brown sugar flavor?

- What could be more perfect for such an old-school cake flavor than a vintage loaf pan? I baked this cake in my long slim pan. Truth be told, I bake all loaf cakes in that pan, but it felt especially appropriate for this recipe.

- In addition to buttering and flouring the pan, I lined the bottom with parchment. Side note: did you know that you can wash off parchment and use it again? It is impregnated with silicone, so it has no problem doing a bit of time in the dishwater. [updated 6/22/11 to clarify: you can wash the parchment in a sink of soapy water, but I wouldn't try an actual dishwasher]


the verdict:

This cake had wonderfully caramelized edges, thanks to the brown sugar. Even though I had used a substantial percentage of whole grain flour, the loaf was light, moist and with the unmistakeable sweet date taste. My husband loved this one, eating it for dessert with rum ice cream the first two evenings, then switched to toasting it with butter for the next several days. We both agreed that it made delectable toast. There is no doubt that this recipe will be a repeat in my kitchen, and sooner rather than later. Thanks, Mary, for a great pick!

Tuesday, June 14, 2011

{TWD} Chocolate Biscotti


Biscotti are twice-baked cookies. First the dough is shaped into a flat log and baked. Once the log has cooled, it is sliced up and the pieces are put back on the baking sheet for some more oven time.

Something about biscotti seems to inspire baker extraordinaire Dorie Greenspan to think of military-type formations. And although the image seems crystal-clear in her mind, sometimes she leaves her baker followers in the Tuesdays With Dorie baking group a bit in the dark. The first time the TWD bakers made biscotti (the Lenox Almond Biscotti), there was much confusion and hilarity over Dorie's instruction in the recipe to "stand them up like a marching band" for the second bake. (Case in point: Cathy/The Tortefeasor's 2008 biscotti post, which you really owe it to yourself to read.)

Biscotti are once again on the TWD "to bake" list. This week's assigned recipe is Chocolate Biscotti, and when the recipe instructions get to the part about the second bake, Dorie advises, "you'll have an army of biscotti." Thank goodness I knew what to expect this time: all you have to do is cut the baked cookie log and separate the resulting pieces, with the same side facing down as in the first bake. Ideally you will line them up, as Dorie envisions, although I've found that they bake just as well with a haphazard arrangement as with a military or a marching band formation on the baking sheet.

n.o.e.'s notes:

- Jacque of Daisy Lane Cakes is this week's hostess, and she chose the biscotti recipe. Click over to Jacque's biscotti post to find the recipe, or better yet, click to Jacque's post and also buy yourself a copy of Dorie's book, Baking; From My House to Yours.

- I veered ever so slightly from the recipe. The cocoa powder I used was King Arthur Flour's Double-Dutch Dark Cocoa which I thought would be a good way to ensure as intense a chocolate flavor as possible. When it came time to add the espresso powder, mine was nowhere to be found. Instead, I used instant decaf coffee. This seemed like a better plan anyway, since I intended to serve the biscotti at an evening meeting of my book group. Who needs biscotti-induced insomnia, anyway?

- The recipe calls for almonds, but Dorie gives a lot of leeway as to which type of almond. I used some sliced, toasted almonds. I prefer sliced almonds in cookies because they produce nice, thin crunchy bits.

My biscotti have not achieved military or marching band precision, but they still baked up perfectly

- I had a momentary mental lapse when I forgot to add the chocolate chips and the almonds to the biscotti dough. I had already formed the log and put it in the oven, when I remembered the add-ins hadn't been added! I immediately pulled it out again, put it back in the bowl, added the missing ingredients and re-formed the log. Whew!

the verdict:

The biscotti had the requisite crunchy texture, but they were not at all dry-tasting. The chocolate flavor was prominent, aided by little pockets of melty chocolate chips, and complemented by the toasty almonds. My tasters all loved this recipe. The leftovers were divided among them, with one couple planning to pack the biscotti as snacks for a long stint in the car the following day.

Saturday, June 11, 2011

Rhubarb Tart with Raspberry Cream

IMG_2374 - Version 2


The Blackberry Farm Cookbook was one of my Christmas presents. I felt quit virtuous waiting to receive it until then, since I'd been coveting it for more than a year. The book photographs are so lush, and the recipes so appealing that once I unwrapped the book I almost left it on the coffee table to avoid the kitchen's inevitable trail of smudges, spills, and dented corners. But a cookbook only reaches its full potential when it's used, and I was curious to see if the taste of the food matched the beauty of the book's presentation.

But first, I took the time to read and savor the pages. I like the cookbook's arrangement of recipes by season. I have a few other cookbooks that have this type of organization and they are wonderful resources for menu planning.

I wanted to make something from the Spring section, and when my online buddy Kayte, who had received this book for her birthday, suggested making the Rhubarb Raspberry Tart, I happily agreed to join her (virtually, that is). This is a perfect recipe to make now, when it's not too late to find Spring's fresh rhubarb and Summer's ripe raspberries are appearing on the produce department scene.

n.o.e.'s notes:

- The recipe, which I've included, below, can be found in from The Blackberry Farm Cookbook.

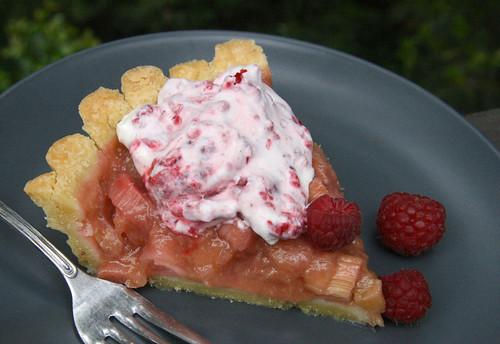
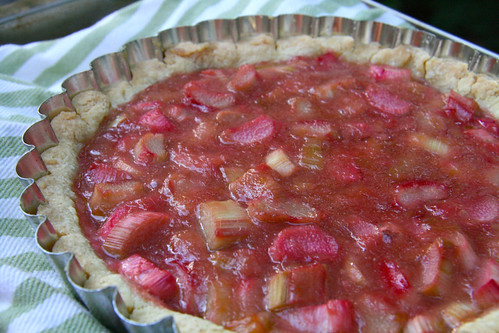
- The tart combines raspberry and rhubarb, but it employs a bit unconventional way of pairing the flavors. The tart filling is straight-up rhubarb; the raspberry part of this tart comes in the whipped cream topping.

- If you want to make this tart and fresh rhubarb is not available, frozen rhubarb is fairly common in the freezer section of many grocery stores.

- To make the filling, half the rhubarb is cooked in a saucepan with orange juice, sugar along with some cornstarch to thicken it. Then the reserved half of the rhubarb is added and the filling is baked in the slightly blind-baked crust until the filling is bubbly and the rhubarb is tender.

IMG_2359

- I made 2/3 recipe, in my 7.5" deep tart pan. By mistake I used the book's Sweet Pastry Dough rather than the Basic Pastry Dough which is indicated in the recipe. In my mind, a tart calls for tart crust rather than pie crust, I guess! The sweet dough had an interesting method: the butter is brought to room temperature before being mixed with the other ingredients in a food processor. Then the dough is chilled until it is cool enough to roll out to fit the tart pan.

- When the crust was blind baking, it oozed a lot of butter. I blotted up some of it, but also found that the crust magically re-absorbed the butter as it sat cooling on the counter.

- I rarely, if ever, sweeten my whipped cream, and I left out the recommended confectioner's sugar. I will say, however, that this is one of those times when a slight sweetening of the cream would be welcome.

the verdict:

This was a lovely dessert. The tart crust was delectable and I love the unusual combination of the creamy raspberry topping and the decidedly tart tart.

the recipe:

Rhubarb Tart with Raspberry Cream

adapted from The Blackberry Farm Cookbook and adjusted to 2/3 original size

tart or pie crust of choice in 7 to 8inch tart pan, blind baked and cooled
4 cups of sliced rhubarb
1/2 cup of granulated sugar
heaping 1/2 T of arrowroot or cornstarch (I used cornstarch)
scant 1/4 cup freshly squeezed orange juice
1 1/3 cup wild or regular raspberries (I used regular)
2/3 cup heavy cream
heaping 1/2 T confectioner's sugar (I omitted, but would include next time)

1. In a medium saucepan, combine 2 c of the rhubarb, with the sugar, orange juice and cornstarch. Cook over medium heat, stirring, for 6-7 minutes, until thickened. Remove from heat.

2. Fold remaining 2 c rhubarb into the cooked mixture.

3. Pour filling into the tart shell and bake 25-30 mins, until bubbling. Remove from oven and place on rack to cool to room temperature.

4. In a medium bowl, crush the raspberries with a spoon.

5. Whip the cream and confectioner's sugar in the bowl of a stand mixer or in a medium bowl with an electric hand mixer until the cream forms soft peaks.

6. Fold the crushed berries into the whipped cream and serve with the tart.

Thursday, June 9, 2011

Amaretto Ice Cream


In our house ice cream is popular in every season, but I realize that not everyone enjoys eating the cold stuff year-round (Except, have you ever noticed how popular ice cream is in very cold countries in very cold times of year? I think they might be onto something!) For those slightly-less-diehard ice cream eaters, the recent heat wave in many parts of the US has ushered in the churning season. So now I can share a delicious ice cream flavor with you!

I'm always on the lookout for new ice cream flavors to try. When I saw this recipe from The Times (London) Online, which calls for crushed amaretti cookies and amaretto liqueur, both of which I happened to have in the pantry, I set forth to make it posthaste.

n.o.e.'s notes:

- I've included the recipe for this ice cream below.

- I prefer creamy to sugary in my ice cream, and I nearly always reduce the amount of sugar in ice cream recipes.

the verdict:

This was a wonderfully almondy, slightly boozy ice cream with added crunch and flavor from the crushed cookies that were churned into the ice cream base.

Fittingly, in this post with a British ice cream recipe, let me share this youtube video of the world's first amphibious ice cream truck, developed in the UK by Cadbury's:


the recipe:

Amaretto Ice Cream
adapted from a recipe by Lucas Hollweg, in The Times Online

Serves 4-6

300ml whole milk
90g granulated sugar (I used a bit less)
3 medium egg yolks (I used around 45g of yolks)
3 tbsp amaretto
250ml chilled whipping cream
30g amaretti biscuits (I use the Lazzaroni brand, because it's sold in my local deli)

Heat the milk and sugar in a medium pan over medium heat until hot and the sugar is dissolved.

In a separate bowl, beat the egg yolks with a whisk until lightened. While whisking continuously, pour the hot milk mixture into the egg yolks in a steady stream. Pour back into the saucepan and heat until thickened enough to coat the back of a spoon. The custard should be about 170 F degrees.

Remove custard from the heat and pour into a bowl set in an ice water bath. Stir until cooled, then stir in the amaretto.

Chill in the refrigerator for several hours or overnight. Once cold, stir in the cream, then churn in an ice-cream machine or still-freeze.

When the mixture is nearly firm, break the amaretti biscuits into pieces about the size of petits pois and stir in until evenly distributed.

After churning, scrape into a container, cover and freeze for 2 hours until firm enough to scoop. The alcohol should mean it's scoopable straight from the freezer; if not, let it soften for 10 minutes in the fridge before serving.

Tuesday, June 7, 2011

{TWD} Blueberry Brown Sugar Plain Cake


Perhaps the best part of summer is the return of fresh berries (optimally, local) at affordable prices. I love eating them by the bowlful and handful, but I try to save some for baking also. The bakers of Tuesdays With Dorie got a chance to bake with berries this week; the assigned recipe is Dorie Greenspan's Blueberry Brown Sugar Plain Cake.

It's tempting to doctor this cake up a bit, adding a streusel topping or a glaze, but that would defeat the whole purpose of it being a "plain" cake. I mean, it's right there in the title! It's a quick and easy cake, provided that your ingredients are at room temperature, and I wanted to test it the way Dorie intended it to be. Besides, how plain can a cake really be that boasts both blueberries and brown sugar?

n.o.e.'s notes:

- The recipe for this cake is on this post on the blog Everyday Insanity, by Cindy

- The cake is supposed to be baked in a 7x11 pan. I do have that size pyrex baking dish, and it's pretty rare that I get to use it for baked goods, but I like square cakes, so I used my 8x8 metal pan with a removable bottom. A closer fit would probably have been a 9x9 pan, but I wanted a taller cake.

- I think I truthfully can say I made this one "as written" - absolutely the only thing I changed was the spice component, which was optional. Rather than the 1/2 tsp of cinnamon, I added 1 tsp of ground ginger.

- Including a pint of blueberries made for a high ratio of berries/batter. I gave some thought to dredging the blueberries in flour before folding them into the batter so they wouldn't drop to the bottom of the cake as it baked, but instead I succumbed to laziness. I didn't want to use another clean bowl, and I was hopeful that the batter was thick enough to support the berries without sinkage.

- My cake pan is dark and non-stick, so I decreased the temperature to 360 degrees instead of 375. The cake was in the oven for 40 minutes, and I let it cool in the pan for about 10 minutes before removing it from the pan via the removable pan bottom.


- As I learned when I cut into the cake, the berries had indeed sunk to the bottom.

the verdict:

This cake may have "plain" in the title, but that doesn't mean it's boring or bland. Or unpopular. My tasters all loved this one, and piece after piece disappeared from the serving plate. I enjoyed the texture and the flavor from the brown sugar, but I was wishing that my blueberries were not those sweet, cultivated ones. To me, the intense flavor burst from tiny wild blueberries would have been better in this cake. My tasters were unconvinced; they liked the cake just as is.

Saturday, June 4, 2011

Chicken with Prosciutto and Parmesan


British chef Jamie Oliver has become a champion of simple but tasty and unprocessed food, in schools and homes, both in the UK and in the USA. His website and his books are a great source of easy but delicious recipes, and I've found myself turning to them again and again when time is tight and inspiration is lacking.

One recent weekday I was faced with a package of boneless chicken breasts. None of my usual standby recipes appealed to me, but Jamie's recipe Parmesan Chicken Breasts with Crispy Posh Ham caught my attention, and I decided to give it a try.

n.o.e.'s notes:

- You can find the recipe here

- I try to keep a package of Prosciutto in the freezer; it's wonderful for draping over ripe cantaloupe or jazzing up a salad. It also comes in handy for this recipe!

- I have a bad attitude about pounding chicken breasts. Although I know that it keeps them tender and makes them a uniform thickness so that they cook more evenly, I always dread pounding them. And every time, I realize that it wasn't so bad after all.

- The recipe is a snap and introduced me to a new technique for pounding chicken breasts. First you score one side of the meat and sprinkle it with seasonings and grated parmesan cheese, then lay sliced prosciutto or ham over the top. Then cover with a bit of plastic wrap and pound the breasts. Not only does the pounding thin the meat, it also imbeds the seasoning and the cheese into the meat and adheres the ham to the surface of the chicken.

- The chicken could be prepared in advance and cooked at the last minute. After a quick pan-saute, the chicken is ready to eat.

the verdict:

After I cooked the chicken and plated it, I realized how pretty it was, and I was a little regretful that I was wasting it on a weeknight dinner. It would be perfect for company. You absolutely cannot tell from looking or tasting how easy this was to make. The salty ham was a great counterpoint to the chicken, and the cheese and the thyme added tons of savory flavors.