Saturday, January 30, 2010

Radish and Herb Butter


Radishes and butter are a classic French combination, but I didn't know this until last summer when I saw a post for Radish Herb Butter on the blog Apple Pie, Patis, and Pate. The pairing of radishes with butter struck me as unlikely and yet quite appealing. We have a steady radish supply nearly year round, thanks to our farm box, so although I was eager to make the butter, I bided my time until it was my turn to host book group (we usually have cheese, bread/crackers, fruit, and of course, dessert). I ended up preparing this in November, and now that the holidays are over I finally get to share it.

n.o.e.'s notes:

- You can find the recipe at the end of this post.

- Making this "dish" is as easy as softening some butter, beating it with lemon juice, then stirring in some chopped herbs and julienned radishes. Season to taste, and voila! There you have it.

- It was a little tricky to work the lemon juice into the butter, but persistence paid off (as it often does!)

- I used radishes from the farm box that are kind of reverse of regular radishes: red on inside, white outside

- I served the butter with Dan Lepard's Buttermilk Baps (rolls) - read my baps post here.

the verdict:

The radish herb butter proved to be quite popular with those who tried it at book group. I expected it to be crunchy, with a fresh and sharp radish taste, with the butter serving mainly as a binder. Instead the tastes of the radish, the butter and the herbs mingled and combined to produce a flavor that was mellow and warm, savory and rich. The spread was complemented nicely by the soft buttermilk rolls, but would be equally good with thin crackers. Or, of course, French bread rounds!

the recipe:

Radish Herb Butter
recipe adapted from Green City Market
and adapted from Apple Pie, Patis, and Pate

1 stick (8 ounces) unsalted butter, at room temperature
juice of 1/2 lemon
salt and freshly ground black pepper, to taste
2 tablespoons fresh chives, chopped
2 tablespoons fresh parsley, chopped
5 radishes, approximately, about 1 inch in diameter, washed and trimmed

  1. Cut the radishes into thin strips.
  2. In a bowl, beat the butter with a wooden spoon until smooth.
  3. Beat in the lemon juice and season with salt and pepper to taste. Mix in the chopped herbs .
  4. Stir in the radishes.

Tuesday, January 26, 2010

{TWD} Cocoa-Nana Loaf


This week's recipe for Tuesdays with Dorie baking group is Cocoa-Nana Bread, which is interesting for a couple of reasons: Dorie calls it a "bread," she places it in the "breakfast" section of her book, Baking: From My Home to Yours, and it contains a somewhat unlikely combination of ingredients: chocolate and banana. The chocolate-banana issue garnered nearly as much controversy in TWD's P&Q post this week as the chocolate-raisin one did last week!

While I wasn't sure I'd like the flavors of chocolate and banana together, I made the recipe almost exactly as written, hoping that I'd be wowed by the combination.

n.o.e.'s notes:

- The Cocoa-Nana Bread was chosen this week by Steph of Obsessed With Baking, and you can find the recipe on her post.

- I made 2/3 recipe in two loaf pans; one small, one medium. The recipe was pretty simple to scale to that proportion. The only semi-tricky part was the egg, but with a digital scale that registers in grams, it really isn't that bad. To get 1 1/3 egg, I used one really large egg and added a bit of egg whites from the fridge to get 67 grams total (I usually assume a large egg weighs 50 grams without the shell).

- The only change I made to the recipe is to substitute 2 T of oil for butter in the hopes that it would ensure a nice moist crumb.

- I used a heaping 1/2 cup of mashed banana to equal 1 1/3 whole bananas. This is based on some research that I did when we baked the Black and White Banana Marble Loaf a while back (while there does not seem to be a consensus on the internet, I conclude that 2 bananas is just over 3/4 cup). I really wish that Dorie's recipe would have given a clue, because the size of fruit is quite variable.

- I baked each loaf just until the cake tester came out clean. I had lined the bottom of the pans with parchment, so the loaves released easily. Mine didn't seem to be as dense as those of some of my fellow bakers.

the verdict:

This loaf sliced well and had a nice, tight crumb. The chocolate chips I used were pretty big, so there were sizeable chunks of bittersweet chocolate in each small slice. Unfortunately, on first taste I found the bread a tiny bit dry, so I wish I'd used some more oil, or some yogurt, or more banana. My loaf had a mild chocolatey taste, and a slight, very subtle banana flavor. After an overnight rest in the fridge, the bread was fudgier and not as dry. I enjoyed the bread better cold than I had warm from the oven, but in the end I can't say that I was wowed by it. If I'm going to have chocolate it might as well be decadent, and if banana's on the menu, make it a plain old delicious banana bread!

Saturday, January 23, 2010

Ad Hoc's Chicken Breasts with Tarragon

Boneless chicken breasts are a staple dinner item at our house. When I got my copy of Thomas Keller's new book Ad Hoc at Home I was excited to see a quick and elegant looking recipe for boneless chicken.

n.o.e.'s notes:

- Scroll down for the recipe. The basic method, as Keller explains it, is "flattened, seasoned, sauteed, and served with a simple pan sauce."

- The recipe calls for a teaspoon of yellow curry powder. I was pretty excited to make my own curry powder, using the recipe from the back of Ad Hoc at Home. Keller's recipe calls for 20 different spices/seeds, all ground up and mixed together - allspice, anise, bay leaf, brown mustard seeds, cardamom, cinnamon stick, cloves, coriander, cumin, fennel seed, fenugreek, nutmeg, mace, black peppercorns, ginger, star anise, yellow mustard seeds, turmeric, paprika, flaky sea salt. It turned out that I had most of the ingredients. Some of my spices were already ground when he called for whole, and I ground up some whole spices that Keller specified as ground. The curry powder was the perfect job for my spice grinder (a spare coffee grinder dedicated to spices). A full batch made a TON of curry powder; I spooned it into some empty spice bottles, and gave some to each of my daughters.

- I had bought a big load of chicken, enough for 1 1/2 recipe. It took forever to pound it all out thin. (Honestly, is there a worse kitchen job than pounding chicken breasts?) Luckily once I finished that work, the rest was fairly easy, and I ended up with enough chicken for an army.

- I love the precision of the directions in this cookbook, and have found the timing to be completely accurate. The chicken breasts brown - in batches - for a minute on each side. I set my timer for 1 minute and then hit repeat until all the chicken was browned.

the verdict:

This is a simple, elegant and subtlely-flavored chicken. My daughter JDE and I liked the chicken quite well, but my husband found it quite bland, and couldn't really taste the different flavors. I think the curry could be doubled or even tripled without any problem. I froze the leftover chicken, and it thawed and reheated quite nicely, and during the busy holiday time I loved having extra dinners that were already prepared.


The recipe:

Sauteed Chicken Breasts with Tarragon

1 teaspoon sweet paprika
1 teaspoon Yellow Curry Powder (recipe in the book) or Madras curry powder
6 large (about 6 ounces each) or 12 small (about 3 ounces each) boneless, skinless chicken breasts
Kosher salt
Canola oil
3 tablespoons (1 1/2 ounces) unsalted butter
1 tablespoon minced shallot
1/4 cup dry white wine
1 cup chicken stock
1 tablespoon coarsely chopped tarragon plus 1 tablespoon whole tarragon leaves
Freshly ground black pepper.

1. Mix together the paprika and curry in a small bowl. Season the chicken breasts on both sides with the mixture. Cover and refrigerate for 2 hours.

2. Lay 2 pieces of chicken on a large piece of plastic wrap, cover with more plastic and pound with a mallet until they are about 1/4-inch thick. Repeat with remaining breasts. (Chicken may be wrapped and refrigerated for up to 12 hours.)

3. Preheat oven to 200 degrees. Set a rack over a baking sheet.

4. Season chicken on both sides with salt. In a large skillet over medium-high heat, add enough canola oil to film the bottom of pan. Working in batches, without crowding, place breasts smooth side down and let cook until golden brown, 1 to 1 1/2 minutes. Turn and cook for another 1 to 1 1/2 minutes. Transfer to a baking sheet and keep warm in oven.

5. Wipe out skillet and return to medium heat. Add 1 tablespoon of butter and shallot, and sauté for 30 seconds, swirling pan to coat shallot with butter. Add wine, raise heat to medium-high, and cook until wine is reduced by half, about 1 minute. Add stock, bring to boil, and cook until reduced and slightly thickened, 1 to 2 minutes.

6. Stir in the chopped tarragon, the remaining 2 tablespoons butter, and any juices that have accumulated on baking sheet and swirl to melt the butter. Season to taste with salt and pepper. Arrange chicken on a warmed platter, pour sauce over it, and garnish with the tarragon leaves.

Thursday, January 21, 2010

Ginger Apple Upside Down Cake


Once the weather started turning just the tiniest bit crisp this Fall, the deluge of apple cake recipes began. In Magazines, cookbooks, blogs and food websites, apple cakes were everywhere. I was overwhelmed with possibilities for apple cake recipes. I knew I wanted to bake one, but how to choose a recipe? I bided my time and hoped for clarity.

Then I saw an apple cake in the New York Times and I knew that it was The One that I wanted to bake. The recipe is from Karen Bates, one of the daughters of the family that started The French Laundry restaurant (they sold it to Thomas Keller in 1994). She and her husband have operated an apple orchard for years and years. I figured that she probably knows a thing or two about apple cake! (You can read the story of the orchard here)


n.o.e.'s notes:

- The recipe for this cake is here.

- I baked 1/2 recipe in a small cast iron skillet that's approximately 7 inches in diameter. I didn't make any changes in the recipe - at all!

- The apples I used are my very favorite: Macoun.

- The batter tasted like a lovely intense gingerbread, and the most tantalizing aromas wafted out of the oven while this cake baked.

- Flipping upside-down cakes right side up is a fairly tricky business, especially when you try to use a decorative plate that is a good bit larger than the skillet with the cake in it. It wasn't the neatest job, but I got it inverted.


the verdict:

I love my gingerbread deep, dark, and spicy. This cake has an intense molasses/spice flavor that made it a total winner in our book. It would have ranked very high on the gingerbread perfection scale even without the apples, but oh, my!, the caramelized apples took the cake to even loftier heights. I am very very excited to add this cake to my repertory.

After I baked this cake, I learned that Deb Smitten, of the blog Smitten Kitchen, adapted this recipe to reduce the molasses flavor. So if you are not crazy for molasses, hop on over to her blog and try her version. Of course, for me the molasses is absolutely essential for a great ginger cake!

Tuesday, January 19, 2010

{TWD} Chocolate Oatmeal Almost-Candy Bars

This week's recipe for Tuesdays With Dorie is Chocolate Oatmeal Almost-Candy Bars, and I was pretty excited to try the recipe, since I've never met an oat that I didn't like, and as much as I love baked goods, my real weakness is candy. Not only that, January is National Oatmeal Month, so this recipe, which uses a whopping 3 cups of oats, is a fitting way to celebrate. There's so much going on in these bars, they're like a party unto themselves!

n.o.e.'s notes:

- The recipe calls for salted peanuts in both the oatmeal layer and the chocolate layer. I didn't have peanuts (and truth be told, I don't love chocolate + peanuts) but I did have salted cashews in the nut drawer. As it turned out, I only had enough cashews for the oatmeal layer, so I left my chocolate layer nutless.

- The recipe calls for plump raisins. I used plump dried cherries instead and chopped them in small pieces.

- For the chocolate layer, I had some previously-melted bittersweet chocolate (that I didn't use for the Cocoa Buttermilk Birthday Cake), which I combined with some milk chocolate and some semisweet chocolate. I was worried that the fudge might be too light and sweet, and wondered if I should have used all dark chocolate, but in the end I liked the balance of chocolate flavors.

- I trimmed the edges, then cut the bars into 48 squares (although Dorie cuts 36 bars). The bars are very dense and rich, so I thought mine were perfect for one serving. Plus, they were small enough that you wouldn't feel like a total glutton if you had to sneak back for a second bar. Just in case that happened to you.


the verdict:

These bars are chewy, fudgy, oatmeal-y, with fruity notes from the cherries. They reminded me a bit of a chocolate/oatmeal pb&j, if you can imagine such a thing. I'm glad I didn't put the nuts in with the chocolate; the fudge layer made a nice contrast with the crust. But I wouldn't say candy-bar like; the large quantity of oatmeal keeps them squarely in the bar-cookie department.

I served the bars at our book group meeting last week, and they proved to be popular with nearly everyone. Here are some of the comments:

"I like them because they're not too sweet."

"These are different. I like that."

"They're kind of like raspberry bars, but with chocolate" (and once I heard that, I realized that I've tasted similar raspberry bars).

"Can we get the recipe for these?"

"Do you mind if I keep a few for my children?"

I had nearly 3 dozen bars left over, and they are packed up snugly in my freezer for a future occasion, so I'm not likely to have to bake this recipe again anytime soon. But if you would like to try these bars, you can find the recipe by clicking over to Lillian's blog, Confectiona’s Realm, or on pages 114 and 115 of Dorie Greenspan's book, Baking: From My Home to Yours.

Friday, January 15, 2010

Pickled Hot Peppers


We, along with much of the rest of the US, have been in the grip of an extended cold snap. The biting air has been a sharp reminder of just how far we are from the balmy days of summer. But this year I found a way to save the summer heat and keep it all through the dark cold days of winter. I pickled - for the first time - my late summer bounty of hot peppers.

I got a little carried away when buying pepper plants at the beginning of the summer. We love hot peppers, and even though I remembered our pepper surplus the year I put in 4 pepper plants, this year I actually bought more: jalapeno, habenero, cayenne, serrano, tabasco, and one that my electrician told me is called "pepper from the tree." We had hot peppers for every occasion and recipe, and plenty to spare. Luckily in the first part of the season we had tons of workmen around, so I was able to pawn off give away peppers as they ripened. But then the work came to an end and I was left with friends and relatives as potential pepper recipients. When you have a surplus of super-hot peppers, you start to realize just how few people around you enjoy spicy food.

Enter David Lebovitz. However unlikely it may seem, this American-turned-Parisian pastry chef had a post on his blog - "Pickled Pepper Recipe" - that solved my pepper woes, allowing me to stretch my pepper harvest until the next growing season.

n.o.e.'s notes:

- David Lebovitz based his pickled pepper recipe on a recipe by Michael Ruhlman (author of the recent book Ratio, the cookbook with a cover you can actually cook from). In his blog post about pickled peppers, Ruhlman in turn credits Michael Symon for the recipe.

- I used an assortment of hot peppers.

- The pickling process couldn't have been quicker, and I've been enjoying the peppers in recipes calling for fresh hot peppers. They add not only heat but an interesting flavor from the brine.

- Ruhlman says that the peppers last "for ages" in the fridge, and he seems to be right. Mine have been there for around 3 months, and are still going strong (so to speak).

the verdict:

I love having hot peppers in the fridge in the winter nearly as much as I love having hot peppers in the garden in the summer!

-

Tuesday, January 12, 2010

{TWD} Mrs. Vogel's Scherben

I've never seen the appeal of fried dough. I've eaten beignets in New Orleans (and Atlanta) a few times, and found them pretty tasty (especially when they're hot), but ultimately nothing to swoon over. Most often I've run across fried dough in the form of funnel cakes sold at festivals and fairs. Invariably the weather is unbearably hot and very humid, and the aroma of hot grease hangs heavy on the air. Fried food is just not enticing to me under those conditions, but there are always people lined up at the funnel cake stand, so I'm clearly in the minority.

I've always wondered whether fried dough would be more appealing to me on a cold wintry day, and this week's Tuesdays With Dorie selection, Mrs. Vogel's Scherben, offered the perfect experimental conditions. This January has been extremely cold in many parts of the US, including here at The Dogs Eat the Crumbs headquarters. If ever frying food made sense, it would be this week. So I'm glad that Teanna, of Spork or Foon?, chose the recipe this week, keeping someone else from choosing it in the dead of summer.

n.o.e.'s notes:

- Wikipedia has a lengthy list of fried dough from all around the world, demonstrating the nearly universal appeal of this type of treat.

- I made 1/4 recipe of these cookies, which involved tiny amounts of some of the ingredients: 34 g flour, 4 g butter, 13 g egg, .4 g baking powder, .5 g sugar, .3 g salt

- After a 1 hour rest in the fridge, with the help of a floured countertop my dough easily rolled out paper-thin.

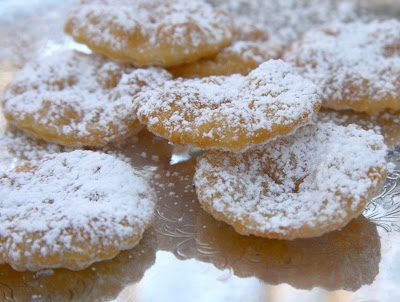
- The picture of these cookies in Dorie's book shows cute little ribbons of fried dough with crinkly edges. After seeing those edges I wasn't going to be satisfied with simple straight edges on my cookies. I don't have a fluted cutting wheel, or any kind of cutting wheel for that matter, but I do have round cutters with scalloped edges, so I used my smallest cutter to make fluted dough circles, then cut an "x" shape in the center.


- My justification for cutting my dough into circles? Dorie says that the scherben can be "any size, any shape."

- I wasn't sure how the dough would hold its shape in the frying process, but the cookies came out very well.

- The pan I used for frying was a very small, deep saucepan, and I poured in about 2 or 3 inches of canola oil.

- I have a simple candy/deep frying thermometer that clips to the side of the pan and was perfect for this job. I wondered how I could keep the oil at the specified 350 degrees. The answer is: I didn't. The oil warmed to 350 degrees and kept going. I turned the burner heat lower, but the oil remained about 375 degrees. It doesn't seem to have been a problem for my cookies.

- When the circles of dough hit the hot oil they puffed and blistered, then turned a lovely golden color - on both sides - in about a minute, perhaps less.

- To dispose of the hot oil in a hurry (I didn't want it in my kitchen for long), I poured it over a neglected area of overgrown underbrush in my back yard.

- Dorie says that one name for this type of cookie is "snowflakes" and I wish I'd used my snowflake cutters.


the verdict:

These cookies were definitely best soon after they were fried - they are light (well, in texture, if not in calories) and crispy. The cinnamon flavor was subtle and the powdered sugar really dressed them up. I'll have to say, however, that even the cold weather and homemade scherben didn't make me love fried dough; to me it tasted kind of "meh." My husband had some of the cookies for dessert several hours later, and really liked them even though by that time they had lost their crispness. It almost made me wish I'd waited to fry them until he was home from work (although that would have been hectic with dinner preparations, and would have entailed an indoor photograph)

I'm glad that I can move deep frying from "Never Done" to "Done That" status. Although the frying itself was a lot of fun, I'm not eager to repeat the deep frying experience. I didn't enjoy disposing of the oil, I really dislike the smell of hot frying oil in my kitchen, and I don't like fried dough - or indeed fried anything - enough to go through the bother.

Thanks, Teanna for choosing this recipe; I glad I finally have tried the deep frying technique. You can find the recipe on Spork or Foon? or on pages 157-159 of Dorie Greenspan's book, Baking: From My Home to Yours.

Friday, January 8, 2010

Parmesan Cod with cress and avocado

I am always on the lookout for recipes that are quick, delicious, and versatile enough to serve as a fast weeknight meal or as an effortless meal for company. The recipe is from Jamie Oliver, and if you haven't tried any of his creations, you can page around his site, and find all manner of delicious food. I always check out his recipe of the day, and it often ends up being on our dinner table in short order.

n.o.e.'s notes:

- Here's the recipe.

- I used 1 pound of cod and followed the recipe to the letter, except (isn't there always an exception in my kitchen?) for the oil that I used to cook the fish. Thomas Keller says he doesn't cook with olive oil - it smokes and the taste changes, and it wastes a lot of good oil. He uses canola, so I tried that here. I cooked the fish in the canola oil (it gave a nice clean taste to the fish) and used olive oil and lemon to dress the salad that drapes across the top of the fish.

the verdict:

This dish turned out to be very quick, very pretty, and very very delicious! I made sure to get a bit of avocado and some cress in each bite of fish - the simple dressing was bright and fresh and combined beautifully with the savory crust of the fish. This recipe will be making a return appearance on our table very soon.

Wednesday, January 6, 2010

Twelfth Night Jam Tart


In western Christian tradition, today, January 6, is the Twelfth (and final) Day of Christmas. It is the feast of the Epiphany, the commemoration of the Three Kings, who followed a star to the Infant Jesus.

There are a few desserts that developed to celebrate the holiday. The most familiar is the Epiphany Cake, or Three Kings Cake, which can have a prize or tiny figure of the baby Jesus baked into it. When I taught Sunday School, I used to bring Epiphany cupcakes to class, and hide jelly candies inside three of the cupcakes. The children who ended up with those cupcake became "kings" for the class, and the rest of us were the followers. We made and decorated crowns and had a royally good time.

There is another Epiphany dessert, a tart with pastry strips forming a star shape (to recall the star that the kings followed to find the infant) and filled with different flavors of jam; one flavor per segment of pastry. The final effect is like a stained glass window, only edible. As soon as I learned of this tart (in my Williams-Sonoma Holiday Favorites cookbook) I knew that I would have to make it; I love tarts and I have an extensive jam selection just begging to be used. Luckily I had the perfect occasion.

Every year our book group has an annual Christmas dinner on a Saturday towards the end of the Twelve Days, so our dinner is often Epiphany-themed. How could I not make this tart for the group?

n.o.e.'s notes:

- You can read more about both of Epiphany desserts on The Old Foodie's post.

- The tart is quite simple: prepare a tart crust dough, shape a star from the dough, prebake the crust then fill the tart with various kind of jam and bake for an additional 5 minutes, until the jam is set.

crust:

- For the pastry I used Dorie Greenspan's sweet tart dough. I made the nut variation, substituting hazelnut meal for some of the flour. You can find the basic sweet tart dough recipe by clicking here and scrolling down. Dorie's tart crust is perfect: easy to work with and delicious as well.

- I used all purpose flour I received from King Arthur Flour back in the summer. King Arthur gave small bags of flour away with the request that it be used in a baked good to give or share with others. When the flour arrived in the mail we were in the middle of some construction work on the house, and I had limited access to my kitchen. So I put the flour aside and after that it was out of sight out of mind. When I came across the flour in December I decided that it would be perfect for this celebration dessert to be shared with a special group of close friends.

- My tart was on the petite side; I baked it in a 7.5 inch tart mold. I made a double batch of tart dough, and used two thirds of it for this Epiphany Tart and the other third for the Tarte Tatin.

- First I lined the tart mold with dough by pressing it lightly along the bottom and up the sides. I rolled the remaining dough between two sheets of plastic wrap to a thickness of about 1/4". I cut the dough into strips about 1/2" wide, then positioned them inside the tart shell to make a star shape, pinching to join them at the seams.

- I baked the crust until lightly golden. About halfway through the baking time, I used the handle of a silicone scraper to gently shape and fix the walls of the star, which had spread and sagged a bit in the oven.

filling:

- Apparently it was a point of pride and/or a good omen in Victorian times to use as many different jams as possible in the Epiphany Tart. I used a different flavor jam for each of the 13 sections of the tart. The jams I used were:
cloudberry
marion blackberry
raspberry
peach
apricot
pink grapefruit
black cherry
gooseberry
strawberry
three citrus marmalade
rhubarb raspberry
fig orange
huckleberry
(I actually took a photo of all of the jam jars I used, but since I'm writing this on an airplane and the photos are on my home computer, I can't show you. Just imagine 13 different sizes and types of jam, and you pretty much have the scene!)

- I spooned jam in each of the sections. Some of the sections were very small, so I only used a teaspoon or so of jam. At that rate I'd need to make a whole batch of tarts to make a dent in my jam supply! I made a diagram of the tart and labeled each type of jam and where it was located. The red raspberry was the one that I could instantly recognize, so that's what I used to orient the chart at serving time.

- After filling the tart, I returned it to the oven for 5 minutes to set the jam.

the verdict:

This tart was a fun addition to the dessert buffet at the book group's Christmas/Epiphany dinner. The distinctive star shape sparked a lot of discussion and everyone was pretty amused at the diagram explicating the locations of the different flavors of jam. When it came time to serve the tart there were a few requests of jams to include and avoid.

I had halfway expected that the primary appeal of the tart would be its novelty and symbolism, so I was surprised at how much people liked this tart. The crust is quite cookie-like and the jam wonderfully jammy. It was reminiscent of a large star-shaped thumbprint cookie. The next time I will make the tart bigger, so that the jam parts are bigger and the jam-to-crust ratio will be higher.

One of the group members, JT, tasted his tart first and really liked it. He offered the following advice, which became our guideline for serving and enjoying the tart: "Make sure your piece of tart has at least 3 different kinds of jam, then mix the flavors in your mouth." In his opinion, the tart would even make a good breakfast. And why not? It's got jam!

I'm glad that I had the opportunity to bake this intriguing, historical, and pretty dessert. It was perfect for our Epiphany party!

Tuesday, January 5, 2010

Happy 2nd Birthday to {TWD}! Cocoa Buttermilk Birthday Cake and Tarte Tatin

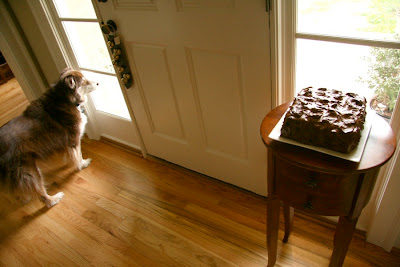
{edit: thanks to my daughter, ALE, for taking these pictures of the cake!}
On January 1 the Tuesdays With Dorie baking group turned two years old! You can read a bit about the group's history on this post written by the group's founder Laurie Woodward of the blog Slush. A milestone like this deserves a celebration! For the anniversary recipe, we had a choice of two recipes, the Cocoa Buttermilk Birthday Cake or the Tarte Tatin. I've never missed a recipe since joining the group in July of 2008, so I baked both the tart and the cake.


Part 1: Cocoa Buttermilk Birthday Cake

My mother's birthday is on Christmas Eve, and I was excited to have a great excuse to make the assigned birthday cake! I made a full recipe, as we had plenty of people to help eat the cake.

n.o.e.'s notes, birthday cake:

- You can find the recipe for the cake by clicking here - our founder Laurie graciously agreed to host the anniversary week, which means she got to type that whole chocolate cake recipe and post it on her blog.

- The recipe calls for two 9" round cake pans that are at least 2" deep. I don't have pans that size/depth, so I used two 8" square pans, which are equivalent in area. The square pans aren't very deep, so I crossed my fingers and hoped that the cake wouldn't overflow the rims of the pans.

- The cake can be made with cocoa only or with additional melted dark chocolate. Even though I measured, chopped and melted the chocolate, at the last minute I decided not to add it in. I've baked plenty of dark, dense chocolate cakes and tortes in the course of TWD, and this week I was intrigued by the prospect of a cocoa cake - that is the recipe's name, after all!

- Dorie frosts the birthday cake with a chocolate malt frosting. I didn't have the proper kind of malt, so I chose a chocolate frosting recipe from Cooks Illustrated (click here and scroll down, the frosting recipe is in the cake directions). True to usual CI style, the method was unusual, but luckily not difficult. The recipe made a ton of frosting, so I'm guessing it was meant for a three layer cake. Consequently I was able to pile a luxurious amount of the fluffy frosting on the cake. I've never made frosting swirls, and I discovered they aren't all that easy to do. I kind of like the exuberant look of the finished cake.


the verdict, birthday cake:

I am glad to have a subtle chocolate layer cake in my baker's toolbox. The layers were light in color, which made me think the cake would be dry, but it wasn't. The cake was soft and light, and matched well with the fluffy frosting. I'm sad to say that somehow in all of the excitement of Christmas I forgot to take a picture of a slice of the cake.

In the interest of full disclosure, I think the birthday girl might have preferred a denser, more fudgy cake, but that being said, she happily enjoyed a second piece!

Part 2: Tarte Tatin

The prospect of baking a tarte tatin was exciting and a little daunting. It is one of those desserts that you don't know how it turned out until you unmold it just prior to serving. Nothing like a little pressure! Fortunately I prepared the tart as a dessert just for my husband and me.

n.o.e.'s notes, tarte tatin:

- Dorie's baking recipes are typically quite specific, but for this classic dessert, Dorie outlines a basic method and gives variations and options. Click here for the recipe.

- I baked half recipe of the tarte tatin, in a 6" cast iron skillet.

- For most of the apples, I used some wonderful, tart, local cooking apples that I got from the farm box. I supplemented with half a Fuji and half a Macoun (had those in the fridge).

- Dorie's instructions are to cook the caramel until dark in color, approximately 15 minutes. I cooked mine for over 20 minutes but the caramel was a pale golden color. I turned the heat a bit higher and got a lovely deep caramel.


- The crust can be puff pastry, pie crust, or tart crust. A few days earlier I'd baked some tarts using Dorie's Sweet Tart Dough (you can find the tart crust recipe if you click here and then scroll down) so I made extra to have on hand for the Tarte Tatin.

- Dorie says to roll the dough about an inch wider than the skillet because the dough will shrink as it cooks. My tart dough did not shrink as it baked; instead the overhanging crust fell off and onto the cookie sheet that was under my skillet. The dough was golden brown in less than half the alloted time.

- Unmolding the tart is a little tricky. Dorie says to act quickly and confidently, and so I tried to do. Two of my apples stuck to the pan, but were easily re-placed. The tart was not centered on the serving plate, but luckily it slid fairly easily. The biggest disappointment is that most of the apples were a bit scorched, but neither of us cared very much about the blackened spots on the apples.

the verdict, Tarte Tatin:

We have loved every tart in Dorie's book so far, and this one is no exception! I served the warm tart with ice cream, and it was quite good. The tart apples paired with the stong caramel to make a wonderfully deep rich flavor. It was so unusual that my husband took a bite and asked me, "Are these apricots or pears?"

Despite Dorie's admonitions that the tart is only good the day it is baked, I heated the leftover tart in the microwave and we loved it as much, if not more, then right from the oven.

Sunday, January 3, 2010

Cocoa Wafers


Most of my baking is related to my participation in the Tuesdays With Dorie baking group. The weekly assigned recipes don't leave much time for other baked goods, but every now and then I have an opportunity to explore other recipes for sweets, and when I do, Alice Medrich's book Pure Dessert is one of the first that I grab. Adding to the fun, I can often count on a virtual bakealong with one or two of my online baking buddies. The week before Christmas I baked these chocolate wafer cookies with Di of Di's Kitchen Notebook. The best thing about this recipe is that it performed double duty: it gave me some additional Christmas cookies, and I used some of the wafers to make the crust for the chocolate cheesecake that we enjoyed for our Christmas dinner (this was Di's suggestion: thank you!).

n.o.e.'s notes:

- Medrich says that she tinkered with the recipe until she produced wonderfully crisp yet tender chocolate cookies that can be eaten on their own or used in other recipes, such as for the crust of a cheesecake. You can find the recipe here, on Smitten Kitchen, accompanied by Deb's high praises about the versatility and deliciousness of these cookies.

- The recipe is dead-easy; it uses cocoa powder (Medrich prefers a good quality natural cocoa; I used Scharffen Berger) and there is no solid chocolate to chop and/or melt. In a matter of minutes the cookies were mixed in the food processor and the logs of dough formed and put in the fridge to chill. Even before I baked or tasted the first cookie, this recipe reached favorite status based on ease alone!

- I used parchment and a long straight-edge ruler to form the logs, and my cookies were the roundest I've ever gotten from a slice-and-bake recipe.

- It took me several days to find the time to bake the wafers, but slicing them and popping them in the oven couldn't have been more straightforward. I baked the first sheets of these cookies for the lower end of the recommended time, and they were delicious and soft-ish. For a crisper cookie for the cheesecake crust, I baked the remainder of the cookies for a few minutes longer.

the verdict:

These cookies are a real find - they have great chocolate flavor on their own, and they are wonderful as a chocolate crust for a cheesecake or icebox pie. They are crispy but still a bit soft at the same time; a great combination.