Pages

Thursday, May 28, 2009

Smashed Fingerling Potatoes with Peas and Onions

The potatoes were mostly hiding under the layer of peas.

Our house has two refrigerators: upstairs and downstairs, and each has a freezer. Upstairs is side-by-side and I use the freezer mainly for ingredients. That's where I stash the citrus zest, ground almonds and pecans, bacon lardons, ice cream maker bowl, frozen cookie dough, frozen berries and veggies, and uncooked meat. Downstairs is a top-freezer model, and it holds mostly prepared food: the soups I’ve got leftover, pans of lasagne or macaroni and cheese, cooked pasta sauces in zippered bags. It’s all very neat in theory but the reality is a good deal murkier.

I ask a lot of my freezers. And generally they seem happy to help. But lately, I’ve noticed signs that my freezers were beginning to feel, well, used. A little freezer burn here, a few things falling out there. And the biggest clue: my downstairs freezer hid my devil’s food cupcakes from me. I had seen the half dozen cupcakes a few days earlier, but when I went to pull them out to bring to book group one Thursday they had vanished into the icy netherworld. I had the chocolate ganache from the upstairs freezer, but no cupcakes to put it on. So I went with plan B: half of the 15 Minute Magic cake (also from the upstairs freezer, thank goodness.)

Things got to the point where I began to dread opening either freezer, and I think the freezers felt the same. I had a full-fledged freezer crisis on my hands. So I began to chip away at the overcrowding in the downstairs freezer. Tossed some outdated things from the back. Took out some lasagne for dinner. Stacked some things a bit neater. And know what? The freezer began to reciprocate. The cupcakes suddenly reappeared right in front of my eyes. Just like they'd always been right there. I could see little pockets of free space.

I kept going - thawed some bean soup for lunch. Gathered the Ziploc bags of chicken bones and simmered up a lovely batch of stock (and there was room in the freezer to put the 3 quarts of stock I made!) And I paid attention to cooking with some of the ingredients I'd stashed in the freezer and promptly forgotten.

And now we get to the subject of this post! I was watching Tyler's Ultimate on the elliptical at the Y, and saw Tyler prepare these Smashed Potatoes as a side dish/base for his salt and pepper salmon. I've made and loved the salmon, but this time I was intrigued with those potatoes. They looked delicious, and best of all, they could help me with my freezer crisis. I had half a bag of pearl onions hanging around and a huge bag of frozen peas. To cap off the perfection: I'd just picked up some beautiful fingerlings in the farm box, and I could accent the dish with herbs from my garden. I loved this dish before I even set foot in the kitchen to prepare it!

n.o.e.'s notes:

- I used what was in my bag of pearl onions - approximately 8 oz rather than the 10 oz specified in the recipe

- 1.5 lb fingerling potatoes, which I boiled as instructed. I left peel on, though. No way was I going to peel those little fingerlings. Plus, I really like potato skins.

- Because my onions were a bit short, I only used 16 oz of frozen green peas (Tyler calls for 20)

- I reduced the amount of lemon in the dish; for us lemon can easily dominate savory dishes.

- I left out the dill - can't abide the taste of it, unfortunately - and instead used a handful of mixed herbs: flat leaf parsley, oregano, and thyme from my little kitchen garden.

- I didn't have water cress, so I planned to substitute arugula, but when the dish was ready and hot I was too lazy to go to the downstairs fridge to fetch it.

the verdict:

We loved this dish - and I'd say that even if it didn't help me so much with the freezer sitation. It makes a great side dish, especially for Spring, with peas and new potatoes. The picture up top doesn't reflect the perfect balance between peas and potatoes (the potatoes are under the layer of peas).

After tasting his portion, my husband stated, "That Tyler, he knows how to make good food." And that's high praise coming from a guy who would take rice or pasta over a potato dish any day.

And me? I gotta love any dish that we can eat 3 days in one week (and not be tired of it) and even more, one that helped me thaw my relationship with my freezers.

I'm sending this off to Tyler Florence Fridays, a weekly roundup of bloggers cooking Tyler's recipes. Stop by and see what everyone has been cooking up! I'm also submitting it to the Frugal Fridays event on Madam Chow's blog - featuring dishes made from ingredients on hand.

Tuesday, May 26, 2009

{TWD} Peanut Butter Chipster Topped Brownies


In my nearly one year of Tuesdays With Dorie participation, the group has made multiples of pies, cakes, cookies, and even puddings. But this is the first true brownie recipe! in her Chipster-Topped Brownies Dorie combines two treats which are classic and beloved on their own: a chocolate brownie with a chocolate chip cookie layer on top! I love both, and I was interested in seeing how they would be together.

From reading this week's P&Q I knew going into this week's recipe that (1) the cookie layer on top was thin and got quite crispy and brown, and (2) the brownie layer took a long time to cook through. Crispy chocolate chip cookies are never my cup of tea, so I came up with a plan that I hoped would provide for a thicker softer cookie layer and a thinner brownie layer that would bake a bit quicker.

As for flavor, Dorie suggested peanut butter chips in the "Playing Around" section of this recipe, so I decided to create a peanut butter and chocolate combination with a few simple adjustments to Dorie's recipe.

n.o.e.'s notes:

- I made 1/3 recipe brownie base, 1/2 recipe of the cookie topping, and baked the combination in a 7.5 x 7.5 inch square pan.

There are still a lot of egg parts hanging around my kitchen (and the June TWD recipes will leave a bunch more egg yolks orphaned!). For the eggs in the brownie, I used egg yolk from the freezer and egg white from the fridge.

- To make peanut butter cookie out of Dorie's cookie recipe, I swapped half the butter for smooth peanut butter. I folded both chocolate chunks and peanut butter chips into the cookie dough.

- To further carry out the theme, I stirred peanut butter chips into the brownie layer.


- It took forever (and a day) for these to bake. Maybe because of the cookie sheet underneath and/or the ceramic baking dish? I lost track of how many times I set the timer for 5 more minutes.

- The cookie layer was so crispy that it cracked and crumbled as I cut it, even with a serrated knife, and lots of care.

the verdict:

I enjoyed these brownies warm, but they were even tastier at room temperature. They had a solid shot of peanut butter flavor, supported by dark chocolate goodness. I'm nearly always a soft and chewy cookie person. The cookie layer on my brownies was quite crisp, which I didn't mind as much with the peanut butter cookie, as I would have with regular chocolate chip cookie as the top layer.

JDE, who's home this week (yay!), and her friend G sampled the brownies. They thought that the peanut butter flavor predominated - in a good way. I am having to pack these up tightly and freeze them or give them away so I don't nibble them all away! However, at the end of the day, I know I'd rather have a brownie, a chocolate chip cookie, and/or a peanut butter cookie, rather than a combination rolled into one.


Thanks to Beth of Supplicious for choosing this week's brownies. You can find the recipe on her post, or on page 94-95 of Dorie Greenspan's book Baking From My Home to Yours.

Saturday, May 23, 2009

Country Lasagne


If I'm going to the trouble of making lasagna, this recipe (scroll down for recipe) is the one I'll have open on the counter. It's a little more time consuming than some, but who makes homemade lasagna to save time? I pulled a pan out of the freezer this week, and we were in Italian-food heaven, with an arugula salad and ciabatta on the side (we always have carbs with our carbs!)

n.o.e.'s notes:

- This lasagne freezes beautifully; wrap in plastic wrap first then foil. Having a batch in the freezer always makes me feel prepared for anything (well, except for those folks in my life who don't eat meat/pork)

- I've used turkey sausage instead of pork.

- Fresh or dried pasta can be used.


the recipe:

Country Lasagne
from The Hay Day Cookbook

2 T butter
1 small carrot, finely chopped
2 onions, thinly sliced
2 cloves garlic, minced
1 T chopped parsley
1 dried chili pepper, broken into pieces
1 lb lean pork shoulder, ground
3/4 c. dry white wine
2 c crushed tomatoes, or 6 large tomatoes, peeled, seeded and finely chopped
salt and freshly ground black pepper to taste
1/2 lb hot pork sausage
1 lb fresh pasta sheets, cut in 2-inch strips, or 1 lb lasagne noodles
1 c fresh ricotta cheese
4 T grated Parmesan cheese
6 oz mozzarella cheese, grated

Melt butter an brown carrot, onions, garlic, and parsley. Add the chili pepper. Add the pork. Lower the heat and brown meat thoroughly. Add wine, boil until it evaporates, and then add tomatoes. Season with salt and pepper and simmer gently until pork is tender.

Preheat oven to 350 degrees.

Twenty minutes before pork is done (it should simmer a total of about 1 hour), add the sausage. Cook pasta, drain, and layer in a 2 quart baking dish with meat sauce, ricotta, and Parmesan, repeating the layers until the dish is full. Top with mozzarella and bake for 30 minutes at 350 degrees. Let stand 15 minutes before serving.

I'm sending this to Presto Pasta Nights, a creation of Ruth at Once Upon A Feast. This weekly round up of delicious pasta dishes from bloggers all over the world is hosted this week by Sara of I'm a Food Blog.

Friday, May 22, 2009

May m.o.m. - Strawberry Basil Muffins

By the next morning, when I took this picture, the streusel topping had melded with the muffin top.

After last month's muffin post, one of my favorite bloggers, Wendy of Pink Stripes, tipped me off to a wonderful springtime muffin that she thought would be a good Muffin of the Month for me to make for my mother. Not only was that an exceptionally thoughtful suggestion, Wendy managed to hit the nail right on the head! My mother has a million food allergies and sensitivities, and this recipe is filled with things that my mother actually can eat - and the muffins are healthy and pretty to boot! The original recipe, from Eating Well, is for Strawberry Orange Muffins, but there is a variation for Strawberry Basil Muffins which sounded intriguing. I'm a fool for herbs, so that's what I baked.

n.o.e.'s notes:

- The pink and green colors that accent this muffin variation make it so pretty!

- I love the fact that this recipe has an oil-based streusel - I used light-flavored olive oil. There isn't a ton of topping, and it barely stretched for my 14 muffins.

- Because my silicone muffin molds are dark, I lowered the oven temperature to 380 degrees. Even so, they cooked quickly. I pulled them out at 15 minutes.

- It wasn't until I was jotting down my notes for this recipe that I realized that I forgot to put the oil in the muffin batter. Oops! Luckily they seemed to bake up nicely.

the verdict:

I was anxious to taste a muffin to see if it turned out. It was plenty moist even without the oil, but I'll make sure to include it next time. The muffin wasn't decadent or rich, but had a lovely springtime flavor of strawberries and fresh herbs.

For some reason my streusel topping was a little bit salty, but it was more or less successful with the savory notes of the basil. From what I tasted, I can tell that this muffin recipe would be right up my alley, so I will definitely bake the muffins again - and next time hope I don't make any errors!

I'm frustrated that I've managed to mess up my mom's muffins for the second month in a row. As a consolation gift, I gave her a loaf of Anadama bread - click to see my Anadama post on my new bread blog.

Tune in next month; we'll see if I can manage to put together a batch of muffins without making any mistakes!

Tuesday, May 19, 2009

{TWD} Fresh Mango Bread


This week's TWD baking assignment is Fresh Mango Bread., chosen by Kelly of Baking with the Boys (the recipe will be on her post). This was a new one on me, even though Dorie says it's a Southern specialty and I've lived here in the South for more than 30 years (born a Yankee, though).

To be ready for this bread, I'd ordered a mango from the
farm box (organic "from farther afield", as they say). I eat very few fresh mangoes so I had to turn to my good buddy, Google, when it was time to ripen and store my mango. And the internet research turned up this interesting fact: mangoes are the #1 consumed fruit in the world, beating bananas 3 to 1 and apples 10 to 1. Did you know that? I sure didn't, and it makes me think I'd better get on the mango-eating band wagon (besides those fabulous chile spiced dried mangoes from Trader Joes).

n.o.e.'s notes:

-My mango must be the type that Dorie used, because it yielded exactly 2 cups of chopped fruit!

- I made a few typical-for-me substitutions in this recipe:

--- 5 oz light flavor olive oil + 1 oz nonfat yogurt

--- 1 c white whole wheat + 1.5 cups ap flour

- I could not get my head around the combination of fresh fruit and raisins. It just sounded odd to me. Dorie said that she'd tweaked nuts out of the recipe, and I tweaked them back in! They just seemed to go with the raisins. I added 1/2 cup finely chopped pecans to keep the golden raisins (and the mango) company.

- Rather than 3 eggs, I used 2 very very large duck eggs (@75 grams each!) + a few drops of egg substitute.

- Rather than a big loaf, I filled 1 smallish and 1 mini loaf pan. The batter pretty much filled the pans. I should have used another mini pan, but I was too lazy to grease and flour it. My reward? The pans overflowed in the oven.


- The biggest issues with other TWD bakers seemed to be whether to include the raisins (always controversial; people have strong opinions about raisins in their baked goods!) and the hairyness of the cooked mangoes in the bread. I have to say the little strings did take me a bit by surprise, but they weren't a deal breaker for me.

the verdict:

I liked the spiciness of this bread, but not sure I liked the mango in it, which is too bad since that's pretty much the point of the bread. That being said, my husband loved this bread and ate it with his breakfast for a week. I still have the mini loaf in the freezer.

Sunday, May 17, 2009

Guinness Gingerbread and Guinness Ice Cream (with Guinness Syrup) Or How to Use a Really Big Can of Guinness


When I saw that this week's assignment for Sweet Melissa Sundays was Guinness Gingerbread, I knew I was golden. No specialty-ingredient hunt this week - we usually have some Guinness kicking around in the downstairs refrigerator, and everything else is a pantry staple. I like love gingerbread, and although I have a fantastic favorite gingerbread recipe, I'm always curious to see if there could be a better gingerbread out there.

After excavating the nether reaches of the basement fridge, I turned up a few 15 oz cans of Guinness, but nothing smaller. The full gingerbread recipe only required 2/3 cup. When I realized that I'd have 10 extra ounces of Guinness I realized this was the perfect opportunity to make Gramercy Tavern's Stout Ice Cream [update: this link seems to be broken, so I've added the recipe - scroll down to the end of this post]. I could serve it with the gingerbread, a la pinkstripes, who always manages to make the most amazing ice creams to accompany her desserts (in fact, this week she made -a different - Guinness ice cream too!)

Guinness Gingerbread

n.o.e.'s notes:

- Katie of Katiecakes chose the gingerbread, and you can find the recipe on her post.

-I omitted the cocoa powder (I learned my lesson from Dorie's Chocolate Gingerbread: I don't like chocolate + gingerbread)

- I added 1/4 tsp mixed spices (left from grinding spices for other recipes) - nutmeg, cloves, allspice

- I added 1 tsp espresso powder

- I don't love my 9x9 pan, so I used a 7.5x7.5 pan and an odd-sized small loaf pan.

- The cake cratered when it baked, but it was only noticeable in the square pan.

the (gingerbread) verdict:

We ate the cake plain - with the ice cream on the side - because I wanted to test the gingerbread's flavor. Unfortunately, we both found it to be a bit bland. It's a nice sturdy, dense, moist cake, though, and I think it will be tasty with a buttercream frosting. That's how I'll serve it when it comes out of the freezer. My regular gingerbread recipe remains the gold standard.


Stout Ice Cream

I've never made honest-to-goodness ice cream (although I've made frozen yogurt and sorbet), and I sort of assumed that I'd start with vanilla. But this recipe made a wonderful introduction into the world of ice cream!

n.o.e.'s notes:

- I made 2/3 recipe, which was extremely easy to scale.

- After cooking the two elements, I had 1 1/2 cup of the custard ice cream base, and over a cup of Guinness/simple syrup. I combined them in a 2-to-1 ratio, chilled the mixture then ran it through the ice cream freezer the next day.

- I still had a bit of the Guinness syrup left, so I boiled that into a thicker syrup to top the ice cream.

the (ice cream) verdict:

This is a fantastically subtle, silky, sophisticated ice cream - the flavor of Guinness without any tinge of alcohol taste (it was boiled away) and with added creaminess. In many ways it reminded me of coffee ice cream - which is my all-time favorite ice cream. I will make this excellent ice cream again!

All gone, at least this can! Stay tuned for more adventures in stout...

Stout Ice Cream
by Michelle Antonishek from Gramercy Tavern New York, NY

2 cups dark beer, such as Brooklyn Chocolate Stout or Guinness
2 cups simple syrup [1.5 cups of water + 1.5 cups sugar, boiled together]
1 1/2 cups milk
1/2 cup heavy cream
1/2 cup sugar, divided
6 large egg yolks

1. To prepare the ice cream, combine the beer and simple syrup (made from equal parts sugar and water) in a medium saucepan. Simmer on low heat until the mixture has reduced by half. Remove the mixture from the pan and set aside to cool.

2. Combine the milk, cream, and 1/4 cup of the sugar in a medium saucepan and bring to a boil. In a separate bowl, whisk the yolks with the remaining 1/4 cup sugar until light in color and fluffy. Add 1/4 cup of the hot milk mixture to the egg-sugar mixture, whisking constantly, to temper. Be careful not to curdle the yolks. Once the yolks are tempered, add the egg-sugar mixture to the hot milk mixture and cook on medium-low heat for 2 minutes, while whisking.

3. Immediately transfer mixture to an ice bath. When it has chilled, strain it. Combine 2 cups of this ice cream base with 1 cup of the beer-syrup reduction. Refrigerate overnight for best results and then freeze in an ice cream machine, following the manufacturer's instructions.

Thursday, May 14, 2009

union square herb roasted chicken

My farm box pe0ple have been working very hard to find a good source of pasture-raised poultry to offer to us members. They located a wonderful farm and were able to purchase a load of chickens, which they have offered for order. There may not be another opportunity to obtain chickens from that farm until the end of summer, so I've purchased several (which come frozen, per state regulations). As a result, I'm embarking on a whole-chicken cooking adventure. While I know that I could cut these chicken up, and cook them in any number of ways (and I might do that), I really love the smell and taste of a roast chicken - and I love using the leftover meat for soups and other dishes, and the bones for making stock.

After looking through a bunch of my cookbooks (and really, doesn't every cookbook have a method of roasting chicken?) I settled on an enticing recipe from the Union Square Cafe Cookbook. You can find the recipe embedded in this interesting article, "In Search of the Perfect Roast Chicken" which compares several roast chicken recipes.

n.o.e.'s notes:

- Two keys to this recipe: season the chicken with salt and pepper well in advance of cooking it, and add the vegetables after the chicken has cooked part way.

- I didn't have tarragon, so subbed some oregano and sage, both of which I have in my herb garden in abundance.

- the pan juices were very thin once I added the requisite 2 cups of stock.

the verdict:

This was the best roast chicken that I've ever made. I'm not sure how much of the deliciousness comes from the quality of this chicken and how much from the cooking method, however.

The meat was tender and moist and, while the pan juices had fantastic savory flavor I might be tempted to thicken them up and make more of a gravy from them. Mmm, gravy!

Although this is a very early stage in my roast chicken quest, I can say that Union Square has come up with a solid recipe that makes an excellent roast chicken.

As a foot note, Jenny from All Things Edible, has been on the search for the perfect roast chicken, and you can read about her latest adventure.

Wednesday, May 13, 2009

Roasted Broccoli with Chile, Parmesan and Lemon


As a child I was quite a picky eater. Although I was required to eat certain vegetables which sometimes meant long stretches of sitting at the dining room table by myself, my mother knew that there were some things that were just outside the pale for me. Broccoli was one of them. Actually I found out years later that my father didn't like broccoli so I could probably have thanked him that I escaped childhood relatively broccoli-free.

As you can imagine, I was not the most adventuresome eater or cook when I went off on my own. Left to my own devices, I usually whipped up grilled cheese, ham and cheese sandwich, tomato soup with cheese, or a cheeseburger. See the common thread here?

My last year in college I lived with 7 other people in a rambling old house with a spacious sunny kitchen. One weekend my friend C and I decided to cook dinner together. I don't remember what we cooked for a main course. Chicken? Fish? I've no idea. But I do remember two things about that dinner. We had Lover's Salad ("lettuce alone" - get it?) and broccoli. C promised me that I'd like broccoli if I had it with cheddar cheese sauce. I was pretty impressed until he let me in on his cooking secret - the cheese sauce came in a can. OK, this was not gourmet eating. But that day I realized that I could accept, if not like, broccoli if it were smothered in cheese. I will always be grateful to C for introducing me to what is now one of my favorite vegetables - and I haven't had it with cheese sauce in at least 25 years!

These days I usually steam broccoli and eat it with salt and pepper. Last week I served a lot of leftovers, and decided to spice things up with a Real Recipe (albeit a very simple one!) for our veggie. I turned to Tyler Florence, and found a recipe for Broccoli with Parmesan and Lemon. The broccoli is roasted in the oven, which sounded like an interesting preparation method.

n.o.e.'s notes:

- My broccoli spears were fairly slender

- I decided to add some heat and used a hot chile-flavored olive oil

- After 10 minutes, the broccoli was bright green but still pretty hard, so I roasted it for 4 minutes more, then just 8 minutes with the cheese (= total of 2 extra minutes)

the verdict:

The broccoli was perfectly tender - it could be cut with a knife and fork but wasn't soft or mushy. The flavors were great. I added minimal lemon juice, and liked it that way. The chilis in the olive oil sort of snuck up and I felt the heat in the back of my throat after finishing a bite.

This was a great way to prepare broccoli. If you have any reluctance to eat the veggie, this preparation, with lots of great flavor, might make a broccoli lover out of you. If not, try the canned cheese sauce!

I'm sending this off to Tyler Florence Fridays, a weekly roundup of bloggers cooking Tyler's recipes. Stop by and see what everyone has been cooking up!

Tuesday, May 12, 2009

{TWD} Tartest Lemon Tart

For 10 months I've had an abiding preoccupation with lemon tarts, specifically since last July 9 when I saw the Deep Lemon Tart on Delia Smith's site . It was love at first sight; I searched for the perfect deep tart mold especially for the recipe (all of my tart molds were shallow). I ended up ordering a lovely deep mold that was a bit smaller in diameter than Delia's, so I scaled the recipe to the smaller pan, making careful notes in the margins of my recipe printout. And then, as it happened, things got in the way - 42 weekly sweet things. I joined TWD in July and here we are nearly a year later and I've still not baked the coveted tart. But lucky for me, Babette of Babette Feasts chose The Tartest Lemon Tart as this week's TWD assignment, so I'm no longer in total lemon tart deprivation. Thank you, Babette for choosing this recipe!

n.o.e.'s notes:

[update: I've had a lot of questions about my deep tart molds. I've ordered them, in several sizes, from PastryItems.com]

- I planned to serve the lemon tart to my book group, so I baked a full recipe. I've never used my little 4" tart molds, so I tried them out.

- The dough yielded 5 mini tart cases that were fairly thick, and I think with a bit of effort, it might have made 6 with a thinner crusts.

- I had 1 Meyer lemon knocking around the produce drawer of my fridge, so I used that in its entirety, pith, zest, and juice, along with 1/2 regular lemon with pith removed.

- I whirled the lemon in the blender with sugarand the rest of the ingredients and then gave it a little taste. I was surprised to find that it wasn't very tart. So I added some more zest, pith, and juice, but what I really wish is that I could have taken some sugar out (and maybe used half and half in place of the cream).

- There was lots of lemon mixture left over after filling the 5 mini tart shells.

- I baked the minis for 15 min at 310 degrees then 15 min at 340 degrees.


- The little tarts came out of oven puffy with a little sugar crust across the top. As they cooled they settled down, jelled, and got dense. I popped them in the fridge overnight.

- The next day it was very difficult to unmold the tarts. Not one of the tarts emerged totally unscathed. Either a piece of crust broke off, or the tart collapsed. I managed to put my thumb through one.

Oops! I guess this one better be mine.
- For a topping, I used the rest of my faux mascarpone and made some more cream filling! This was my first attempt at piping cream. I was in a huge hurry, and didn't realize until too late that the cream wasn't in the center of any of the tarts. Very fun, though.


the verdict:

My tarts were quite lemony but not as tart as I expected. The Meyer lemon was too subtle for my taste; next time I will use regular lemons for the entire filling. My tasters all loved the tarts. One, HY, said that the lemon tart is tied with the pear tart as the best Dorie recipe yet (and she's probably tasted more than half the ones I've baked). Another person, AT, thought the cream topping not really necessary -she loved the lemon by itself. Although I thought the cream complemented the lemon nicely I'm not exactly objective about that mascarpone cream!

As an aside, in addition to the lemon tarts I served the 15 Minute Magic torte (from the freezer), frosted with Sweet Melissa's semisweet ganache (also from the freezer). My tasters were blown away by the torte, couldn't believe it had come from the freezer, and liked it even better than the prune torte!

My husband hadn't been at home when I made the tarts, and he drove straight from work to book group, arriving late, and promptly eating two of the tarts. He didn't realize until we got home that I'd made them - in a complimentary way. But the lemon tarts' glory was short-lived. My husband ended up preferring the Lemon Icebox Cake that I served two days later (but I like the tarts better!)

I would have liked to have eaten this as a slice of a full-sized tart (more lemony filling) rather than minis; my husband thought the little ones were great because of the higher proportion of crust.

These lemon tarts made me want MORE lemon tarts! I hope I can bake Delia's recipe before another 10 months passes... Aaaand, I saw that David Lebovitz posted a lemon tart recipe yesterday, using an unconventional French method of making tart crust that involves boiling butter and water! David's has an elegantly slim layer of lemon curd, very different from Delia's lush deep lemon filling. Oh dear, I guess I'd better make both!

You can find the recipe for Dorie's delicious tarts on Babette's post, or on page 336 of Dorie Greenspan's book Baking From My Home to Yours.

Sunday, May 10, 2009

Sweet Melissa's Lemon Icebox Cake


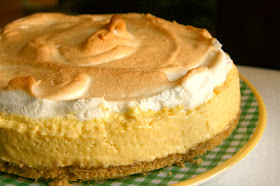
This week's Sweet Melissa Sundays assignment is Lemon Icebox Cake. I don't think I'd ever eaten icebox cake before, and after making - and tasting - this one, I can say it won't be my last!

n.o.e.'s notes:

- Jennifer of Keep Passing the Open Windows chose this recipe, and you can find the recipe on her post.

- If I were to stop and think about it, I'd be scared of this recipe, seeing as it involves separating half a dozen eggs and making a custard with the yolks and a meringue with the whites. Although I can usually handle egg separating, neither custard nor meringue has become second nature to me, and both are fraught with potential pitfalls. Luckily, with this cake everything came together quite nicely.

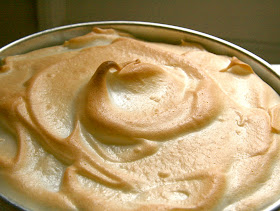
stiff peaks + glossy whites = meringue
- The meringue began to brown very quickly in the oven, so I tented it with some foil so it could cook for the prescribed time without getting too brown.

Ready for the deep freeze!
- I thought it was funny that the directions say to remove the springform cake bottom by inverting the cake onto a plate. No way this one could be inverted with that meringue topping on it! I slid a spatula between the crust and the metal disk, and pushed the cake onto the serving plate. The bottom crust is quite sturdy so that worked well.

You did notice the Wild Strawberry plate, right?
the verdict:

I brought this to a neighborhood dinner party. Everybody seemed to like it - nearly as much as the gooey box brownies that were the other dessert there. My husband loved the cake (even more than the lemon tarts that will be posted on Tuesday!)

This cake is light an fluffy and so cool - the perfect refreshing summer dessert. I really enjoyed the lemon + meringue + crust flavors together. Although the strawberry sauce was fine, it seemed to overpower the soft cake.

best version?

This icebox cake reminded me strongly of lemon meringue pie, only better. My husband would likely say this is the best lemon dessert I've ever made.

Thursday, May 7, 2009

Sweet Potato Crescents

I love Dan Lepard. Every Saturday, I check the Guardian How to Bake page to see Dan's recipe of the week. Because of commitments to my baking groups, I don't have the opportunity to bake very many of Dan's sweets. But lucky for me, he is pretty careful to balance the recipes in his baking column - some breads, some desserts, some savory offerings. The coolest thing about Dan is that he runs his own baker's forum, where he will answer questions about any of his recipes, whether from his books or the Guardian column.

A couple of weeks ago, the featured recipe was Sweet Potato Crescents, which was perfect timing as I'd just received some stunning purple sweet potatoes in my farm box order. An added bonus: his recipe is vegan and quite healthy.

n.o.e.'s notes:

- To cook the sweet potatoes, I cubed them and then braised them in the littlest bit of butter and a tablespoon or 2 of water, for around for 5+ minutes, until tender. If you're making this a vegan dish, you'd omit the butter, naturally.


- The crescent dough is made with oil, which was a relief after all the butter pastry that's come my way in the course of in my weekly baking assignments. The dough was sturdy and smooth, and quite elastic. I rolled it to the specified size and cut the rounds of dough. Once cut, the circles immediately sprang back to a smaller size. So then I had to stretch them as I filled and folded them.

- One note of caution: turmeric will stain your skin yellow. We learned this from past experience, and let's just say that the do-it-yourself-facial book is no longer in our house! Wearing kitchen gloves while handling the pastry would help with this risk.

- I ended up with 17 crescents, and the filling and pastry were perfectly matched in quantity - a pleasant surprise!

the verdict:

I loved the vibrant colors and melding of flavors in these little pastries, as well as the speed with which they came together. I topped them with fresh cilantro and chopped tomatoes, which complemented the flavors of the filling very nicely In place of buttery-sinfulness, this pastry delivered spicy-healthfulness.

Tuesday, May 5, 2009

{TWD} Single Serve Tiramisu in a Jar (and 7 other ways to enjoy mascarpone filling)


You can (and probably should) read this post as a cautionary tale of the evils of electronic social networking. Because of the words of a few people that I've never even met I ended up making a single serving of this week's Tuesdays With Dorie recipe. Yep, in my kitchen, based on a virtual dare, I turned Dorie Greenspan's lavish Tiramisu layer cake into a dessert so small it fit into a jelly jar.

Tiramisu has had an unusually long run in the spotlight, gaining notoriety from the 1993 film Sleepless in Seattle. A sweet little movie propelled an obscure dessert into the limelight where, in a display of inordinate staying power, it has remained for over 15 years.

I am personally ambivalent about tiramisu. This is a little odd, given that coffee is my favorite flavor of ice cream. In theory tiramisu should be a perfect dessert for my coffee-fanatic, chocolate-allergic husband, but he really dislikes it. "Sometimes a dessert tries to do too much," is his assessment. Because this is the first recipe for May, we only had a week's notice of what we would be baking, and my search for a likely recipient was coming up dry. My husband and I weren't going to eat an entire layer cake with flavors that neither one of us really cares about.

I made the mistake of saying to a couple of my bloggy buddies, "I'm thinking one tiramisu cupcake" It was a joke, but they turned it into a challenge. Next thing I know, "It's on!" with the encouraging footnote, "I think if anyone can figure out the math to turn that ginormous cake into a single cupcake, you can."

People who know me in person would probably find it pretty funny that I have this blog reputation as being very math-oriented and precise; in real life I'm much more verbal and visual than mathematical. I scale and measure my baking, because, well baking is precise. Check out Amanda's very recent interview with Dorie Greenspan, our baking guru, on this score. I also do the recipe scaling because I usually like the challenge.

Well, now I had quite the challenge on my hands and I had to use lots of my math abilities to scale this recipe for a big cake down to a single serving size. Luckily for all of you I won't go into details, just the overall approach that I took to this challenge - and of course the results! You'll thank me for sparing you; at the end of the afternoon's baking my digital scale, my calculator, and my brain were smoking.

The cake batter before the dry ingredients + buttermilk. This was so fluffy and good I could have eaten it all with a spoon and been happy.
n.o.e.'s notes:

- I initially planned to make one cupcake, but then my head was turned by Dorie Greenspan's blog entry about food served in canning jars, so I made a deconstructed cupcake in a jar.

- The recipe is an assemblage of several elements, each prepared separately. I made varying percentages of the different elements, aiming to use approximately 1/8 recipe of everything in my single serve dessert

- I baked 1/3 recipe of the yellow cake, figuring I'd freeze the leftover cake for other purposes (have you seen my freezers? They are a real treasure troves! More about that later.) The cake recipe was easy to scale, although I had to eyeball the leavening amounts ( 1/3 of 1/8 tsp baking soda, 2/3 tsp of baking powder) since these amounts were too small to register accurately on my digital scale.

- For the cake I used 2 small vintage loaf pans that are a really unusual size. Two of them were equivalent to 1/3 of the area of the two pans Dorie specified.


- The cakes baked "until done" - translation: I forgot to set timer, and went by smell and broomstraw cake tester.

- I reserved one of the cake rectangles and cut the other to make the layers for my little cake in a jar. Although I have cookie cutters in nearly every shape/theme imaginable, I managed not to have a circular cutter the right size, so I used a peanut butter jar lid. Luckily the cake layers got covered with filling/frosting, so it didn't really matter how bad the cut was. Or that the top of the cake stuck to the inside of the jar lid. Note to self: buy set of biscuit cutters. I kept the cake scraps. Waste not, want not.

- I didn't want to buy mascarpone when I'd need just 1 0z for my cakelet. I had a block of cream cheese that needed to be used, and I followed a few links suggested by Lindsey of Cafe Johnsonia (thanks!) and came up with this site which gives a bunch of recipes for mascarpone substitutes that could be whipped up - specifically to use in tiramisu. Many recipes call for wait times of 24+ hours, but I'm all about the instant gratification, so I went for a variation I call "Three Creams" - which is a combination of cream cheese, butter, and (what else?) cream itself.


- I used the whole block of cream cheese (actually had to scale this recipe bigger!), which I creamed with 5 T of butter and 5 T of whipping cream. This ended up making about 12 oz of creamy faux-mascarpone goodness. You did follow my logic there, right? I didn't want to buy 8 oz. of mascarpone, so I made my own and then I had 12 oz. And I only needed 1 oz... Well at least my cream cheese was put to good use!

- Faced with this abundance of mascarpone, I weighed out 8 oz to use for a full recipe of Dorie's filling/frosting.

- I used some pretty tiny amounts to make 1/6 recipe for the espresso extract and syrup. It was easier to scale 1/6th than 1/8th recipe, and I just left a bit unused in the bowl when I assembled the little cake.

- Assembly was quick and fun. The circles fit into the jar without breaking, and cake + filling pretty much filled the jar. The best part? I could just screw the lid on the jar to pop it in the fridge.

the verdict:

This cake was a spot-on evocation of tiramisu. The cake part is lovely, and a perfect stand-in for ladyfingers. But the absolute star of the show is the mascarpone filling! Soooo good!

And what did I do with the other 7/8 of the filling, you ask? Faced with a big bowl of the cream, I figured I should make some other single-serving desserts! 7 of them, to be exact. Using elements already in my fridge or freezer, here's what I made:

1. The second rectangle of the ladyfinger cake, halved then layered with mascarpone filling and blackberries. Sweet and simple. This was my husband's dessert on day 1, and he loved it.

2. Scraps of ladyfinger cake (left from cutting the circles), soaked with citrus simple syrup (left from making candied mixed peel for my Easter Dove Bread) and layered trifle-style with mascarpone filling and chopped mixed peel, topped with mixed peel and crystallized ginger - for a ginger-citrus effect. This was my dessert on day 2

3. Cubes of gingerbread (in the freezer, left from my gingerbread experiments), layered with mascarpone filling, topped with chopped crystallized ginger. This was my husband's dessert on day 2.


4. Scraps of ladyfinger cake (from cutting the circles), drizzled with berry sauce (in the fridge, leftover from some Saturday morning yogurt parfaits, made with same recipe as this post), layered trifle-style with mascarpone filling, and topped with blackberries. This was my husband's dessert on day 3.


5. Pound cake (from freezer) topped with mascarpone cream and berry sauce. My dessert on day 3.


6. Tiny devil's food cake (in the freezer, left from the White Out Cake), topped with mascarpone cream. Um, lunch?

7. Mascarpone cream all by itself. I make no excuses -this was the best way to enjoy the filling!

I love how making a single serving of tiramisu cake could lead to desserts for three nights and a few snacks, too. You better believe that the rest of that mascarpone will be turned into more of this delicious filling! See how much trouble a person can get into as a result of social networking?

Monday, May 4, 2009

Giveaway Gone and Giving


Thanks to the good folks at random.org, we have a truly randomly-determined winner (who knew that it was even possible to generate random numbers based on atmospheric noise?) of my 200th post celebratory giveaway. Debinhawaii, of the blog Kahakai Kitchen was the lucky #9 comment, so she will have $20 to spend at King Arthur. You'd think living in Hawaii would be enough reward, right? I hope Deb finds something cool to help her in that kitchen-in-pardise!


I'm keenly aware that being a food blogger is in essence a demonstration of abundance, if not excess. So, as a further way to mark my 200 post milestone, I'm making a donation to the Atlanta Community Food Bank. We've long supported this organization's efforts to combat hunger in our community. The ACFB earns 4 stars from Charity Navigator, the amazing independent charity-rating service.


Well, it's been awhile since I've posted any food on this blog, so in exchange for these past few administrative posts, I promise an extra-long Tuesdays With Dorie post tomorrow! The assigned recipe is Tiramisu Cake. Tune in to see how mine turned out...